Creative Woodworks & crafts 1997-12, страница 53
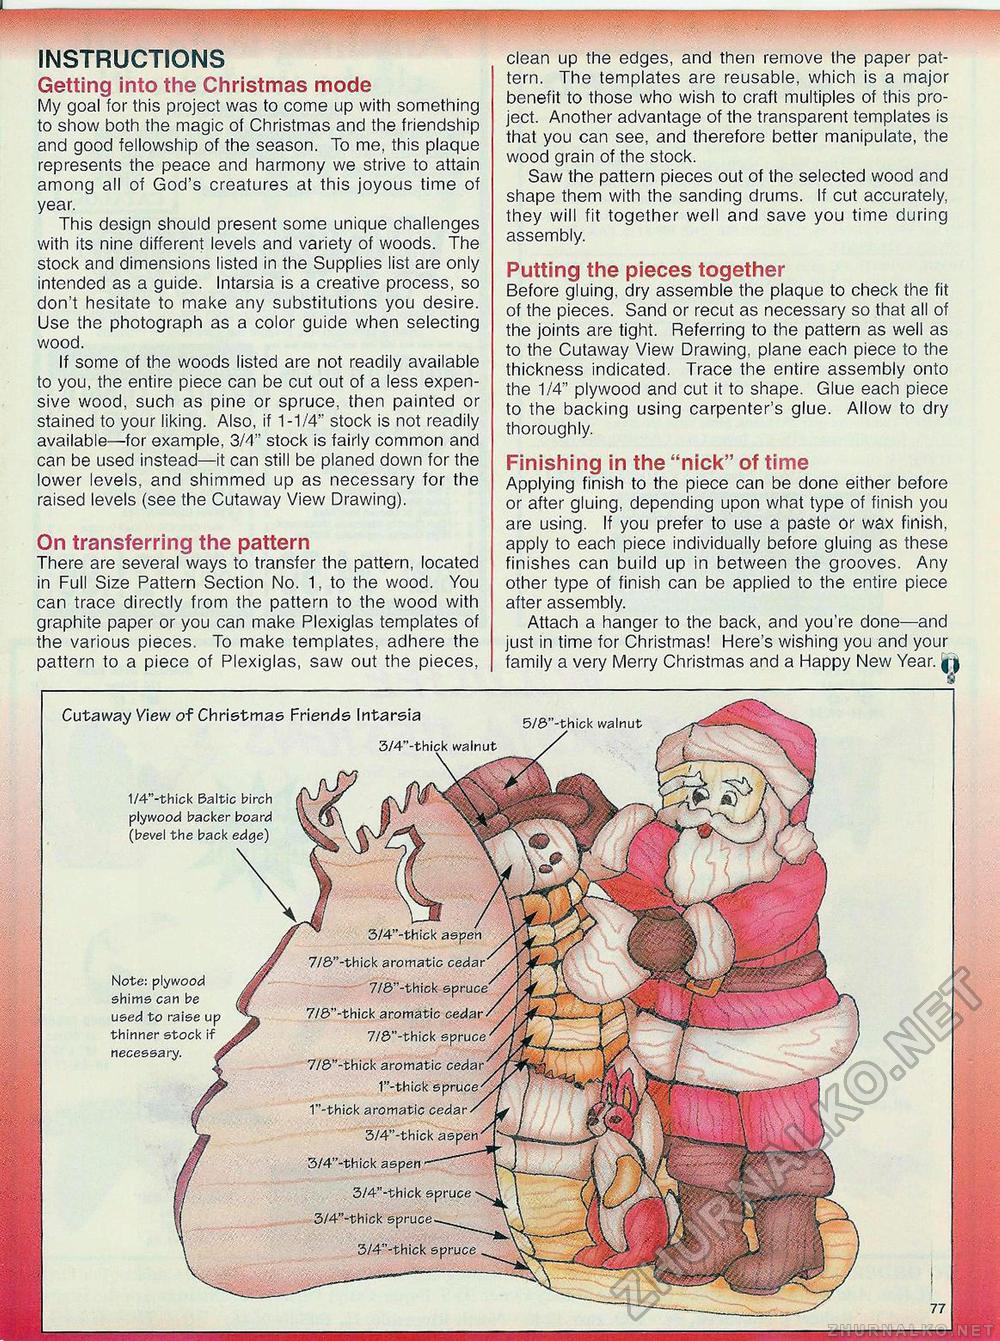
5/0"-thick walnut 3/4"-thick walnut 3/4"-thick aspen 7/&"-thick aromatic cedar 7/£> -thick spruce 7/0"-thick aromatic cedar' 7/8"-thick spruce- 7/S"-thick aromatic cedar' 1"-thick spruce'' 1"-thick aromatic cedar/ 3/4"-thick aspen/ 3/4"-thick aspen 3/4"-thick spruce \ 3/4"-thick spruce-,^^ 3/4"-thick spruce ^ INSTRUCTIONS Getting into the Christmas mode My goal for this project was to come up with something to show both the magic of Christmas and the friendship and good fellowship of the season. To me, this plaque represents the peace and harmony we strive to attain among all of God's creatures at this joyous time of year. This design should present some unique challenges with its nine different levels and variety of woods. The stock and dimensions listed in the Supplies list are only intended as a guide. Intarsia is a creative process, so don't hesitate to make any substitutions you desire. Use the photograph as a color guide when selecting wood. If some of the woods listed are not readily available to you, the entire piece can be cut out of a less expensive wood, such as pine or spruce, then painted or stained to your liking. Also, if 1-1/4" stock is not readily available—for example, 3M" stock is fairly common and can be used instead—it can still be planed down for the lower levels, and shimmed up as necessary for the raised levels (see the Cutaway View Drawing). On transferring the pattern There are several ways to transfer the pattern, located in Full Size Pattern Section No. 1, to the wood. You can trace directly from the pattern to the wood with graphite paper or you can make Plexiglas templates of the various pieces. To make templates, adhere the pattern to a piece of Plexiglas, saw out the pieces, clean up the edges, and then remove the paper pattern. The templates are reusable, which is a major benefit to those who wish to craft multiples of this project. Another advantage of the transparent templates is that you can see, and therefore better manipulate, the wood grain of the stock. Saw the pattern pieces out of the selected wood and shape them with the sanding drums. If cut accurately, they will fit together well and save you time during assembly. Putting the pieces together Before gluing, dry assemble the plaque to check the fit of the pieces. Sand or recut as necessary so that all of the joints are tight. Referring to the pattern as well as to the Cutaway View Drawing, plane each piece to the thickness indicated. Trace the entire assembly onto the 1/4" plywood and cut it to shape. Glue each piece to the backing using carpenter's glue. Allow to dry thoroughly. Finishing in the "nick" of time Applying finish to the piece can be done either before or after gluing, depending upon what type of finish you are using. If you prefer to use a paste or wax finish, apply to each piece individually before gluing as these finishes can build up in between the grooves. Any other type of finish can be applied to the entire piece after assembly. Attach a hanger to the back, and you're done—and just in time for Christmas! Here's wishing you and your family a very Merry Christmas and a Happy New Year. ( j Cutaway View of Christmas Friends Intarsia 1/4"-thick Baltic birch plywood backer board (bevel the back edge) Note: plywood shims can be used to raise up thinner stock if necessary. - |


