Creative Woodworks & crafts 1998-07, страница 14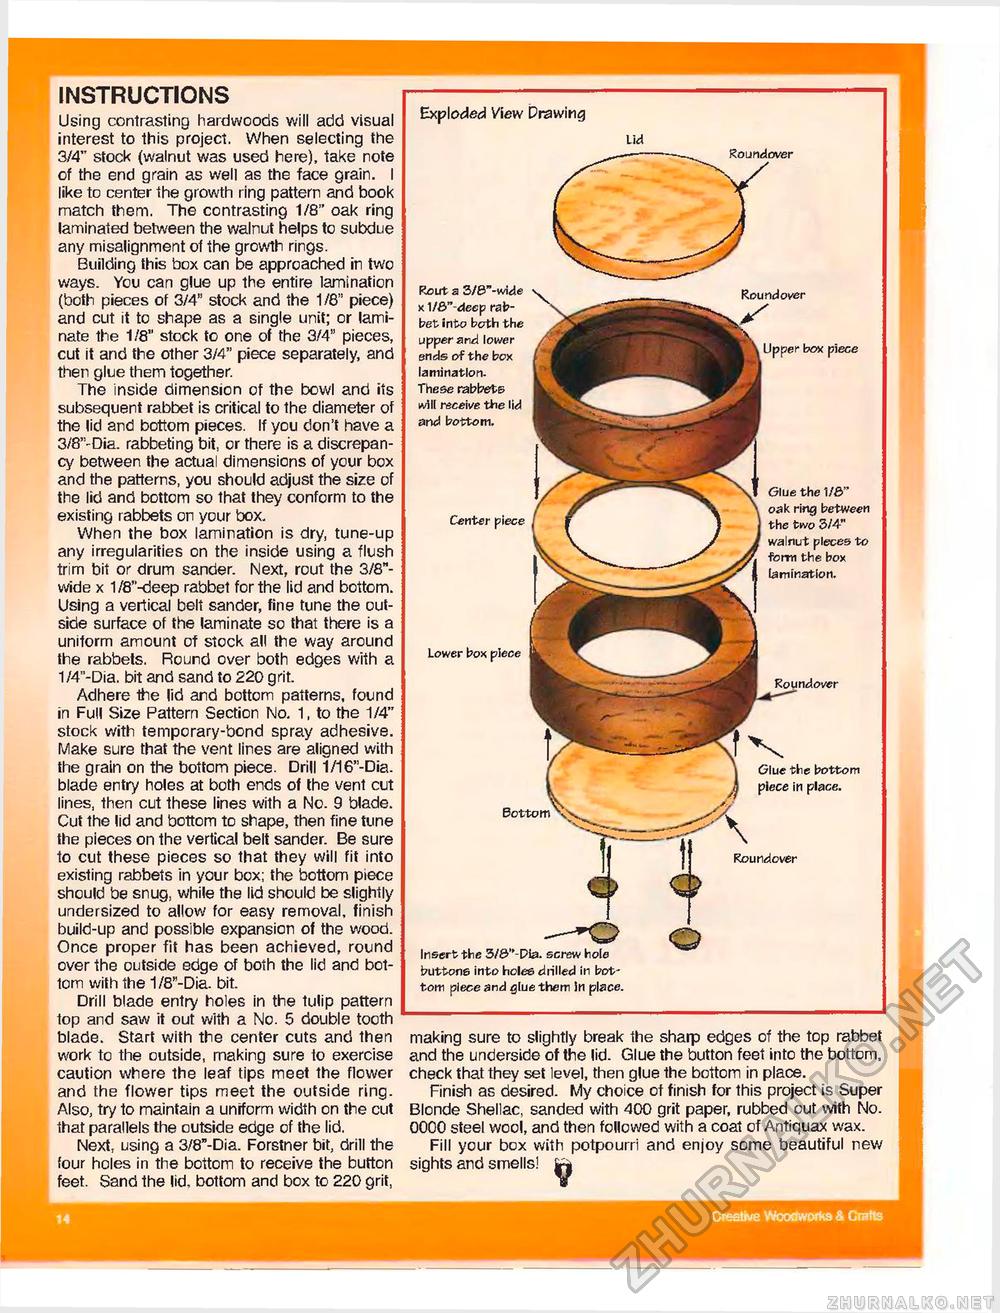
INSTRUCTIONS Using contrasting hardwoods will add visual interest to this project. When selecting the 3/4" stock (walnut was used here), take note of the end grain as well as the face grain. I like to center the growth ring pattern and book match them. The contrasting 1/8" oak ring laminated between the walnut helps to subdue any misalignment of the growth rings. Building this box can be approached in two ways. You can glue up the entire lamination (both pieces of 3/4" stock and the 1/8" piece) and cut it to shape as a single unit; or laminate the 1/8" stock to one of the 3/4" pieces, cut it and the other 3/4" piece separately, and then glue them together. The inside dimension of the bowl and its subsequent rabbet is critical to the diameter of the lid and bottom pieces. If you don't have a 3/8"-Dia. rabbeting bit, or there is a discrepancy between the actual dimensions of your box and the patterns, you should adjust the size of the lid and bottom so that they conform to the existing rabbets on your box. When the box lamination is dry, tune-up any irregularities on the inside using a flush trim bit or drum sander. Next, rout the 3/8"-wide x 1/8"-deep rabbet for the lid and bottom. Using a vertical belt sander, fine tune the outside surface of the laminate so that there is a uniform amount of stock all the way around the rabbets. Round over both edges with a 1/4"-Dia. bit and sand to 220 grit. Adhere the lid and bottom patterns, found in Full Size Pattern Section No. 1, to the 1/4" stock with temporary-bond spray adhesive. Make sure that the vent lines are aligned with the grain on the bottom piece. Drill 1/16"-Dia. blade entry holes at both ends of the vent cut lines, then cut these lines with a No. 9 blade. Cut the lid and bottom to shape, then fine tune the pieces on the vertical belt sander. Be sure to cut these pieces so that they will fit into existing rabbets in your box; the bottom piece should be snug, while the lid should be slightly undersized to allow for easy removal, finish build-up and possible expansion of the wood. Once proper fit has been achieved, round over the outside edge of both the lid and bottom with the 1/8"-Dia. bit. Drill blade entry holes in the tulip pattern top and saw it out with a No. 5 double tooth blade. Start with the center cuts and then work to the outside, making sure to exercise caution where the leaf tips meet the flower and the flower tips meet the outside ring-Also, try to maintain a uniform width on the cut that parallels the outside edge of the lid. Next, using a 3/8"-Dia. Forstner bit, drill the four holes in the bottom to receive the button feet. Sand the lid, bottom and box to 220 grit, making sure to slightly break the sharp edges of the top rabbet and the underside of the lid. Glue the button feet into the bottom, check that they set level, then glue the bottom in place. Finish as desired. My choice of finish for this project is Super Blonde Shellac, sanded with 400 grit paper, rubbed out with No. 0000 steel wool, and then followed with a coat of Antiquax wax. Fill your box with potpourri and enjoy some beautiful new sights and smells! tj Center piece Glue the 1/6" oak ring between the two 3/4" walnut pieces to form the box lamination. Exploded View Drawing Lid Rou ndover Rout a 3/0"-wide x 1/fl"-deep rabbet into both the upper and lower ends of the box lamination. These rabbets kvill receive the lid and bottom. Lower box piece Bottom Rou ndover Insert the 3/&"-Dla. screw hole buttons into holes drilled in bottom piece and glue them in place. Round over Upper box piece Glue the bottom piece in place. Creative Woodwwfcsi Grafts |


