Creative Woodworks & crafts 1998-09, страница 20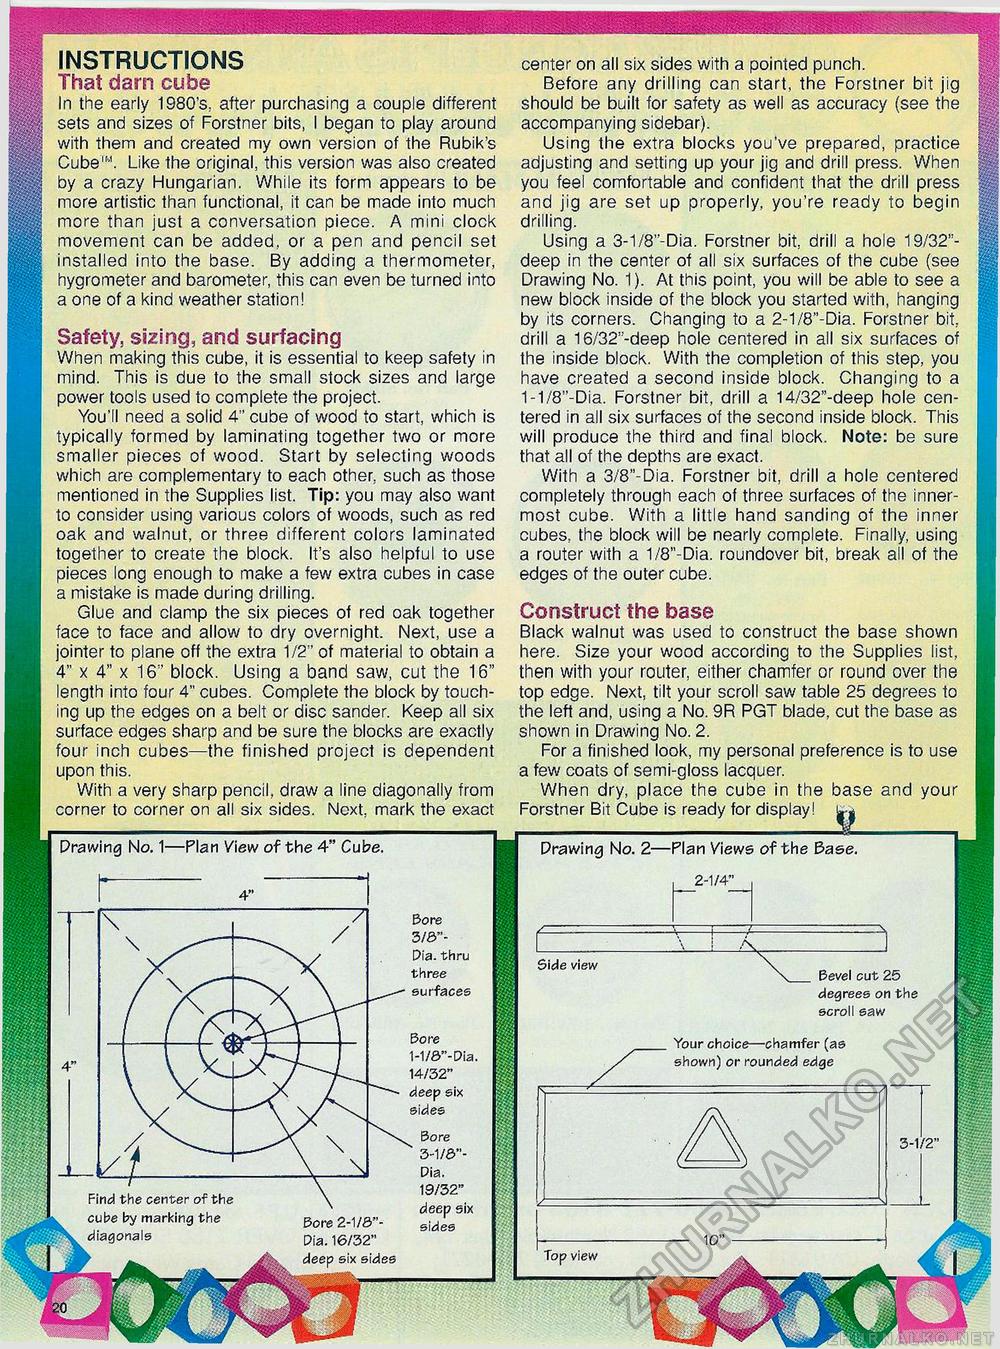
Bore 3/8"-Pia. thru three surfaces Side view Bevel cut 25 degrees on the scroll saw Bore 1-1/8"-Dia 14/32" deep six sides Your choice—chamfer (as shown) or rounded edge Bore 3-1/8"- Dia. 19/32" deep six sides Find the center of the cube by marking the diagonals Bore 2-1/8"-Oia. 16/32" deep six sides : view Safety, sizing, and surfacing When making this cube, it is essential to keep safety in mind. This is due to the small stock sizes and large power tools used to complete the project. You'll need a solid 4" cube of wood to start, which is typically formed by laminating together two or more smaller pieces of wood. Start by selecting woods which are complementary to each other, such as those mentioned in the Supplies list. Tip: you may also want to consider using various colors of woods, such as red oak and walnut, or three different colors laminated together to create the block. It's also helpful to use pieces long enough to make a few extra cubes in case a mistake is made during drilling. Glue and clamp the six pieces of red oak together face to face and allow to dry overnight. Next, use a jointer to plane off the extra 1/2" of material to obtain a 4" x 4" x 16" block. Using a band saw, cut the 16" length into four 4" cubes. Complete the block by touching up the edges on a belt or disc sander. Keep all six surface edges sharp and be sure the blocks are exactly four inch cubes—the finished project is dependent upon this. With a very sharp pencil, draw a line diagonally from corner to corner on all six sides. Next, mark the exact Construct the base Black walnut was used to construct the base shown here. Size your wood according to the Supplies list, then with your router, either chamfer or round over the top edge. Next, tilt your scroll saw table 25 degrees to the left and, using a No. 9R PGT blade, cut the base as shown in Drawing No. 2. For a finished look, my personal preference is to use a few coats of semi-gloss lacquer. When dry, place the cube in the base and your Forstner Bit Cube is ready for display! Prawing No. 2—Plan Views of the Base. INSTRUCTIONS That darn cube In the early 1980's, after purchasing a couple different sets and sizes of Forstner bits, I began to play around with them and created my own version of the Rubik's Cube""'. Like the original, this version was also created by a crazy Hungarian. While its form appears to be more artistic than functional, it can be made into much more than just a conversation piece. A mini clock movement can be added, or a pen and pencil set installed into the base. By adding a thermometer, hygrometer and barometer, this can even be turned into a one of a kind weather station! Prawing No. 1—Plan View of the 4" Cube. center on all six sides with a pointed punch. Before any drilling can start, the Forstner bit jig should be built for safety as well as accuracy (see the accompanying sidebar). Using the extra blocks you've prepared, practice adjusting and setting up your jig and drill press. When you feel comfortable and confident that the drill press and jig are set up properly, you're ready to begin drilling. Using a 3-1/8"-Dia. Forstner bit, drill a hole 19/32"-deep in the center of all six surfaces of the cube (see Drawing No. 1). At this point, you will be able to see a new block inside of the block you started with, hanging by its corners. Changing to a 2-1/8"-Dia. Forstner bit, drill a 16/32"-deep hole centered in all six surfaces of the inside block. With the completion of this step, you have created a second inside block. Changing to a 1-1/8"-Dia. Forstner bit, drill a 14/32"-deep hole centered in all six surfaces of the second inside block. This will produce the third and final block. Note: be sure that all of the depths are exact. With a 3/8"-Dia. Forstner bit, drill a hole centered completely through each of three surfaces of the innermost cube. With a little hand sanding of the inner cubes, the block will be nearly complete. Finally, using a router with a 1/8"-Dia. roundover bit, break all of the edges of the outer cube. 2-1/4" |


