Creative Woodworks & crafts 1999-01, страница 13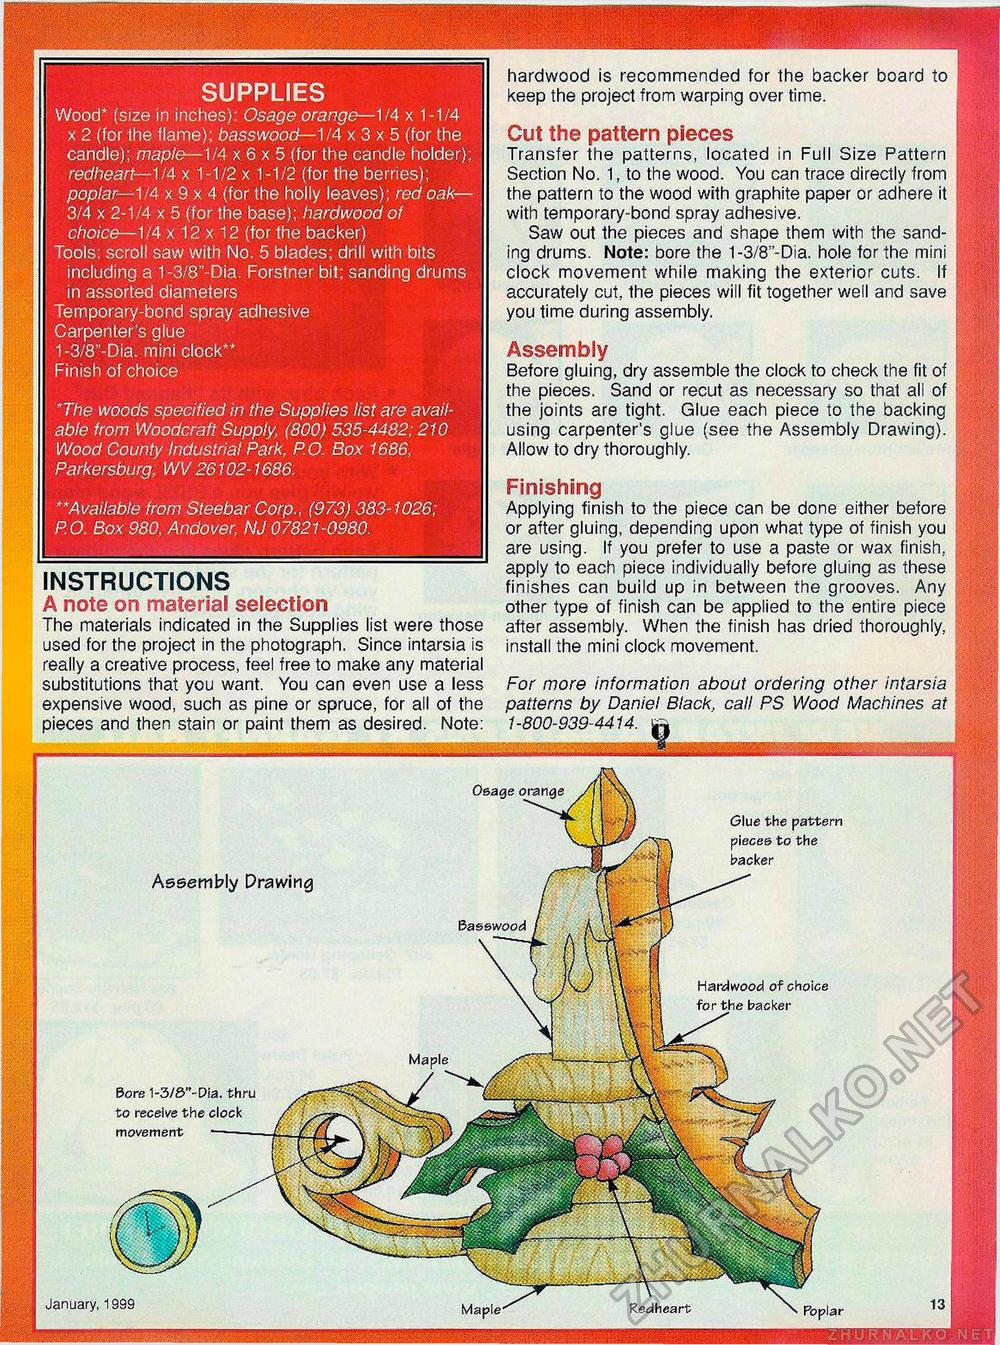
supplies Wood* (size in inches): Osage orange—1/4 x 1-1/4 x 2 (for the flame); basswood—1/4 x 3 x 5 (for the candle); maple—1/4 x 6 x 5 (for the candle holder); redheart—1/4 x 1-1/2 x 1-1/2 (for the berries); poplar—MA x 9 x 4 (for the holly leaves); red oak— 3/4 x 2-1/4 x 5 (for the base); hardwood of choice—1/4 x 12 x 12 (for the backer) Tools: scroll saw with No. 5 blades; drill with bits including a 1-3/8"-Dia. Forstner bit; sanding drums in assorted diameters Temporary-bond spray adhesive Carpenter's glue 1-3/8"-Dia. mini clock" Finish of choice *The woods specified in the Supplies list are available from Woodcraft Supply, (800) 535-4482; 210 Wood County Industrial Park, P.O. Box 1686. Parkersburg, WV 26102-1686. **Available from Steebar Corp., (973) 383-1026; P.O. Box 980, Andover, NJ 07821-0980. instructions A note on material selection The materials indicated in the Supplies list were those used for the project in the photograph. Since intarsia is really a creative process, feel free to make any material substitutions that you want. You can even use a less expensive wood, such as pine or spruce, for all of the pieces and then stain or paint them as desired. Note: hardwood is recommended for the backer board to keep the project from warping over time. Cut the pattern pieces Transfer the patterns, located in Full Size Pattern Section No. 1, to the wood. You can trace directly from the pattern to the wood with graphite paper or adhere it with temporary-bond spray adhesive. Saw out the pieces and shape them with the sanding drums. Note: bore the 1-3/8"-Dia. hole for the mini clock movement while making the exterior cuts. If accurately cut, the pieces will fit together well and save you time during assembly. Assembly Before gluing, dry assemble the clock to check the fit of the pieces. Sand or recut as necessary so that all of the joints are tight. Glue each piece to the backing using carpenter's glue (see the Assembly Drawing). Allow to dry thoroughly. Finishing Applying finish to the piece can be done either before or after gluing, depending upon what type of finish you are using. If you prefer to use a paste or wax finish, apply to each piece individually before gluing as these finishes can build up in between the grooves. Any other type of finish can be applied to the entire piece after assembly. When the finish has dried thoroughly, install the mini clock movement. For more information about ordering other intarsia patterns by Daniel Black, call PS Wood Machines at 1-800-939-4414. Assembly Drawing Glue the pattern pieces to the backer Basswood Hardwood of choice backer Bore 1-3/&"-Dia. thru to receive the clock movement January, 1999 |


