Creative Woodworks & crafts 1999-01, страница 62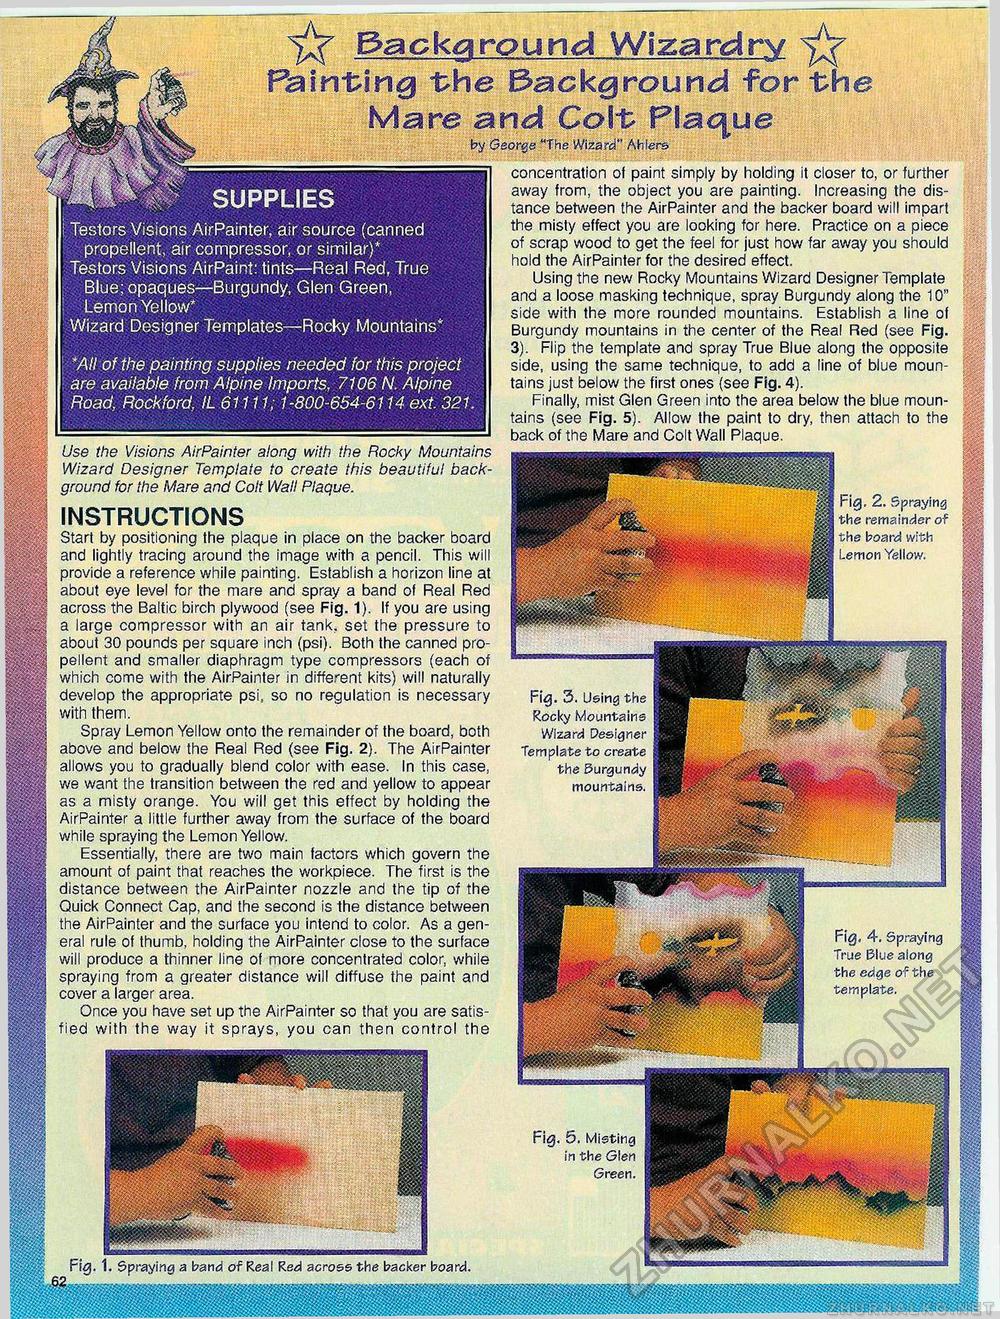
mm^w supplies Testors Visions AirPainter, air source (canned propellent, air compressor, or similar)* Testors Visions AirPaint: tints—Real Red, True Blue; opaques—Burgundy, Glen Green, Lemon Yellow* Wizard Designer Templates—Rocky Mountains' 'All of the painting supplies needed for this project are available from Alpine Imports, 7106 N. Alpine Road, Rockford, IL 61111; 1-800-654-6114 ext. 321 ^ background Wizardry ^ Pain-ting "the Background for-the Mare and Co\t> Plague by George "The Wizard" Ahlers concentration of paint simply by holding it closer to, or further away from, the object you are painting. Increasing the distance between the AirPainter and the backer board will impart the misty effect you are looking for here. Practice on a piece of scrap wood to get the feel for just how far away you should hold the AirPainter for the desired effect. Using the new Rocky Mountains Wizard Designer Template and a loose masking technique, spray Burgundy along the 10" side with the more rounded mountains. Establish a line of Burgundy mountains in the center of the Real Red (see Fig. 3). Flip the template and spray True Blue along the opposite side, using the same technique, to add a line of blue mountains just below the first ones (see Fig. 4). Finally, mist Glen Green into the area below the blue mountains (see Fig. 5). Allow the paint to dry, then attach to the back of the Mare and Colt Wall Plaque. Use the Visions AirPainter along with the Rocky Mountains Wizard Designer Template to create this beautiful background for the Mare and Colt Wall Plaque. instructions Start by positioning the plaque in place on the backer board and lightiy tracing around the image with a pencil. This will provide a reference while painting. Establish a horizon line at about eye level for the mare and spray a band of Real Red across the Baltic birch plywood (see Fig. 1). If you are using a large compressor with an air tank, set the pressure to about 30 pounds per square inch (psi). Both the canned propellent and smalier diaphragm type compressors (each of which come with the AirPainter in different kits) will naturally develop the appropriate psi, so no regulation is necessary with them. Spray Lemon Yellow onto the remainder of the board, both above and below the Real Red (see Fig. 2). The AirPainter allows you to gradually blend color with ease. In this case, we want the transition between the red and yellow to appear as a misty orange. You will get this effect by holding the AirPainter a little further away from the surface of the board while spraying the Lemon Yellow. Essentially, there are two main factors which govern the amount of paint that reaches the workpiece. The first is the distance between the AirPainter nozzle and the tip of the Quick Connect Cap, and the second is the distance between the AirPainter and the surface you intend to color. As a general rule of thumb, holding the AirPainter close to the surface will produce a thinner line of more concentrated color, while spraying from a greater distance will diffuse the paint and cover a larger area. Once you have set up the AirPainter so that you are satisfied with the way it sprays, you can then control the Fig, 2. Spraying the remainder of the board with Lemon Yellow. Fig. 3. Using the Rocky Mountains Wizard Designer Template to create the Burgundy mountains. Fig, 4. Spraying True Blue along the edge of the template. Fig. 5. Misting in the Glen Green. Fig. 1. Spraying a band of Real Red across the backer board. |


