Creative Woodworks & crafts 1999-01, страница 75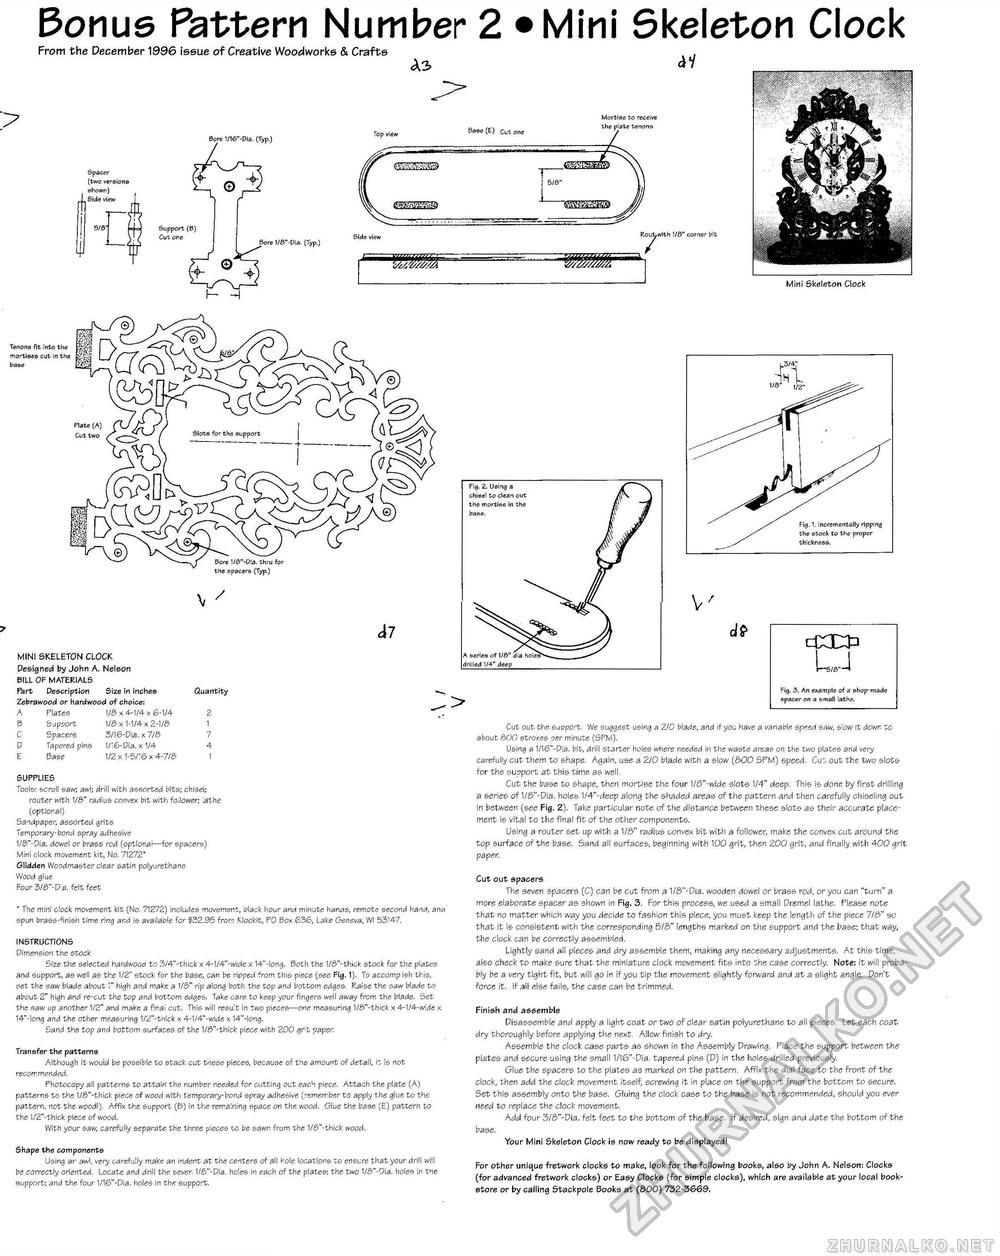
Bonus Pattern Number 2 •Mini Skeleton ClockFrom the December 1996 issue of Creative Woodworks & Crafts 1] Spacer (two versions shown) Side view 5/3" Pore 1/16n-Dia. (Typ.) Support (13) Cut one &ore (Typ.) A3 Top view ay 5ase (E) Cut one Mortise to receive the plate tenons V&" corner bit Mini Skeleton Clock I- H V / d7 MINI SKELETON CLOCK Designed by John A. Nelson SILL OF MATERIALS Part Description Size in inches Zebrawood or hardwood of choice: Quantity
SUPPLIES Tools: scroll saw; awl; drill with assorted bits; chisel; router with 1/S>" radius convex bit with foi lower: iathe (optional) Sandpaper, assorted grits Temporary-bond spray adhesive 1 /<&"-• Pia. dowel or brass rod (optional—for spacers) Mini clock movement kit, No. 71272* Glidden Wood master clear satin polyurethane Wood glue Four 3/0"-Dia. felt feet * The mini clock movement kit (No. 71272) includes movement, black hour an<4 minute han<2S, remote second hand, ana spun brass-finish time ring and is available for $32.95 from KJockit, PO f3ox 636, Lake Geneva, VVI 53147. INSTRUCTIONS Dimension the stock Size the selected hardwood to 3/4"-thick x 4-1/4v-wide x 14"-long. Both the 1/0'Hhick stock for the plates and support, as well as the 1/2" stock for the base, can be ripped from this piece (see Fig. 1). To accomp ish this, set the saw blade abouthigh and make a 1/0" rip along both the top and bottom edges. Raise the saw blade to about 2" high and re-cut the top and bottom edges. Take care to keep your fingers well away from the blade. Set the saw up another 1/2" and make a finai cut. This will resu't in two pieces—one measuring 1/&"-thick x 44/4-wide x 14"-5ong and the other measuring 1/2"-thick x 4-1/4"-wide x 14"'-long. Sand the top and bottom surfaces of the 1/ft'Hhick piece with 200 grit paper. Transfer the patterns Although it vyould be possible to stack cut tnese pieces, because of the amount of detail, it is not recommended. Photocopy all patterns to attain the number needed for cutting out each piece. Attach the plate (A) patterns to the 1/0*-thick piece of wood with temporary-bond spray adhesive (remember to apply the glue to the pattern, not the wood!). Affix the support (B) in the remaining space on the wood. Glue the base (E) pattern to the 1/2"-thick piece of wood. With your saw, carefully separate the three pieces to be sawn from the 1/S"-thick wood. Shape the components Using ar awl, very carefully make an indent at the centers of all hole locations to ensure that your drill will be correctly oriented. Locate and drill the seven 1/0"-Dia. holes in each of the plates: the two 1/<S"-9ia. holes in tne support; and the four 1/16M-Dia, holes in the support. Fig. 2. Using a chisel to clean out the mortise in the base. Fig. 1. Incrementally ripping the stock to the proper thickness. A series of 1 f&* dia holes drilled 1/4" deep v / d? L-s/e—I Fig. 3, An example of a shop-made spacer on a small lathe. Cut out the support. We suggest using a 2/0 blade, and if you have a variable speed saw, s!ow it down to about 000 strokes ser minute (SPM). Using a 1/16"-D(a, bit, drill starter holes where needed in the waste areas on the two plates and very carefully cut them to shape. Again, use a 2/0 blade with a slow (300 SPM) speed. Cut out the two slots for the support at this time as well. Cut the base to shape, then mortise the four 1/<3"-wide slots 1/4" deep. This is done by first drilling a series of 1/0'%-Dia. holes 1/4"-deep along the shaded areas of the pattern and then carefully chiseling out in between (see Fig. 2). Take particular note of the distance between these slots as their accurate placement is vital to the final fit of the other components. Using a router set up with a 1/6" radius convex bit with a follower, make the convex cut around the top surface of the base. Sand all surfaces, beginning with 100 grit, then 200 grit, and finally with 400 grit paper. Cut out spacers The seven spacers (C) can be cut from a 1/&"-Dia. wooden dowel or brass rod, or you can "turn" a more elaborate spacer as shown in Fig, 3, For this process, we used a small Premel lathe. Please note that no matter which way you decide to fashion this piece, you must keep the length of the piece 7/&" so that it is consistent with the corresponding 5/&" lengths marked on the support and the base; that way, the clock can be correctly assembled. Lightly sand all pieces and dry assemble them, making any necessary adjustments. At this time, also check to make sure that the miniature clock movement fits into the case correctly. Note: it will probably be a very tight fit, but will go in if you tip the movement slightly forward and at a slight angle. Don't force it. If all else fails, the case can be trimmed. Finish and assemble Disassemble and apply a light coat or two of clear satin polyurethane to all pieces. Let each coat dry thoroughly before applying the next. Allow finish to dry. Assemble the clock case parts as shown in the Assembly Drawing, Place the support between the plates arid secure using the small 1/16"-Dia. tapered pins (D) in the holes drilled previously. Glue the epacere> to the plates as marked on the pattern, Affix the dial face to the front of the clock, then add the clock movement itself, screwing it in place on the support from the bottom to secure. Set this assembly onto the base. Gluing the clock case to the base is not recommended, should you ever need to replace the clock movement. Add four 3/&"-Dia. felt feet to the bottom of the base. If desired, sign and date the bottom of the base. Your Mini Skeleton Clock is now ready to be displayed! For other unique fretwork clocks to make, look for the following books, also by John A. Nelson: Clocks (for advanced fretwork clocks) or Easy Clocks (for simple clocks), which are available at your local bookstore or by calling Stackpole Books at (800) 732-3669. Side view Tenons fit into the mortises cut in the base Plate (A) Cut two Slots for the support |


