Creative Woodworks & crafts 2001-11, страница 79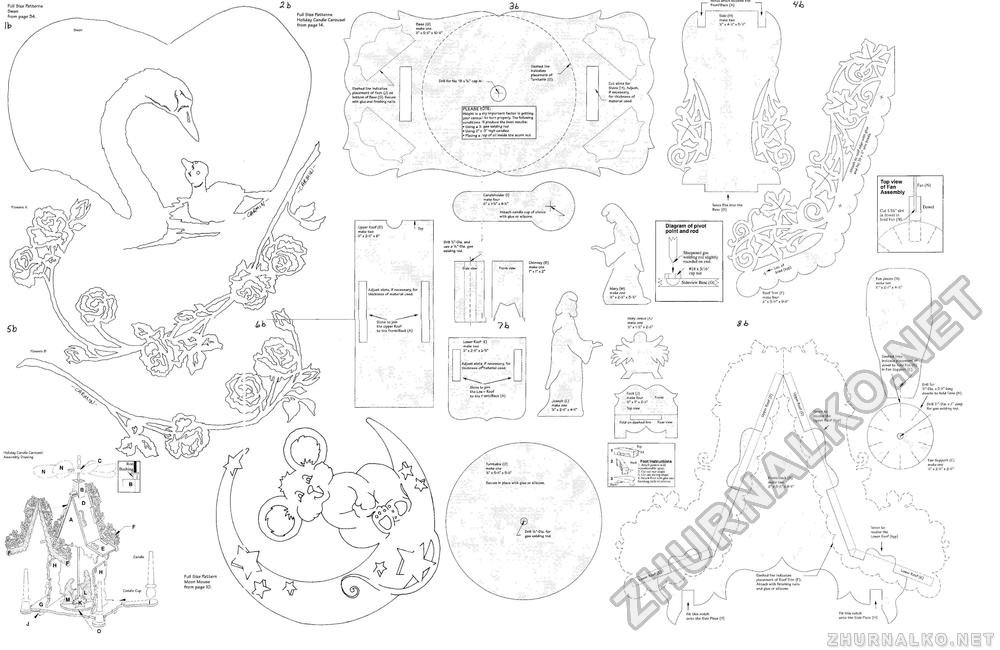
Notcii which receives we Front'Back (A) Full Size Patterns Swan from page 34, Full Size Patterns Holiday Candle Carousel from page 14. Side (H) make two 'A" x 4-A" x 5--Y.: Base (<5) make one YT x 5-//' x 10-%' Cashed line indicates placement of Turntable (0). Drill for No. 1& x % Cut slots for Sides (H), Adjust, if necessary, for thickness of material used. Dashed line indicates placement of Foot (J) on bottom of Base (G). Secure with glue and finishing nails. PLEASE }0TE: Weight is a sry important factor in getting your carous I to turn properly. The following conditions ill produce the best results; » Using a % gas welding rod ♦ Using 2" t- 3" high candles » Placing a ,"op of oil inside the acorn nut Top view of Fan Assembly Candleholder (I) make four Ye" x x Tenon fits into the Bas<; (G) Dowel Flowers A Cul 1/16" Slot in dowel to hoid Fan (N).- Attach candle cup of choice with glue or silicone. Diagram of pivot point and rod Upper Roof (D) make two V" x 2-f-r x 6" Drill %"-Dia, and use a %"-D\s. gas welding rod. Sharpened gas welding rod slightly rounded on end. Chimney (B) make one 1" x 1" x 2" Front view Side view Fan pieces (N) make ten V,-" x 2-/" x A-% Sideview Base (G) Mary (M) make one %" x Z'/" x 3-%" Adjust slots, if necessary, for thickness of material used. Roof Trim (F) make four A" x 3-*" x 9-'A' bafy Jesus make one '/«" x 1-%" x 2-An" Slots to join the Upper Roof to the Front/Back (A) Lower Roof E) make two 1 x 2-F x Z-%' Flowers B Dashed lines indicate placement of dowel to hoid Fan (N) in Fan Support (C). Adjust slots if necessary, for thickness of'material used. Drill for iT-Pia. x ?.-r-long dowels to hold Fans (N) Slots t? join the Low :r Roof to the F *ont/Back (A) Foot (J) make four %" x 1" x 2-A' Top view Front Joseph (L) make one x 2-A" x 4-'A' Tenon to receive the Upper Roof (typ) ' Fold on dashed line Rear view Holiday Candle Carousel Assembly Drawing Fan Support (Cj make one %" x Z-'A" x 2-V" Foot Instructions !. Attach pattern will) reposilionable spray. 2. Cul out rear shape 3. Cut out the top shape 4. Atlaeh Foot with glue and finishing naifs or silicone Rod, Bushing] Turntable (0) make one ■%" x 5-'A" x 5-/V Front/Back (A) make two 'A" x &-'A-" x &-'/: Secure in place with glue or silicone. Tenon to receive the Lower Roof (typ) Drill %"-Dia. for gas welding rod. Candle Oashed line indicates placement of Roof Trim (F) Attach with finishing nails and glue or silicone. Full Size Pattern Moon Mouse from page 10. Candle Cup Fit this notch onto the Side Piece (H) Fit this notch onto the Side Piece (H) |


