Creative Woodworks & crafts 2004-11, страница 6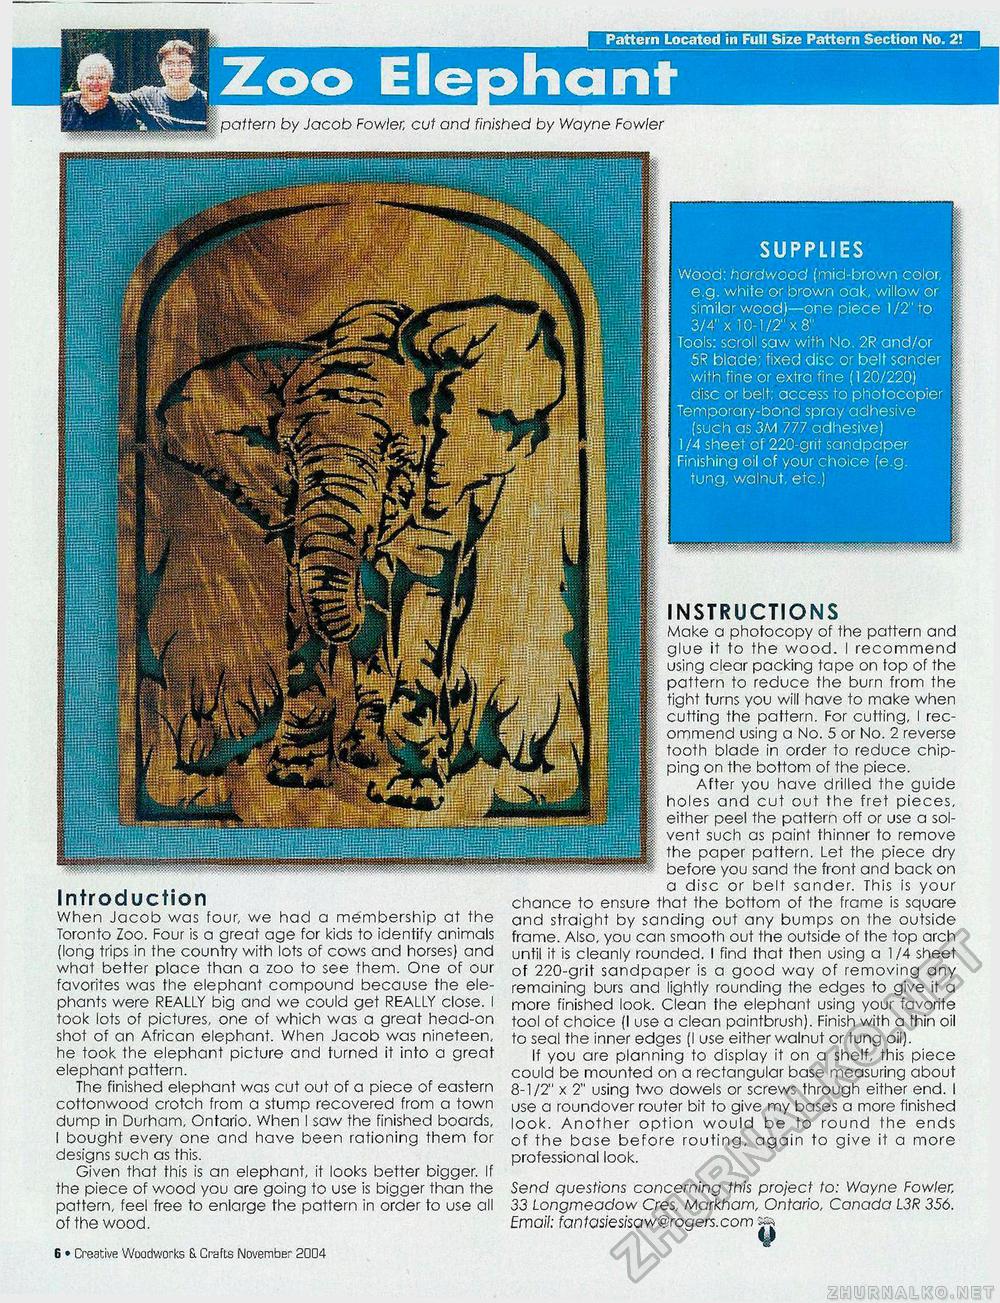
Pattern Located in Full Size Pattern Section No. 2! Zoo Elephant If pattern by Jacob Fowler; cut and finished by Wayne Fowler Wood: hardwood (mid-brown color, e.g. white or brown oak, willow or similar wood)—one piece 1/2" to 3/4" x 10-1/2" x 8" Tools: scroll saw with No. 2R and/or 5R blade; fixed disc or belt sander with fine or extra fine (120/220) disc or belt; access to photocopier Temporary-bond spray adhesive (such as 3M 777 adhesive) 1 /4 sheet of 220-grit sandpaper Finishing oil of your choice (e.g. tung, walnut, etc.) Introduction When Jacob was four, we had a membership at the Toronto Zoo. Four is a great age for kids to identify animals (long trips in the country with lots of cows and horses) and what better place than a zoo to see them. One of our favorites was the elephant compound because the elephants were REALLY big and we could get REALLY close. I took lots of pictures, one of which was a great head-on shot of an African elephant. When Jacob was nineteen, he took the elephant picture and turned it into a great elephant pattern. The finished elephant was cut out of a piece of eastern cottonwood crotch from a stump recovered from a town dump in Durham, Ontario. When I saw the finished boards, I bought every one and have been rationing them for designs such as this. Given that this is an elephant, it looks better bigger. If the piece of wood you are going to use is bigger than the pattern, feel free to enlarge the pattern in order to use all of the wood. 6 • Creative Woodworks S. Crafts November 2004 SUPPLIES INSTRUCTIONS Make a photocopy of the pattern and glue it to the wood. I recommend using clear packing tape on top of the pattern to reduce the burn from the tight turns you will have to make when cutting the pattern. For cutting, I recommend using a No. 5 or No. 2 reverse tooth blade in order to reduce chipping on the bottom of the piece. After you have drilled the guide holes and cut out the fret pieces, either peel the pattern off or use a solvent such as paint thinner to remove the paper pattern. Let the piece dry before you sand the front and back on a disc or belt sander. This is your chance to ensure that the bottom of the frame is square and straight by sanding out any bumps on the outside frame. Also, you can smooth out the outside of the top arch until it is cleanly rounded. I find that then using a 1/4 sheet of 220-grit sandpaper is a good way of removing any remaining burs and lightly rounding the edges to give it a more finished look. Clean the elephant using your favorite tool of choice (I use a clean paintbrush). Finish with a thin oil to seal the inner edges (I use either walnut or tung oil). If you are planning to display it on a shelf, this piece could be mounted on a rectangular base measuring about 8-1/2" x 2" using two dowels or screws through either end. I use a roundover router bit to give my bases a more finished look. Another option would be to round the ends of the base before routing, again to give it a more professional look. Send questions concerning this project to: Wayne Fowler, 33 Longmeadow Cres, Markham, Ontario, Canada L3R 356. Email: fanfasiesisaw@rogers.com |


