Creative Woodworks & Crafts-059-1998-Fall, страница 8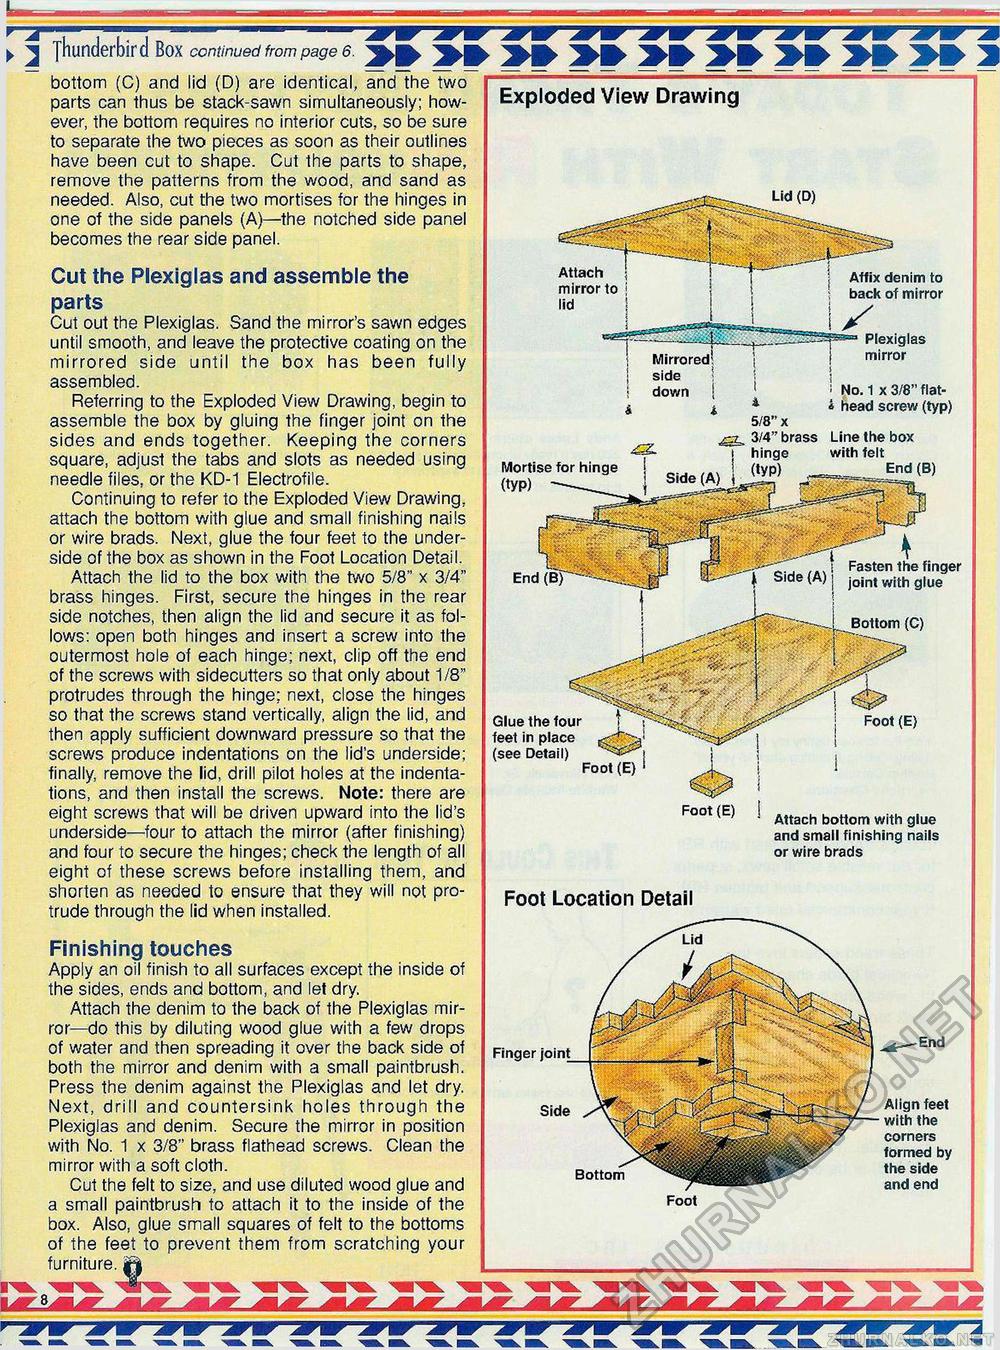
J yhunderbird Box continued from page 6. bottom (C) and lid (D) are identical, and the two parts can thus be stack-sawn simultaneously; however, the bottom requires no interior cuts, so be sure to separate the two pieces as soon as their outlines have been cut to shape. Cut the parts to shape, remove the patterns from the wood, and sand as needed. Also, cut the two mortises for the hinges in one of the side panels (A)—the notched side panel becomes the rear side panel. Cut the Plexiglas and assemble the parts Cut out the Plexiglas. Sand the mirror's sawn edges until smooth, and leave the protective coating on the mirrored side until the box has been fully assembled. Referring to the Exploded View Drawing, begin to assemble the box by gluing the finger joint on the sides and ends together. Keeping the corners square, adjust the tabs and slots as needed using needle files, or the KD-1 Electrofile. Continuing to refer to the Exploded View Drawing, attach the bottom with glue and small finishing nails or wire brads. Next, glue the four feet to the underside of the box as shown in the Foot Location Detail. Attach the lid to the box with the two 5/8" x 3/4" brass hinges. First, secure the hinges in the rear side notches, then align the lid and secure it as follows: open both hinges and insert a screw into the outermost hole of each hinge; next, clip off the end of the screws with sidecutters so that only about 1/8" protrudes through the hinge: next, close the hinges so that the screws stand vertically, align the lid, and then apply sufficient downward pressure so that the screws produce indentations on the lid's underside; finally, remove the lid, drill pilot holes at the indentations, and then install the screws. Note: there are eight screws that will be driven upward into the lid's underside—four to attach the mirror (after finishing) and four to secure the hinges; check the length of all eight of these screws before installing them, and shorten as needed to ensure that they will not protrude through the lid when installed. Finishing touches Apply an oil finish to all surfaces except the inside of the sides, ends and bottom, and let dry. Attach the denim to the back of the Plexiglas mirror—do this by diluting wood glue with a few drops of water and then spreading it over the back side of both the mirror and denim with a small paintbrush. Press the denim against the Plexiglas and let dry. Next, drill and countersink holes through the Plexiglas and denim. Secure the mirror in position with No. 1 x 3/8" brass flathead screws. Clean the mirror with a soft cloth. Cut the felt to size, and use diluted wood glue and a small paintbrush to attach it to the inside of the box. Also, glue small squares of felt to the bottoms of the feet to prevent them from scratching your furniture. ^ Exploded View Drawing Lid (D) Affix denim to back of mirror Plexiglas mirror No. 1 x 3/8" flat-i head screw (typ) 42. Mortise for hinge (typ) End I 1 5/8" x ^z, 3/4" brass Line the box hinge with felt (•VP) End (B) I Fasten the finger t Side {A) j jojnt wjth glue Bottom (C) .. v., . Glue the four feet in place (see Detail) Foot (E) Foot (E) Foot (E) Attach bottom with glue and small finishing nails or wire brads Foot Location Detail Finger joint Side Bottom -End Align feet with the corners formed by the side and end Foot |


