Creative Woodworks & crafts-125-2007-Holiday, страница 28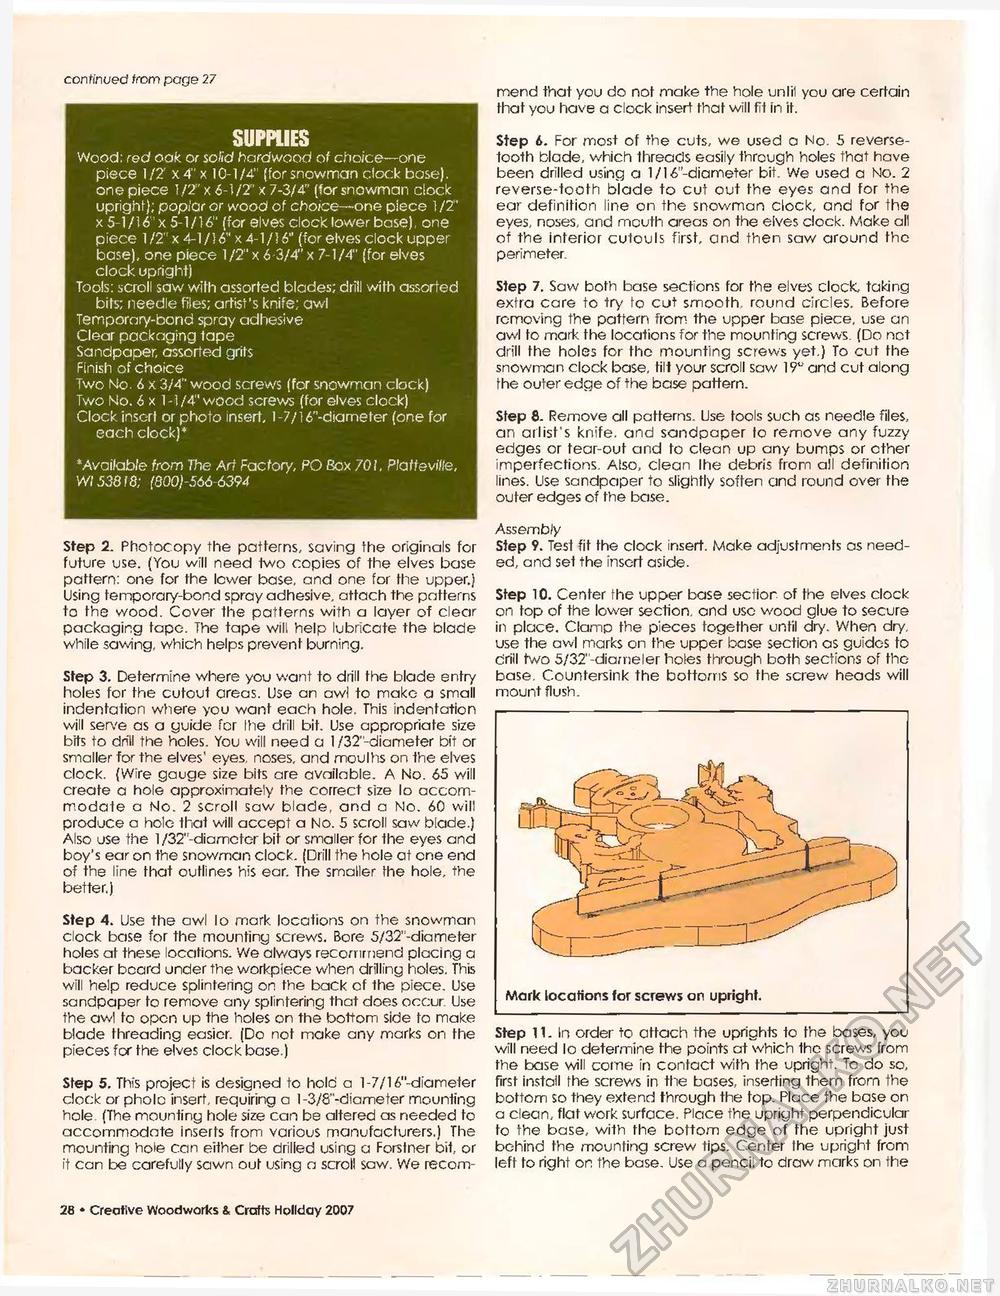
continued from page 27 mend that you do not make the hole unlil you are certain that you have a clock insert that will tit in it. SUPPLIES Wood: red oak or solid hardwood of choice—one piece 1/2' x4" x 10-1/4" (for snowman clock bose). one piece 1/2" x 6-1/2" x 7-3/4" (for snowman clock upright); poplar or wood of choice—one piece 1 /2" x 5-1/16" x 5-1/16" (for elves clock lower base), one piece 1/2" x 4-1/16" x 4-1/16" (for elves clock upper base), one piece 1/2" x 6 3/4" x 7-1/4" (for elves clock upright) Tools: scroll saw with assorted blades; drill with assorted bits; needle files; artist's knife; awl Temporary-bond spray adhesive Clear packaging tape Sandpaper, assorted grits Finish of choice Two Mo. 6 x 3/4" wood screws (for snowman clock) Two Mo. 6 x 1-1/4" wood screws (for elves clock) Clock insert or photo insert, l-7/l6"-diameter (one for each clock)* * Available from The Art Factory, PO Box 701. Plaffevi/te, Wl 53818; (QOOj-566 6394 Step 2. Photocopy the patterns, saving the originals for future use. (You will need two copies of the elves base pattern: one for the lower base, and one for the upper.) Using temporary-bond spray adhesive, attach the patterns to the wood. Cover the patterns with a layer of clear packaging tape. The tape will help lubricate the blade while sawing, which helps prevent burning. Step 3. Determine where you want to drill the blade entry holes for the cutout areas. Use an awl to make a small indentation where you want each hole. This indentation will serve as a guide for the drill bit. Use appropriate size bits to drill the holes. You will need a 1 /32"-diameter bit or smaller for the elves' eyes, noses, and moulhs on the elves clock. {Wire gauge size bits are available. A No. 65 will create a hole approximately the correct size lo accommodate a No. 2 scroll saw blade, and a No. 60 will produce a hole that will accept a No. 5 scroll saw blade.) Also use the 1/32"-diamctor bit or smaller for the eyes and boy's ear on the snowman clock. (Drill the hole at one end of the line that outlines his ear. The smaller the hole, the better.) Step 4. Use the awl lo mark locations on the snowman clock base for the mounting screws. Bore 5/32"-diameter-holes at these locations. We always recommend placing a backer board under the workpiece when drilling holes. This will help reduce splintering on the back of the piece. Use sandpaper to remove any splintering that does occur. Use the awl to open up the holes on the bottom side to make blade threading easier. (Do not make any marks on the pieces for the elves clock base.) Step 5. This project is designed to hold a l-7/16"-diameter clock or pholc insert, requiring a 1 -3/S"-diameter mounting hole (The mounting hole size can be altered as needed to accommodate inserts from various manufacturers.) The mounting hole can either be drilled using a Forstner bit, or it can be carefully sawn out using a scroll saw. We recom- Step 6. For most of the cuts, we used a No. 5 reverse-tooth blade, which threads easily through holes that have been drilled using a 1/16"-diameter bit. We used a No. 2 reverse-tooth blade to cut out the eyes and for the ear definition line on the snowman clock, and for the eyes, noses, and mouth areas on the elves clock. Make all of the interior cutouls first, and then saw around the perimeter. Step 7. Saw both base sections for the elves clock, taking extra care to try to cut smooth round circles. Before removing the pattern from the upper base piece, use an awl to mark the locations for the mounting screws. (Do net drill the holes for tho mounting screws yet.) To cut the snowman clock base, tilt your scroll saw 19" and cut along the outer edge of the base pattern. Step 8. Remove all patterns. Use tools such as needle files, an artist's knife, and sandpaper to remove any fuzzy edges or tear-out and to clean up any bumps or other imperfections. Also, clean Ihe debris from all definition lines. Use sandpaper to slightly soften and round over the outer edges of the base. Assembly Step 9. Test fit the clock insert. Make adjustments as needed, and set the insert aside. Step 10. Center the upper base section of the elves clock on fop of the lower section, and use wood glue to secure in place. Clamp the pieces together until dry. When dry, use the awl marks on the upper base section as guides to drill two 5/32"-diameler holes through both sections of tho base. Countersink the bottoms so the screw heads will mount flush. Step 11. In order to attach the uprights to the bases, you will need lo determine the points at which 1he screws from the base will come in contact with the upright. To do so, first install the screws in the bases, inserting them from the bottom so they extend through the fop. Place the base on a clean, flat work surface. Place the upright perpendicular to the base, with the bottom edge of the upright just behind the mounting screw tips. Center the upright from left to right on the base. Use a pencil to draw marks on the 28 ■ Creative Woodworks S. Crafts Holiday 2007 |


