Popular Woodworking 2002-04 № 127, страница 64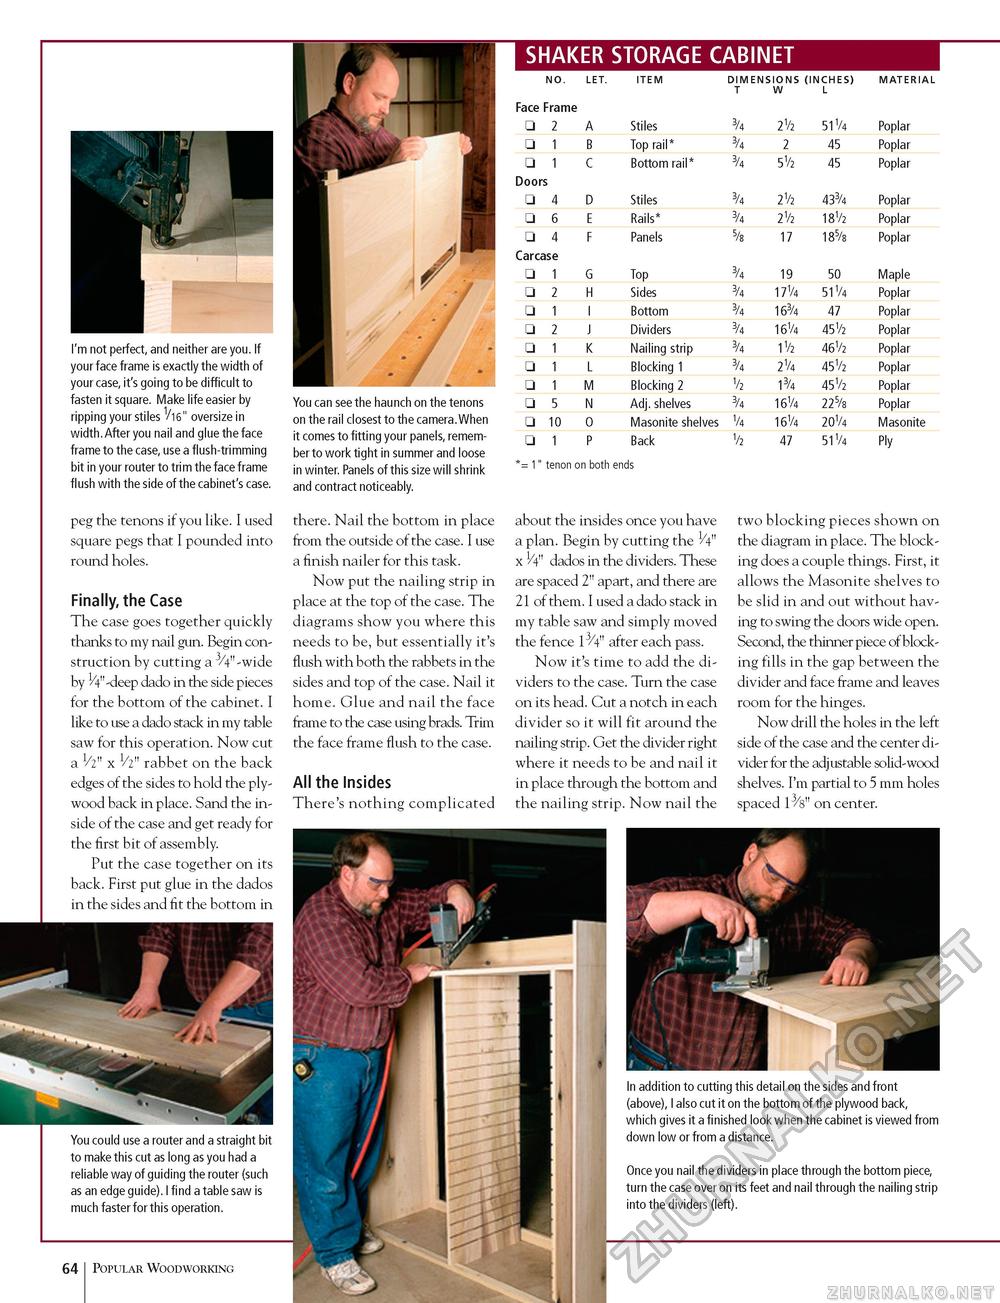
I'm not perfect, and neither are you. If your face frame is exactly the width of your case, it's going to be difficult to fasten it square. Make life easier by ripping your stiles 1/i6" oversize in width.After you nail and glue the face frame to the case, use a flush-trimming bit in your router to trim the face frame flush with the side of the cabinet's case. peg the tenons if you like. I used square pegs that I pounded into round holes. Finally, the Case The case goes together quickly thanks to my nail gun. Begin construction by cutting a 3/4"-wide by !/4" -deep dado in the side pieces for the bottom of the cabinet. I like to use a dado stack in my table saw for this operation. Now cut a 1/2" x 1/2" rabbet on the back edges of the sides to hold the plywood back in place. Sand the inside of the case and get ready for the first bit of assembly. Put the case together on its back. First put glue in the dados in the sides and fit the bottom in SHAKER STORAGE CABINET
there. Nail the bottom in place from the outside of the case. I use a finish nailer for this task. Now put the nailing strip in place at the top of the case. The diagrams show you where this needs to be, but essentially it's flush with both the rabbets in the sides and top of the case. Nail it home. Glue and nail the face frame to the case using brads. Trim the face frame flush to the case. All the Insides There's nothing complicated about the insides once you have a plan. Begin by cutting the V4" x 1/4" dados in the dividers. These are spaced 2" apart, and there are 21 of them. I used a dado stack in my table saw and simply moved the fence 13/4" after each pass. Now it's time to add the dividers to the case. Turn the case on its head. Cut a notch in each divider so it will fit around the nailing strip. Get the divider right where it needs to be and nail it in place through the bottom and the nailing strip. Now nail the two blocking pieces shown on the diagram in place. The blocking does a couple things. First, it allows the Masonite shelves to be slid in and out without having to swing the doors wide open. Second, the thinner piece of blocking fills in the gap between the divider and face frame and leaves room for the hinges. Now drill the holes in the left side of the case and the center divider for the adjustable solid-wood shelves. I'm partial to 5 mm holes spaced 13/s" on center. You could use a router and a straight bit to make this cut as long as you had a reliable way of guiding the router (such as an edge guide). I And a table saw is much faster for this operation. 64 Popular Woodworking In addition to cutting this detail on the sides and front (above), I also cut it on the bottom of the plywood back, which gives it a finished look when the cabinet is viewed from down low or from a distance. Once you nail the dividers in place through the bottom piece, turn the case over on its feet and nail through the nailing strip into the dividers (left). |
||||||||||||||||||||||||||||||||||||||||||||||||||||||||||||||||||||||||||||||||||||||||||||||||||||||||||||||||||||||||||||||||||||||||||||||||||||||||||


