Popular Woodworking 2002-12 № 131, страница 16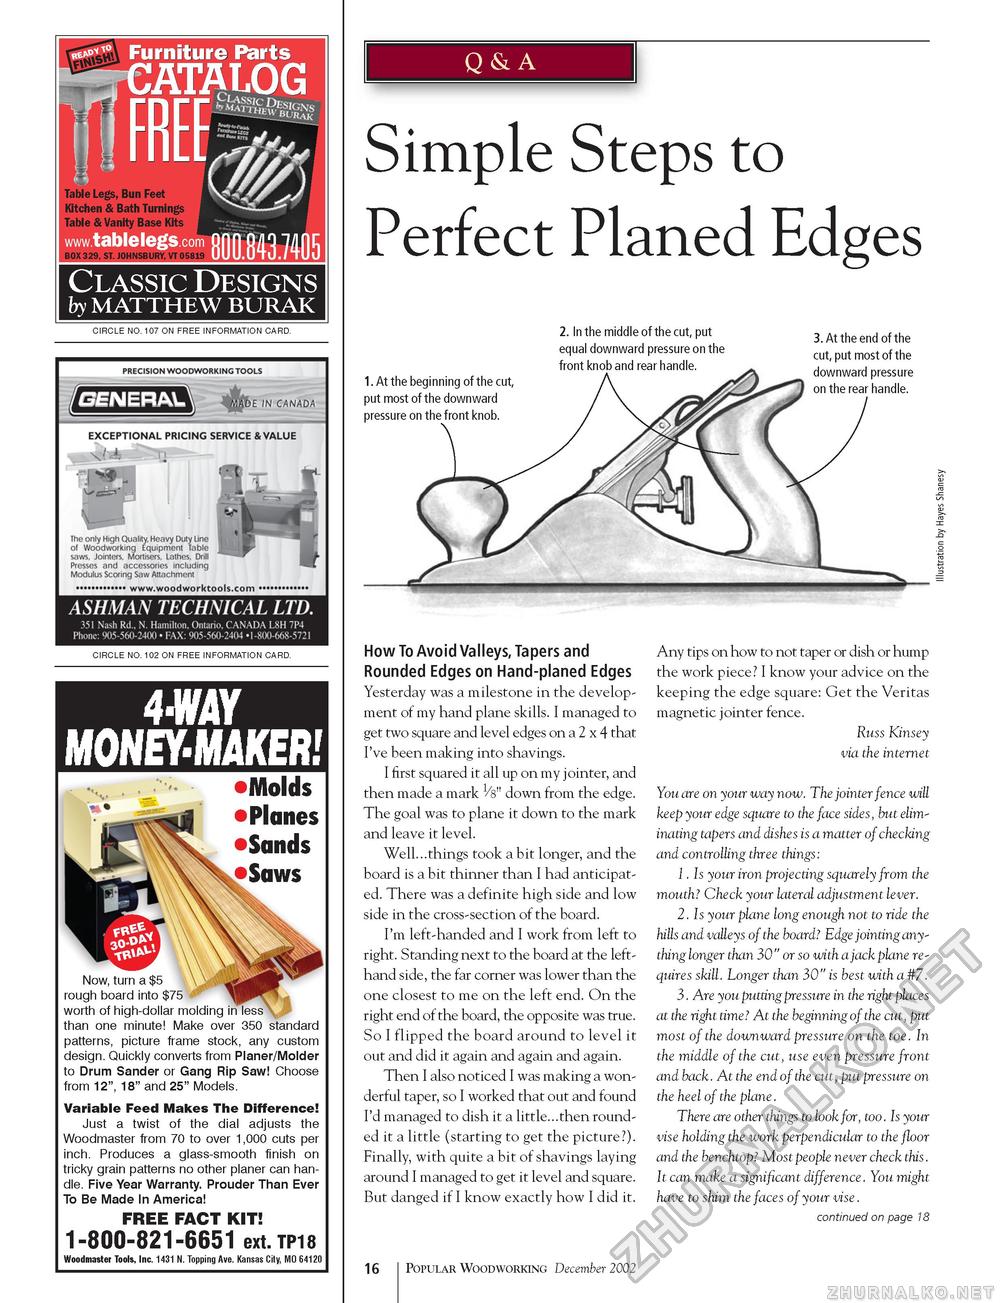
Classic Designs by MATTHEW BURAK CIRCLE NO. 107 ON FREE INFORMATION CARD. CIRCLE NO. 102 ON FREE INFORMATION CARD. 4-WAY MONEY-MAKER! Molds Planes Sands Saws Now, turn a $5 rough board into $75 worth of high-dollar molding in less than one minute! Make over 350 standard patterns, picture frame stock, any custom design. Quickly converts from Planer/Molder to Drum Sander or Gang Rip Saw! Choose from 12", 18" and 25" Models. Variable Feed Makes The Difference! Just a twist of the dial adjusts the Woodmaster from 70 to over 1,000 cuts per inch. Produces a glass-smooth finish on tricky grain patterns no other planer can handle. Five Year Warranty. Prouder Than Ever To Be Made In America! FREE FACT KIT! 1-800-821-6651 ext. TP18 Woodmaster Tools, Inc. 1431 N. Topping Ave. Kansas City, MO 64120 Q & A Simple Steps to Perfect Planed Edges2. In the middle of the cut, put equal downward pressure on the front knob and rear handle. 1. At the beginning of the cut, put most of the downward pressure on the front knob. 3. At the end of the cut, put most of the downward pressure on the rear handle. How To Avoid Valleys, Tapers and Rounded Edges on Hand-planed Edges Yesterday was a milestone in the development of my hand plane skills. I managed to get two square and level edges on a 2 x 4 that I've been making into shavings. I first squared it all up on my jointer, and then made a mark Vs" down from the edge. The goal was to plane it down to the mark and leave it level. Well...things took a bit longer, and the board is a bit thinner than I had anticipated. There was a definite high side and low side in the cross-section of the board. I'm left-handed and I work from left to right. Standing next to the board at the left-hand side, the far corner was lower than the one closest to me on the left end. On the right end of the board, the opposite was true. So I flipped the board around to level it out and did it again and again and again. Then I also noticed I was making a wonderful taper, so I worked that out and found I'd managed to dish it a little...then rounded it a little (starting to get the picture?). Finally, with quite a bit of shavings laying around I managed to get it level and square. But danged if I know exactly how I did it. Any tips on how to not taper or dish or hump the work piece? I know your advice on the keeping the edge square: Get the Veritas magnetic jointer fence. Russ Kinsey via the internet You are on your way now. The jointer fence will keep your edge square to the face sides, but eliminating tapers and dishes is a matter of checking and controlling three things: 1. Is your iron projecting squarely from the mouth? Check your lateral adjustment lever. 2. Is your plane long enough not to ride the hills and valleys of the board? Edge jointing anything longer than 30" or so with a jack plane requires skill. Longer than 30" is best with a #7. 3. Are you putting pressure in the right places at the right time? At the beginning of the cut, put most of the downward pressure on the toe. In the middle of the cut, use even pressure front and back. At the end of the cut, put pressure on the heel of the plane. There are other things to look for, too. Is your vise holding the work perpendicular to the floor and the benchtop? Most people never check this. It can make a significant difference. You might have to shim the faces of your vise. continued on page 18 16 Popular Woodworking December 2002 |


