Popular Woodworking 2003-06 № 134, страница 89
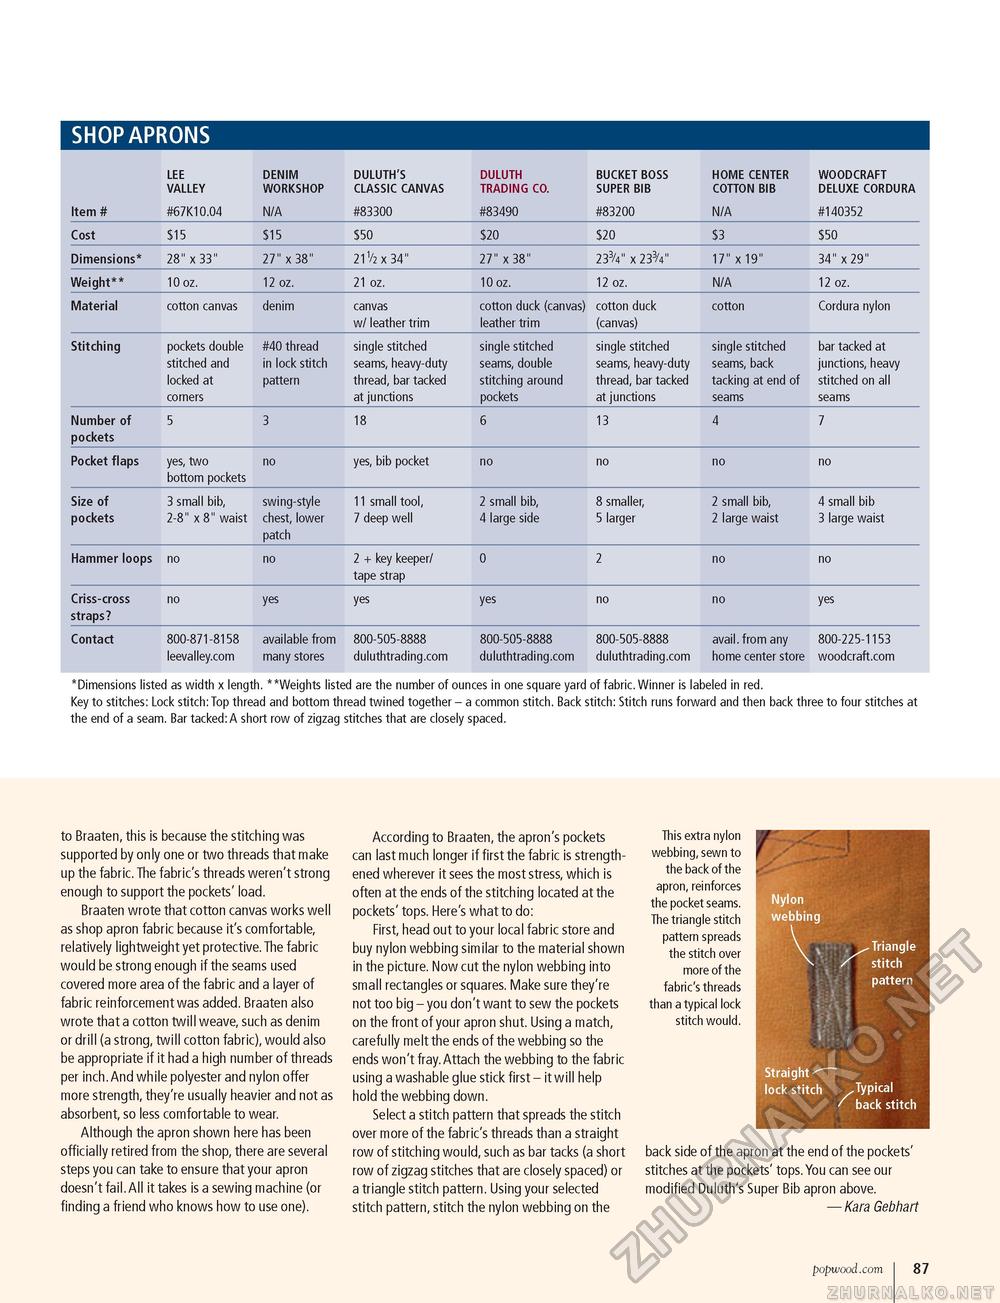
*Dimensions listed as width x length. "Weights listed are the number of ounces in one square yard of fabric. Winner is labeled in red. Key to stitches: Lock stitch: Top thread and bottom thread twined together - a common stitch. Back stitch: Stitch runs forward and then back three to four stitches at the end of a seam. Bar tacked: A short row of zigzag stitches that are closely spaced. *Dimensions listed as width x length. "Weights listed are the number of ounces in one square yard of fabric. Winner is labeled in red. Key to stitches: Lock stitch: Top thread and bottom thread twined together - a common stitch. Back stitch: Stitch runs forward and then back three to four stitches at the end of a seam. Bar tacked: A short row of zigzag stitches that are closely spaced. to Braaten, this is because the stitching was supported by only one or two threads that make up the fabric. The fabric's threads weren't strong enough to support the pockets' load. Braaten wrote that cotton canvas works well as shop apron fabric because it's comfortable, relatively lightweight yet protective. The fabric would be strong enough if the seams used covered more area of the fabric and a layer of fabric reinforcement was added. Braaten also wrote that a cotton twill weave, such as denim or drill (a strong, twill cotton fabric), would also be appropriate if it had a high number of threads per inch.And while polyester and nylon offer more strength, they're usually heavier and not as absorbent, so less comfortable to wear. Although the apron shown here has been officially retired from the shop, there are several steps you can take to ensure that your apron doesn't fail.All it takes is a sewing machine (or finding a friend who knows how to use one). According to Braaten, the apron's pockets can last much longer if first the fabric is strengthened wherever it sees the most stress, which is often at the ends of the stitching located at the pockets' tops. Here's what to do: First, head out to your local fabric store and buy nylon webbing similar to the material shown in the picture. Now cut the nylon webbing into small rectangles or squares. Make sure they're not too big - you don't want to sew the pockets on the front of your apron shut. Using a match, carefully melt the ends of the webbing so the ends won't fray.Attach the webbing to the fabric using a washable glue stick first - it will help hold the webbing down. Select a stitch pattern that spreads the stitch over more of the fabric's threads than a straight row of stitching would, such as bar tacks (a short row of zigzag stitches that are closely spaced) or a triangle stitch pattern. Using your selected stitch pattern, stitch the nylon webbing on the This extra nylon webbing, sewn to the back of the apron, reinforces the pocket seams. The triangle stitch pattern spreads the stitch over more of the fabric's threads than a typical lock stitch would. Nylon webbing .Triangle stitch pattern Straight ^ lock stitch .Typical ' back stitch back side of the apron at the end of the pockets' stitches at the pockets' tops. You can see our modified Duluth's Super Bib apron above. — Kara Gebhart popwood.com 87 |
||||||||||||||||||||||||||||||||||||||||||||||||||||||||||||||||||||||||||||||||||||||||||||||||||||||||||||||


