Popular Woodworking 2003-12 № 138, страница 31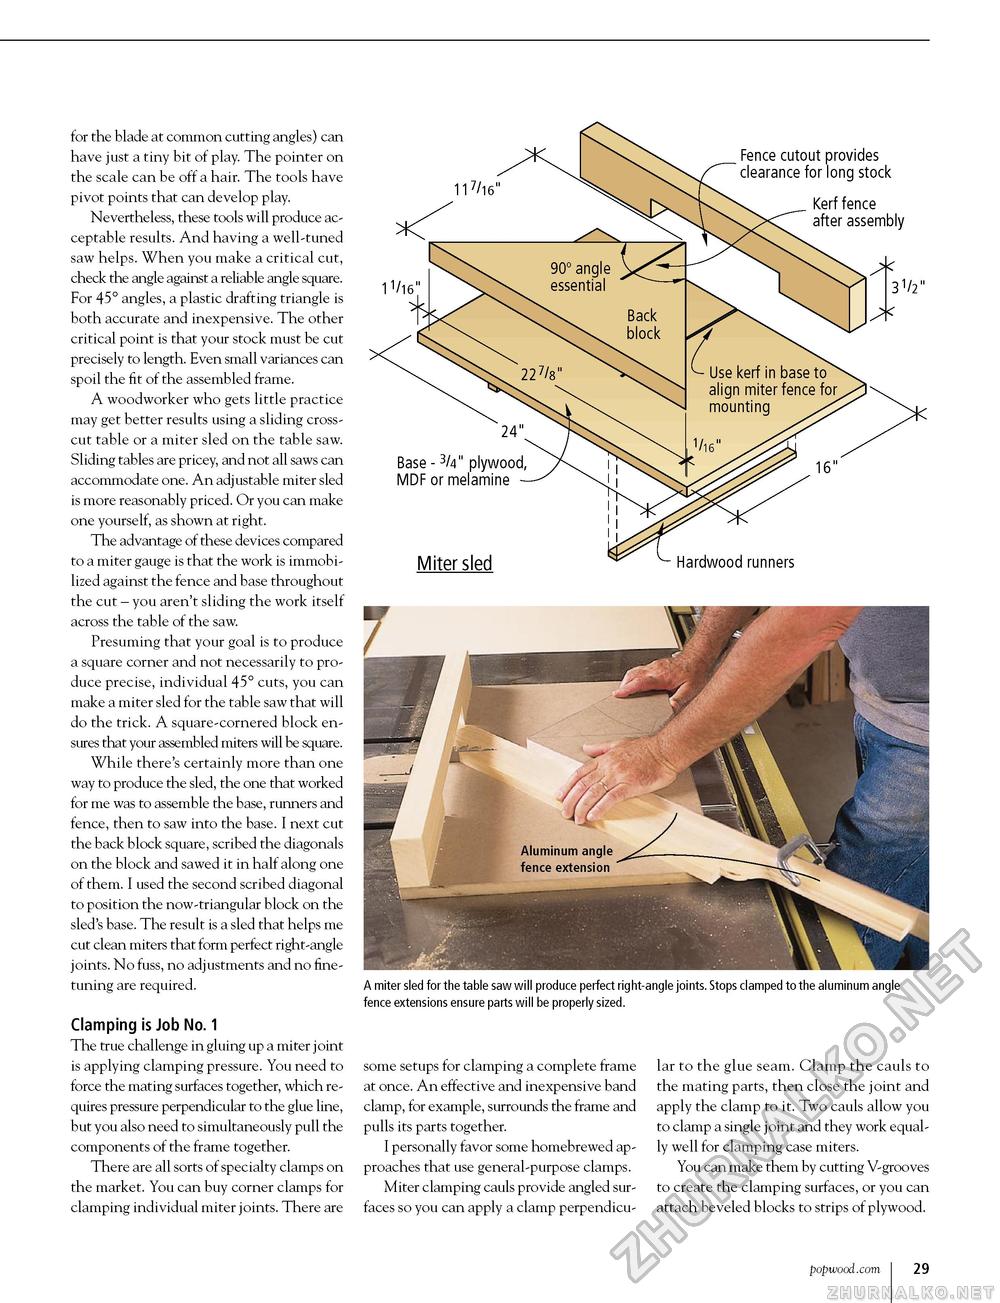
Fence cutout provides clearance for long stock Kerf fence after assembly Base - 3/4" plywood, MDF or melamine Miter sled Hardwood runners A miter sled for the table saw will produce perfect right-angle joints. Stops clamped to the aluminum angle fence extensions ensure parts will be properly sized. for the blade at common cutting angles) can have just a tiny bit of play. The pointer on the scale can be off a hair. The tools have pivot points that can develop play. Nevertheless, these tools will produce acceptable results. And having a well-tuned saw helps. When you make a critical cut, check the angle against a reliable angle square. For 45° angles, a plastic drafting triangle is both accurate and inexpensive. The other critical point is that your stock must be cut precisely to length. Even small variances can spoil the fit of the assembled frame. A woodworker who gets little practice may get better results using a sliding crosscut table or a miter sled on the table saw. Sliding tables are pricey, and not all saws can accommodate one. An adjustable miter sled is more reasonably priced. Or you can make one yourself, as shown at right. The advantage of these devices compared to a miter gauge is that the work is immobilized against the fence and base throughout the cut - you aren't sliding the work itself across the table of the saw. Presuming that your goal is to produce a square corner and not necessarily to produce precise, individual 45° cuts, you can make a miter sled for the table saw that will do the trick. A square-cornered block ensures that your assembled miters will be square. While there's certainly more than one way to produce the sled, the one that worked for me was to assemble the base, runners and fence, then to saw into the base. I next cut the back block square, scribed the diagonals on the block and sawed it in half along one of them. I used the second scribed diagonal to position the now-triangular block on the sled's base. The result is a sled that helps me cut clean miters that form perfect right-angle joints. No fuss, no adjustments and no fine-tuning are required. Clamping is Job No. 1 The true challenge in gluing up a miter joint is applying clamping pressure. You need to force the mating surfaces together, which requires pressure perpendicular to the glue line, but you also need to simultaneously pull the components of the frame together. There are all sorts of specialty clamps on the market. You can buy corner clamps for clamping individual miter joints. There are some setups for clamping a complete frame at once. An effective and inexpensive band clamp, for example, surrounds the frame and pulls its parts together. I personally favor some homebrewed approaches that use general-purpose clamps. Miter clamping cauls provide angled surfaces so you can apply a clamp perpendicu lar to the glue seam. Clamp the cauls to the mating parts, then close the joint and apply the clamp to it. Two cauls allow you to clamp a single joint and they work equally well for clamping case miters. You can make them by cutting V-grooves to create the clamping surfaces, or you can attach beveled blocks to strips of plywood. popwood.com 73 |


