Popular Woodworking 2004-04 № 140, страница 84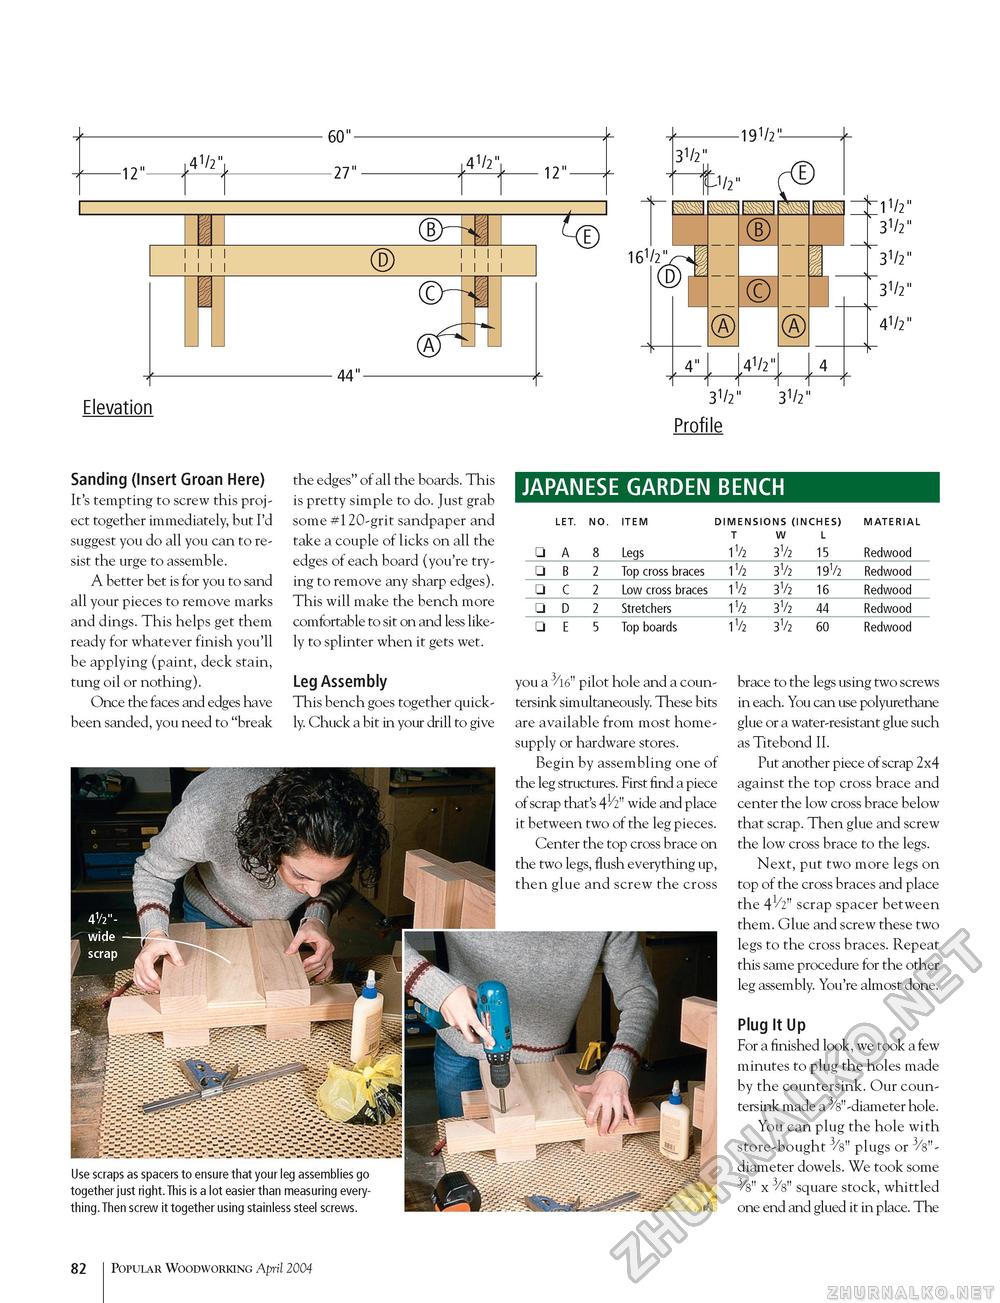
Elevation i i i i i i i i TWT I ® M l l l l I I I I 1 ©rm (A 44"-
161/2" -19V2- 31/2" (J/2" A 4" 31/2" Profile
31/2" m 31/2" 11/2 31/2 "3V2 31/2 41/2 4 Sanding (Insert Groan Here) It's tempting to screw this project together immediately, but I'd suggest you do all you can to resist the urge to assemble. A better bet is for you to sand all your pieces to remove marks and dings. This helps get them ready for whatever finish you'll be applying (paint, deck stain, tung oil or nothing). Once the faces and edges have been sanded, you need to "break the edges" of all the boards. This is pretty simple to do. Just grab some #120-grit sandpaper and take a couple of licks on all the edges of each board (you're trying to remove any sharp edges). This will make the bench more comfortable to sit on and less likely to splinter when it gets wet. Leg Assembly This bench goes together quickly. Chuck a bit in your drill to give JAPANESE GARDEN BENCH
□ E 5 Top boards 60 Redwood □ E 5 Top boards 1V2 3V2 60 Redwood you a pilot hole and a countersink simultaneously. These bits are available from most home-supply or hardware stores. Begin by assembling one of the leg structures. First find a piece of scrap that's wide and place it between two of the leg pieces. Center the top cross brace on the two legs, flush everything up, then glue and screw the cross Use scraps as spacers to ensure that your leg assemblies go together just right.This is a lot easier than measuring every-thing.Then screw it together using stainless steel screws. brace to the legs using two screws in each. You can use polyurethane glue or a water-resistant glue such as Titebond II. Put another piece of scrap 2x4 against the top cross brace and center the low cross brace below that scrap. Then glue and screw the low cross brace to the legs. Next, put two more legs on top of the cross braces and place the 41/2" scrap spacer between them. Glue and screw these two legs to the cross braces. Repeat this same procedure for the other leg assembly. You're almost done. Plug It Up For a finished look, we took a few minutes to plug the holes made by the countersink. Our countersink made a ^"-diameter hole. You can plug the hole with store-bought 3/sn plugs or 3/8"-diameter dowels. We took some 3/8" x 3/8" square stock, whittled one end and glued it in place. The 82 Popular Woodworking April 2004 |
|||||||||||||||||||||||||||||||||||||||||||||||||||||||||||||||||||||||||


