Popular Woodworking 2004-08 № 142, страница 52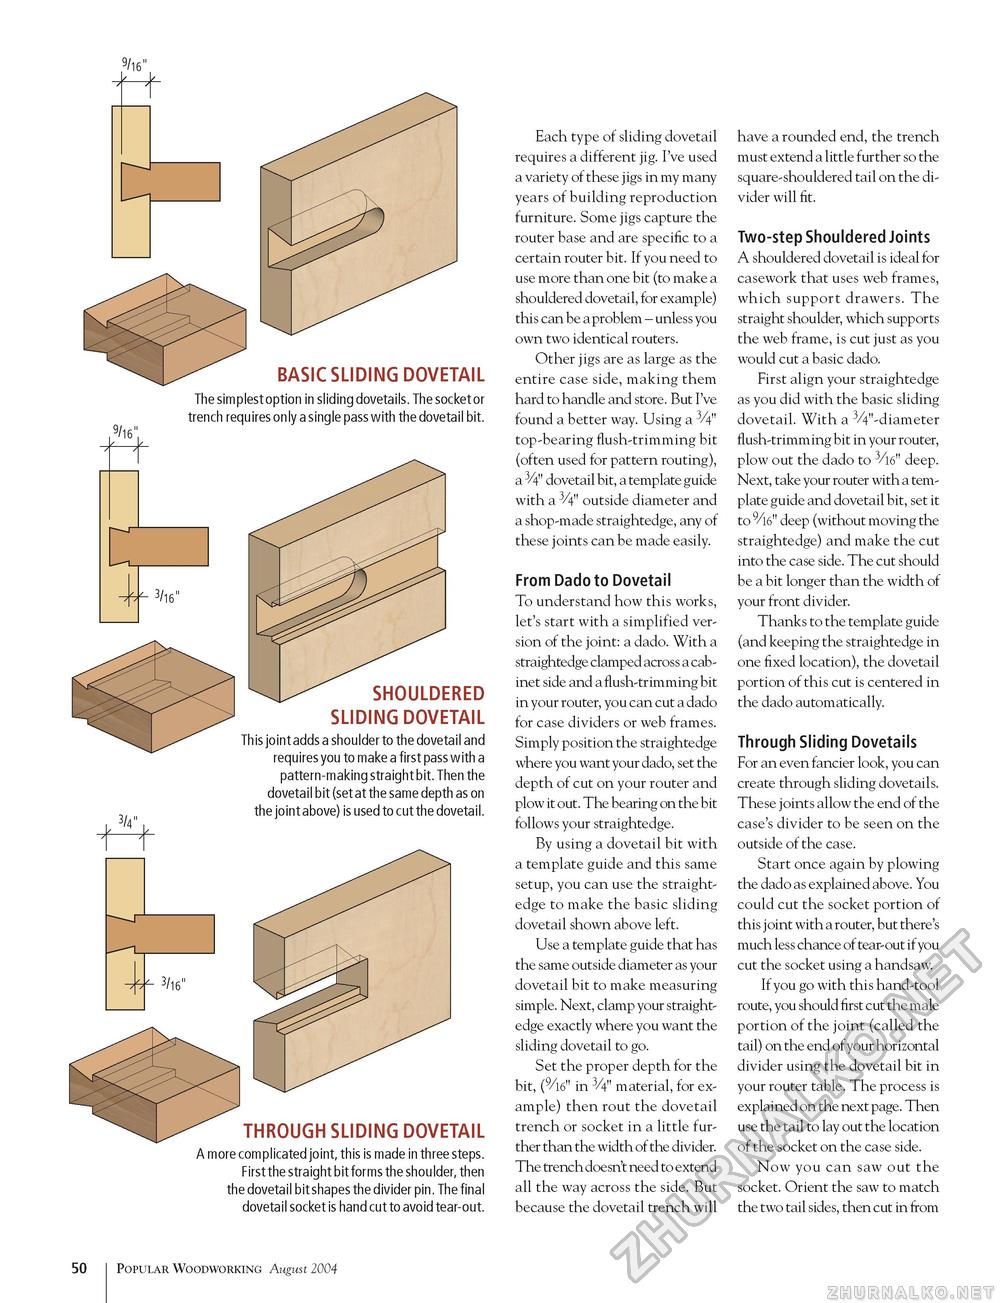
basic sliding dovetail The simplest option in sliding dovetails. The socket or trench requires only a single pass with the dovetail bit. 3/4" shouldered sliding dovetail This joint adds a shoulder to the dovetail and requires you to make a first pass with a pattern-making straight bit. Then the dovetail bit (set at the same depth as on the joint above) is used to cut the dovetail. 3/16" through sliding dovetail A more complicated joint, this is made in three steps. First the straight bit forms the shoulder, then the dovetail bit shapes the divider pin. The final dovetail socket is hand cut to avoid tear-out. Each type of sliding dovetail requires a different jig. I've used a variety of these jigs in my many years of building reproduction furniture. Some jigs capture the router base and are specific to a certain router bit. If you need to use more than one bit (to make a shouldered dovetail, for example) this can be a problem - unless you own two identical routers. Other jigs are as large as the entire case side, making them hard to handle and store. But I've found a better way. Using a 3/4" top-bearing flush-trimming bit (often used for pattern routing), a 3/4" dovetail bit, a template guide with a 3/4" outside diameter and a shop-made straightedge, any of these joints can be made easily. From Dado to Dovetail To understand how this works, let's start with a simplified version of the joint: a dado. With a straightedge clamped across a cabinet side and a flush-trimming bit in your router, you can cut a dado for case dividers or web frames. Simply position the straightedge where you want your dado, set the depth of cut on your router and plow it out. The bearing on the bit follows your straightedge. By using a dovetail bit with a template guide and this same setup, you can use the straightedge to make the basic sliding dovetail shown above left. Use a template guide that has the same outside diameter as your dovetail bit to make measuring simple. Next, clamp your straightedge exactly where you want the sliding dovetail to go. Set the proper depth for the bit, (9/l6" in 3/4" material, for example) then rout the dovetail trench or socket in a little further than the width of the divider. The trench doesn't need to extend all the way across the side. But because the dovetail trench will have a rounded end, the trench must extend a little further so the square-shouldered tail on the divider will fit. Two-step Shouldered Joints A shouldered dovetail is ideal for casework that uses web frames, which support drawers. The straight shoulder, which supports the web frame, is cut just as you would cut a basic dado. First align your straightedge as you did with the basic sliding dovetail. With a 3/4"-diameter flush-trimming bit in your router, plow out the dado to 3/l6" deep. Next, take your router with a template guide and dovetail bit, set it to 9/l6" deep (without moving the straightedge) and make the cut into the case side. The cut should be a bit longer than the width of your front divider. Thanks to the template guide (and keeping the straightedge in one fixed location), the dovetail portion of this cut is centered in the dado automatically. Through Sliding Dovetails For an even fancier look, you can create through sliding dovetails. These joints allow the end of the case's divider to be seen on the outside of the case. Start once again by plowing the dado as explained above. You could cut the socket portion of this j oint with a router, but there's much less chance of tear-out if you cut the socket using a handsaw. If you go with this hand-tool route, you should first cut the male portion of the joint (called the tail) on the end of your horizontal divider using the dovetail bit in your router table. The process is explained on the next page. Then use the tail to lay out the location of the socket on the case side. Now you can saw out the socket. Orient the saw to match the two tail sides, then cut in from 50 Popular Woodworking August 2004 |


