Popular Woodworking 2004-10 № 143, страница 66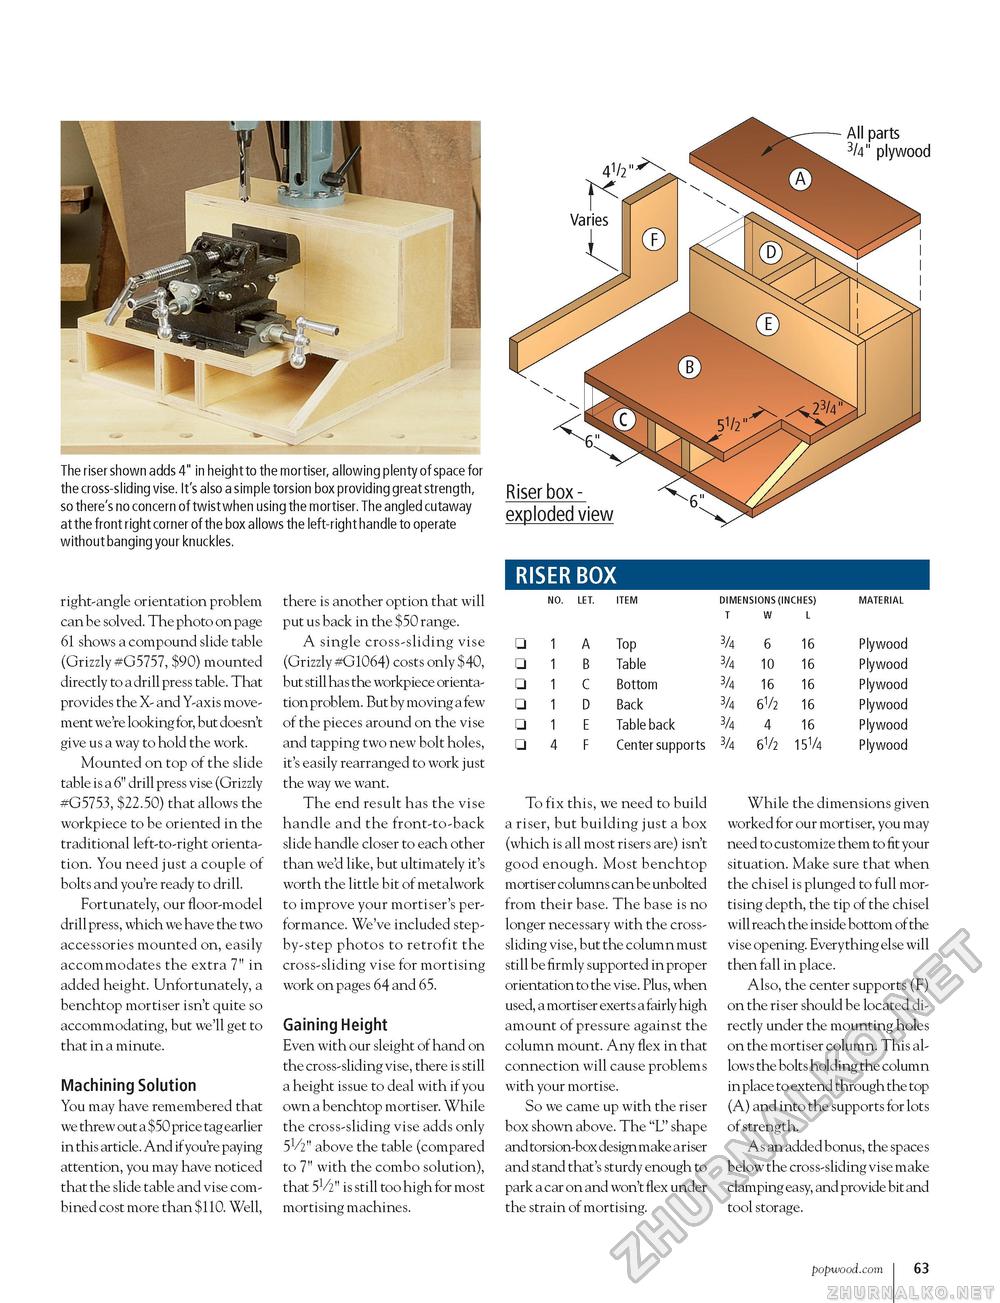
All parts 3/4" plywood The riser shown adds 4" in height to the mortiser, allowing plenty of space for the cross-sliding vise. It's also a simple torsion box providing great strength, so there's no concern of twist when using the mortiser. The angled cutaway at the front right corner of the box allows the left-right handle to operate without banging your knuckles. right-angle orientation problem can be solved. The photo on page 61 shows a compound slide table (Grizzly #G5757, $90) mounted directly to a drill press table. That provides the X- and Y-axis movement we're looking for, but doesn't give us a way to hold the work. Mounted on top of the slide table is a 6" drill press vise (Grizzly #G5753, $22.50) that allows the workpiece to be oriented in the traditional left-to-right orientation. You need just a couple of bolts and you're ready to drill. Fortunately, our floor-model drill press, which we have the two accessories mounted on, easily accommodates the extra 7" in added height. Unfortunately, a benchtop mortiser isn't quite so accommodating, but we'll get to that in a minute. Machining Solution You may have remembered that we threw out a $50 price tag earlier in this article. And if you're paying attention, you may have noticed that the slide table and vise combined cost more than $110. Well, there is another option that will put us back in the $50 range. A single cross-sliding vise (Grizzly #G1064) costs only $40, but still has the workpiece orientation problem. But by moving a few of the pieces around on the vise and tapping two new bolt holes, it's easily rearranged to work just the way we want. The end result has the vise handle and the front-to-back slide handle closer to each other than we'd like, but ultimately it's worth the little bit of metalwork to improve your mortiser's performance. We've included step-by-step photos to retrofit the cross-sliding vise for mortising work on pages 64 and 65. Gaining Height Even with our sleight of hand on the cross-sliding vise, there is still a height issue to deal with if you own a benchtop mortiser. While the cross-sliding vise adds only 51/2" above the table (compared to 7" with the combo solution), that 51/2" is still too high for most mortising machines. 4
exploded view RISER BOX □ □ □ □ □ □ To fix this, we need to build a riser, but building just a box (which is all most risers are) isn't good enough. Most benchtop mortiser columns can be unbolted from their base. The base is no longer necessary with the cross-sliding vise, but the column must still be firmly supported in proper orientation to the vise. Plus, when used, a mortiser exerts a fairly high amount of pressure against the column mount. Any flex in that connection will cause problems with your mortise. So we came up with the riser box shown above. The "L" shape and torsion-box design make a riser and stand that's sturdy enough to park a car on and won't flex under the strain of mortising. Plywood Plywood Plywood Plywood Plywood Plywood While the dimensions given worked for our mortiser, you may need to customize them to fit your situation. Make sure that when the chisel is plunged to full mortising depth, the tip of the chisel will reach the inside bottom of the vise opening. Everything else will then fall in place. Also, the center supports (F) on the riser should be located directly under the mounting holes on the mortiser column. This allows the bolts holding the column in place to extend through the top (A) and into the supports for lots of strength. As an added bonus, the spaces below the cross-sliding vise make clamping easy, and provide bit and tool storage. 4 popwood.com 63 |
||||||||||||||||||||||||||||||||||||||||


