Popular Woodworking 2004-11 № 144, страница 24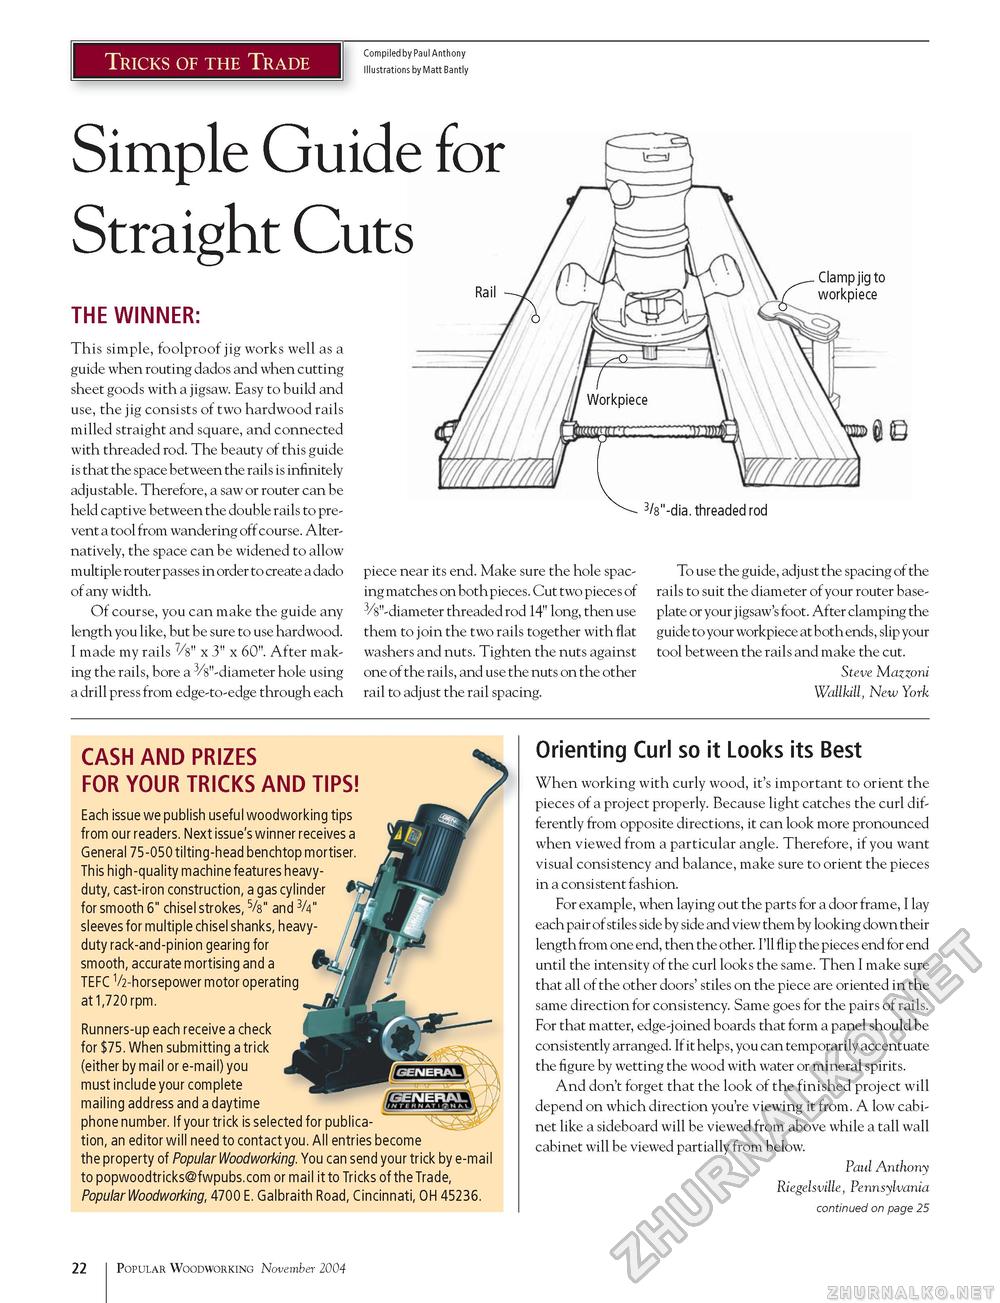
Tricks of the Trade Compiled by Paul Anthony Illustrations by Matt Bantly Simple Guide for Straight Cuts Rail - THE WINNER: Clamp jig to workpiece 3/8"-dia. threaded rod This simple, foolproof jig works well as a guide when routing dados and when cutting sheet goods with a jigsaw. Easy to build and use, the jig consists of two hardwood rails milled straight and square, and connected with threaded rod. The beauty of this guide is that the space between the rails is infinitely adjustable. Therefore, a saw or router can be held captive between the double rails to prevent a tool from wandering off course. Alternatively, the space can be widened to allow multiple router passes in order to create a dado of any width. Of course, you can make the guide any length you like, but be sure to use hardwood. I made my rails 7/8" x 3" x 60". After making the rails, bore a 3/8"-diameter hole using a drill press from edge-to-edge through each piece near its end. Make sure the hole spacing matches on both pieces. Cut two pieces of 3/8"-diameter threaded rod 14" long, then use them to join the two rails together with flat washers and nuts. Tighten the nuts against one of the rails, and use the nuts on the other rail to adjust the rail spacing. To use the guide, adjust the spacing of the rails to suit the diameter of your router baseplate or your j igsaw's foot. After clamping the guide to your workpiece at both ends, slip your tool between the rails and make the cut. Steve Mazzoni Wallkill, New York CASH AND PRIZES FOR YOUR TRICKS AND TIPS! Each issue we publish useful woodworking tips from our readers. Next issue's winner receives a General 75-050 tilting-head benchtop mortiser. This high-quality machine features heavy-duty, cast-iron construction, a gas cylinder for smooth 6" chisel strokes, 5/s" and 3/4" sleeves for multiple chisel shanks, heavy-duty rack-and-pinion gearing for smooth, accurate mortising and a TEFC V2-horsepower motor operating at 1,720 rpm. Runners-up each receive a check for $75. When submitting a trick (either by mail or e-mail) you must include your complete mailing address and a daytime phone number. If your trick is selected for publication, an editor will need to contact you. All entries become the property of Popular Woodworking. You can send your trick by e-mail to popwoodtricks@fwpubs.com or mail it to Tricks of the Trade, PopularWoodworking, 4700 E. Galbraith Road, Cincinnati, OH 45236. Orienting Curl so it Looks its Best When working with curly wood, it's important to orient the pieces of a project properly. Because light catches the curl differently from opposite directions, it can look more pronounced when viewed from a particular angle. Therefore, if you want visual consistency and balance, make sure to orient the pieces in a consistent fashion. For example, when laying out the parts for a door frame, I lay each pair of stiles side by side and view them by looking down their length from one end, then the other. I'll flip the pieces end for end until the intensity of the curl looks the same. Then I make sure that all of the other doors' stiles on the piece are oriented in the same direction for consistency. Same goes for the pairs of rails. For that matter, edge-joined boards that form a panel should be consistently arranged. If it helps, you can temporarily accentuate the figure by wetting the wood with water or mineral spirits. And don't forget that the look of the finished project will depend on which direction you're viewing it from. A low cabinet like a sideboard will be viewed from above while a tall wall cabinet will be viewed partially from below. Paul Anthony Riegelsville, Pennsylvania continued on page 25 22 Popular Woodworking November 2004 |


