Popular Woodworking 2004-12 № 145, страница 24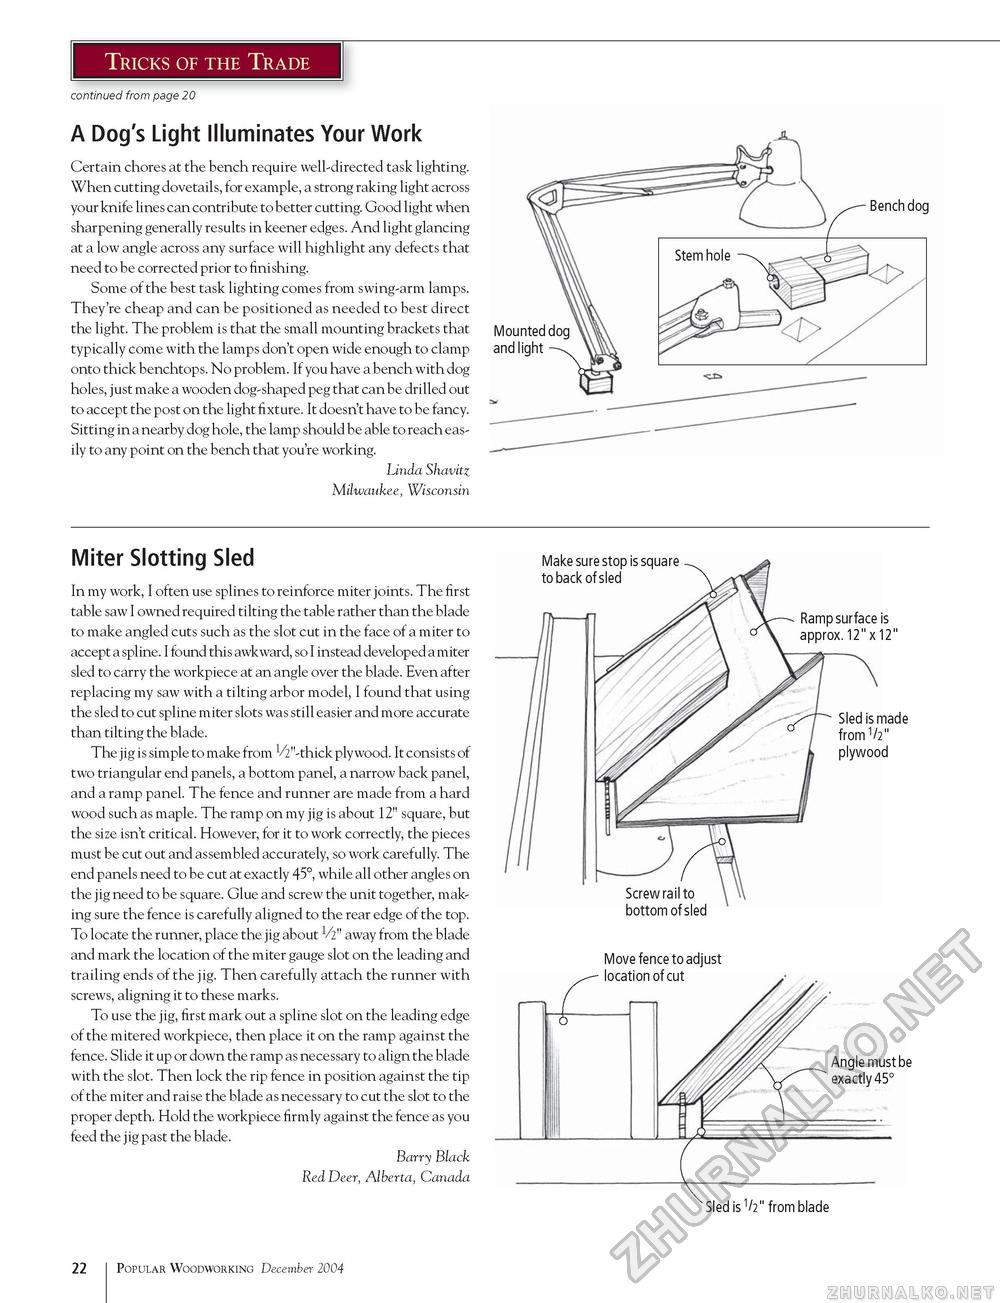
Tricks of the Trade continued from page 20 A Dog's Light Illuminates Your Work Certain chores at the bench require well-directed task lighting. When cutting dovetails, for example, a strong raking light across your knife lines can contribute to better cutting. Good light when sharpening generally results in keener edges. And light glancing at a low angle across any surface will highlight any defects that need to be corrected prior to finishing. Some of the best task lighting comes from swing-arm lamps. They're cheap and can be positioned as needed to best direct the light. The problem is that the small mounting brackets that typically come with the lamps don't open wide enough to clamp onto thick benchtops. No problem. If you have a bench with dog holes, just make a wooden dog-shaped peg that can be drilled out to accept the post on the light fixture. It doesn't have to be fancy. Sitting in a nearby dog hole, the lamp should be able to reach easily to any point on the bench that you're working. Linda Shavitz Milwaukee, Wisconsin Miter Slotting Sled In my work, I often use splines to reinforce miter joints. The first table saw I owned required tilting the table rather than the blade to make angled cuts such as the slot cut in the face of a miter to accept a spline. I found this awkward, so I instead developed a miter sled to carry the workpiece at an angle over the blade. Even after replacing my saw with a tilting arbor model, I found that using the sled to cut spline miter slots was still easier and more accurate than tilting the blade. The jig is simple to make from V2"-thick plywood. It consists of two triangular end panels, a bottom panel, a narrow back panel, and a ramp panel. The fence and runner are made from a hard wood such as maple. The ramp on my jig is about 12" square, but the size isn't critical. However, for it to work correctly, the pieces must be cut out and assembled accurately, so work carefully. The end panels need to be cut at exactly 45°, while all other angles on the jig need to be square. Glue and screw the unit together, making sure the fence is carefully aligned to the rear edge of the top. To locate the runner, place the jig about V2" away from the blade and mark the location of the miter gauge slot on the leading and trailing ends of the jig. Then carefully attach the runner with screws, aligning it to these marks. To use the jig, first mark out a spline slot on the leading edge of the mitered workpiece, then place it on the ramp against the fence. Slide it up or down the ramp as necessary to align the blade with the slot. Then lock the rip fence in position against the tip of the miter and raise the blade as necessary to cut the slot to the proper depth. Hold the workpiece firmly against the fence as you feed the jig past the blade. Barry Black Red Deer, Alberta, Canada Move fence to adjust 22 100 Popular Woodworking December 2004 |


