Popular Woodworking 2005-04 № 147, страница 35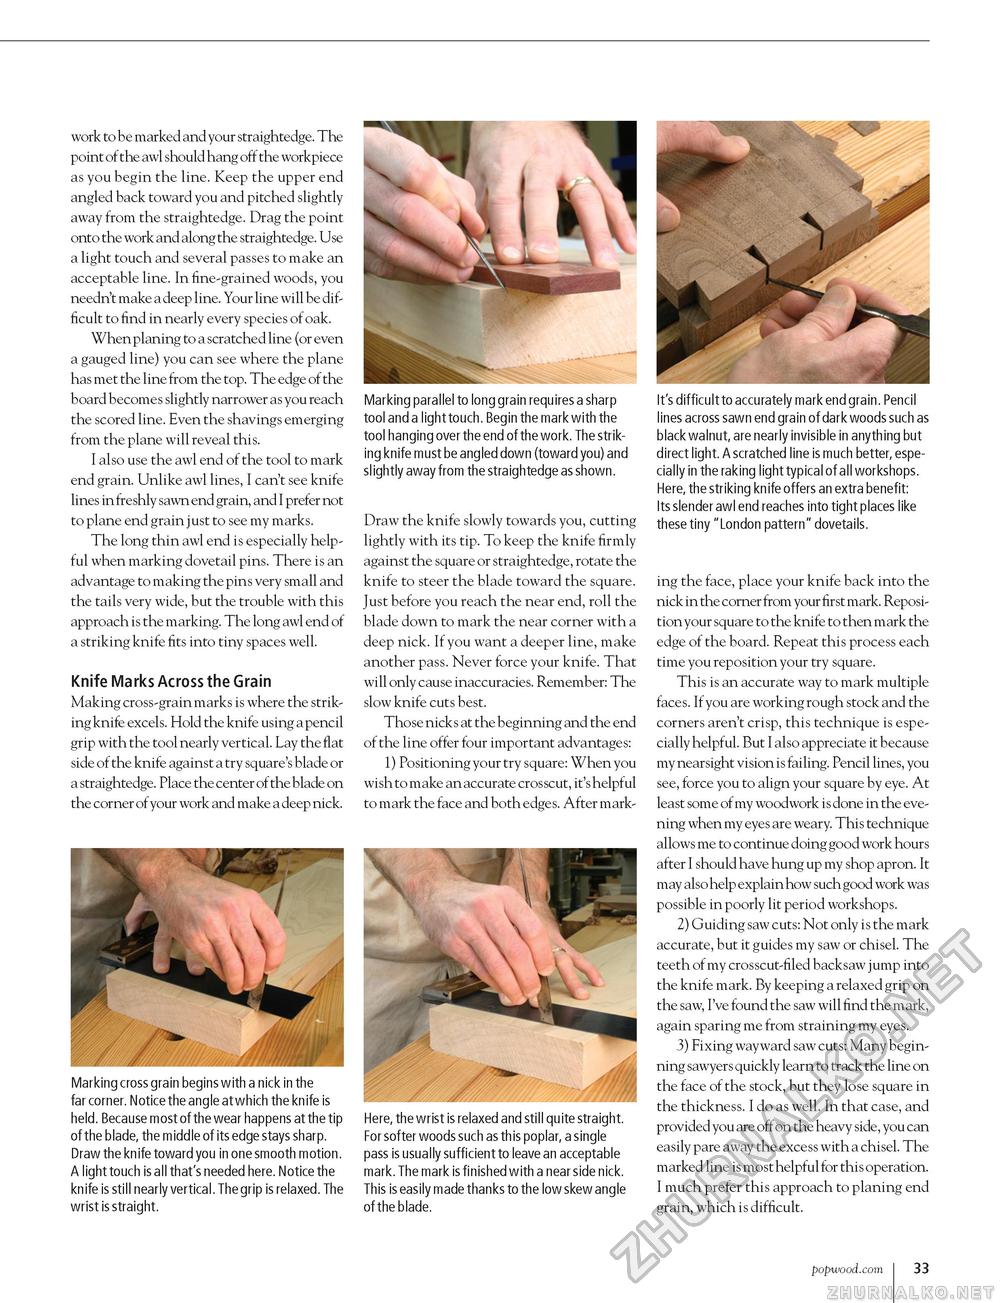
work to be marked and your straightedge. The point of the awl should hang off the workpiece as you begin the line. Keep the upper end angled back toward you and pitched slightly away from the straightedge. Drag the point onto the work and along the straightedge. Use a light touch and several passes to make an acceptable line. In fine-grained woods, you needn't make a deep line. Your line will be difficult to find in nearly every species of oak. When planing to a scratched line (or even a gauged line) you can see where the plane has met the line from the top. The edge of the board becomes slightly narrower as you reach the scored line. Even the shavings emerging from the plane will reveal this. I also use the awl end of the tool to mark end grain. Unlike awl lines, I can't see knife lines in freshly sawn end grain, and I prefer not to plane end grain just to see my marks. The long thin awl end is especially helpful when marking dovetail pins. There is an advantage to making the pins very small and the tails very wide, but the trouble with this approach is the marking. The long awl end of a striking knife fits into tiny spaces well. Knife Marks Across the Grain Making cross-grain marks is where the striking knife excels. Hold the knife using a pencil grip with the tool nearly vertical. Lay the flat side of the knife against a try square's blade or a straightedge. Place the center of the blade on the corner of your work and make a deep nick. Marking cross grain begins with a nick in the far corner. Notice the angle at which the knife is held. Because most of the wear happens at the tip of the blade, the middle of its edge stays sharp. Draw the knife toward you in one smooth motion. A light touch is all that's needed here. Notice the knife is still nearly vertical. The grip is relaxed. The wrist is straight. Marking parallel to long grain requires a sharp tool and a light touch. Begin the mark with the tool hanging over the end of the work. The striking knife must be angled down (toward you) and slightly away from the straightedge as shown. Draw the knife slowly towards you, cutting lightly with its tip. To keep the knife firmly against the square or straightedge, rotate the knife to steer the blade toward the square. Just before you reach the near end, roll the blade down to mark the near corner with a deep nick. If you want a deeper line, make another pass. Never force your knife. That will only cause inaccuracies. Remember: The slow knife cuts best. Those nicks at the beginning and the end of the line offer four important advantages: 1) Positioning your try square: When you wish to make an accurate crosscut, it's helpful to mark the face and both edges. After mark- J>~ Here, the wrist is relaxed and still quite straight. For softer woods such as this poplar, a single pass is usually sufficient to leave an acceptable mark. The mark is finished with a near side nick. This is easily made thanks to the low skew angle of the blade. It's difficult to accurately mark end grain. Pencil lines across sawn end grain of dark woods such as black walnut, are nearly invisible in anything but direct light. A scratched line is much better, especially in the raking light typical of all workshops. Here, the striking knife offers an extra benefit: Its slender awl end reaches into tight places like these tiny "London pattern" dovetails. ing the face, place your knife back into the nick in the corner from your first mark. Reposition your square to the knife to then mark the edge of the board. Repeat this process each time you reposition your try square. This is an accurate way to mark multiple faces. If you are working rough stock and the corners aren't crisp, this technique is especially helpful. But I also appreciate it because my nearsight vision is failing. Pencil lines, you see, force you to align your square by eye. At least some of my woodwork is done in the evening when my eyes are weary. This technique allows me to continue doing good work hours after I should have hung up my shop apron. It may also help explain how such good work was possible in poorly lit period workshops. 2) Guiding saw cuts: Not only is the mark accurate, but it guides my saw or chisel. The teeth of my crosscut-filed backsaw jump into the knife mark. By keeping a relaxed grip on the saw, I've found the saw will find the mark, again sparing me from straining my eyes. 3) Fixing wayward saw cuts: Many beginning sawyers quickly learn to track the line on the face of the stock, but they lose square in the thickness. I do as well. In that case, and provided you are off on the heavy side, you can easily pare away the excess with a chisel. The marked line is most helpful for this operation. I much prefer this approach to planing end grain, which is difficult. popwood.com 33 |


