Popular Woodworking 2006-02 № 153, страница 43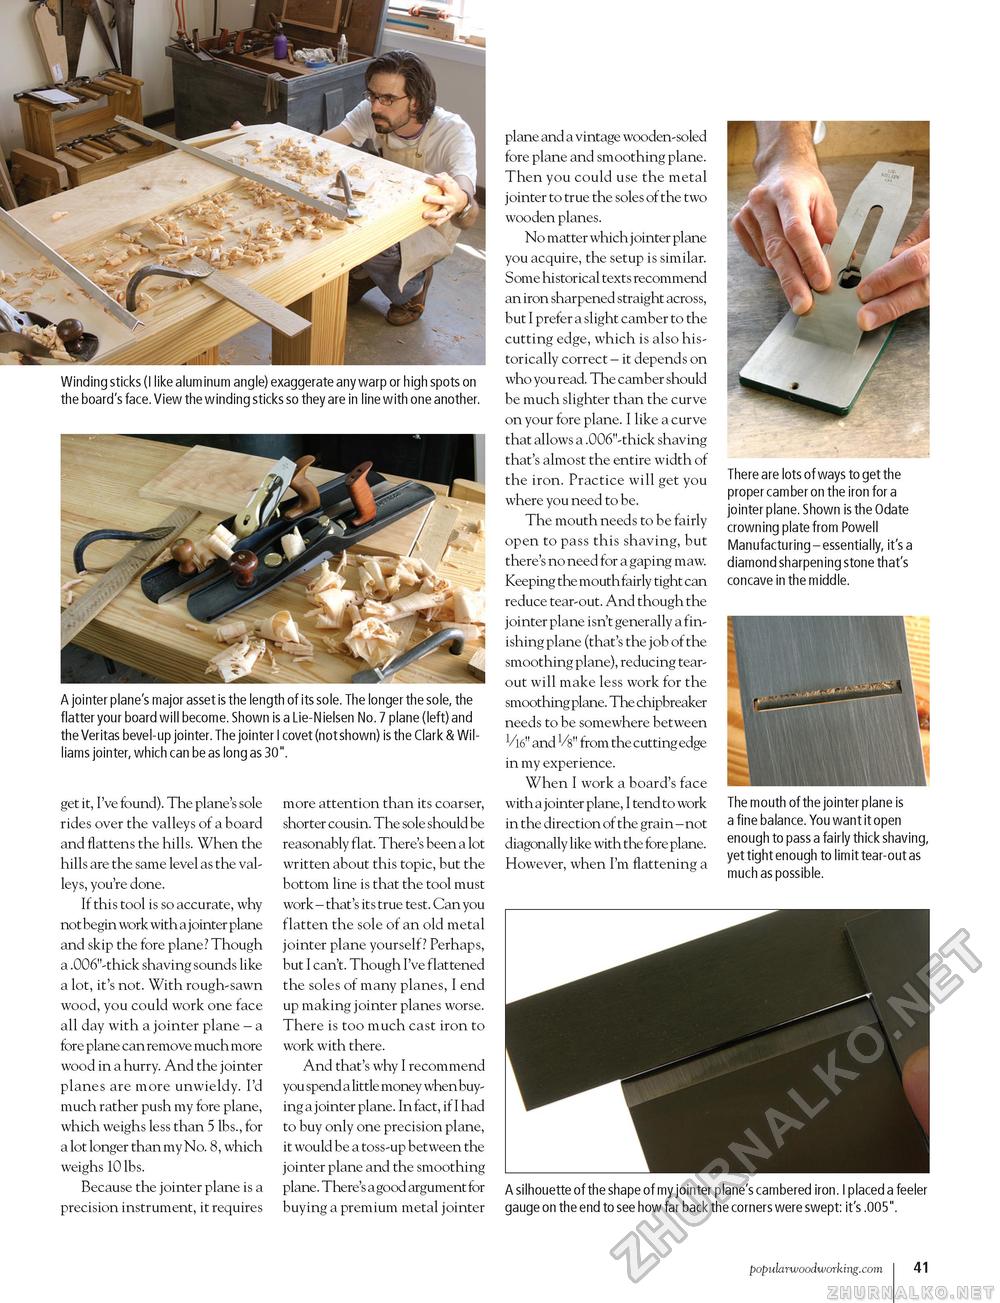
Winding sticks (I like alum inum angle) exaggerate any warp or high spots on the board's face. View the winding sticks so they are in line with one another. A jointer plane's major asset is the length of its sole. The longer the sole, the flatter your board will become. Shown is a Lie-Nielsen No. 7 plane (left) and the Veritas bevel-up jointer. The jointer I covet (not shown) is the Clark & Williams jointer, which can be as long as 30". get it, I've found). The plane's sole rides over the valleys of a board and flattens the hills. When the hills are the same level as the valleys, you're done. If this tool is so accurate, why not begin work with a jointer plane and skip the fore plane? Though a .006"-thick shaving sounds like a lot, it's not. With rough-sawn wood, you could work one face all day with a jointer plane - a fore plane can remove much more wood in a hurry. And the jointer planes are more unwieldy. I'd much rather push my fore plane, which weighs less than 5 lbs., for a lot longer than my No. 8, which weighs 10 lbs. Because the jointer plane is a precision instrument, it requires more attention than its coarser, shorter cousin. The sole should be reasonably flat. There's been a lot written about this topic, but the bottom line is that the tool must work - that's its true test. Can you flatten the sole of an old metal jointer plane yourself? Perhaps, but I can't. Though I've flattened the soles of many planes, I end up making jointer planes worse. There is too much cast iron to work with there. And that's why I recommend you spend a little money when buying a jointer plane. In fact, if I had to buy only one precision plane, it would be a toss-up between the jointer plane and the smoothing plane. There's a good argument for buying a premium metal jointer plane and a vintage wooden-soled fore plane and smoothing plane. Then you could use the metal jointer to true the soles of the two wooden planes. No matter which jointer plane you acquire, the setup is similar. Some historical texts recommend an iron sharpened straight across, but I prefer a slight camber to the cutting edge, which is also historically correct - it depends on who you read. The camber should be much slighter than the curve on your fore plane. I like a curve that allows a .006"-thick shaving that's almost the entire width of the iron. Practice will get you where you need to be. The mouth needs to be fairly open to pass this shaving, but there's no need for a gaping maw. Keeping the mouth fairly tight can reduce tear-out. And though the jointer plane isn't generally a finishing plane (that's the job of the smoothing plane), reducing tear-out will make less work for the smoothing plane. The chipbreaker needs to be somewhere between 116" and V8" from the cutting edge in my experience. When I work a board's face with a jointer plane, I tend to work in the direction of the grain - not diagonally like with the fore plane. However, when I'm flattening a There are lots of ways to get the proper camber on the iron for a jointer plane. Shown is the Odate crowning plate from Powell Manufacturing - essentially, it's a diamond sharpening stone that's concave in the middle. The mouth of the jointer plane is a fine balance. You want it open enough to pass a fairly thick shaving, yet tight enough to limit tear-out as much as possible. A silhouette of the shape of my jointer plane's cambered iron. I placed a feeler gauge on the end to see how far back the corners were swept: it's .005". popularwoodworking.com I 103 |


