Popular Woodworking 2006-02 № 153, страница 82
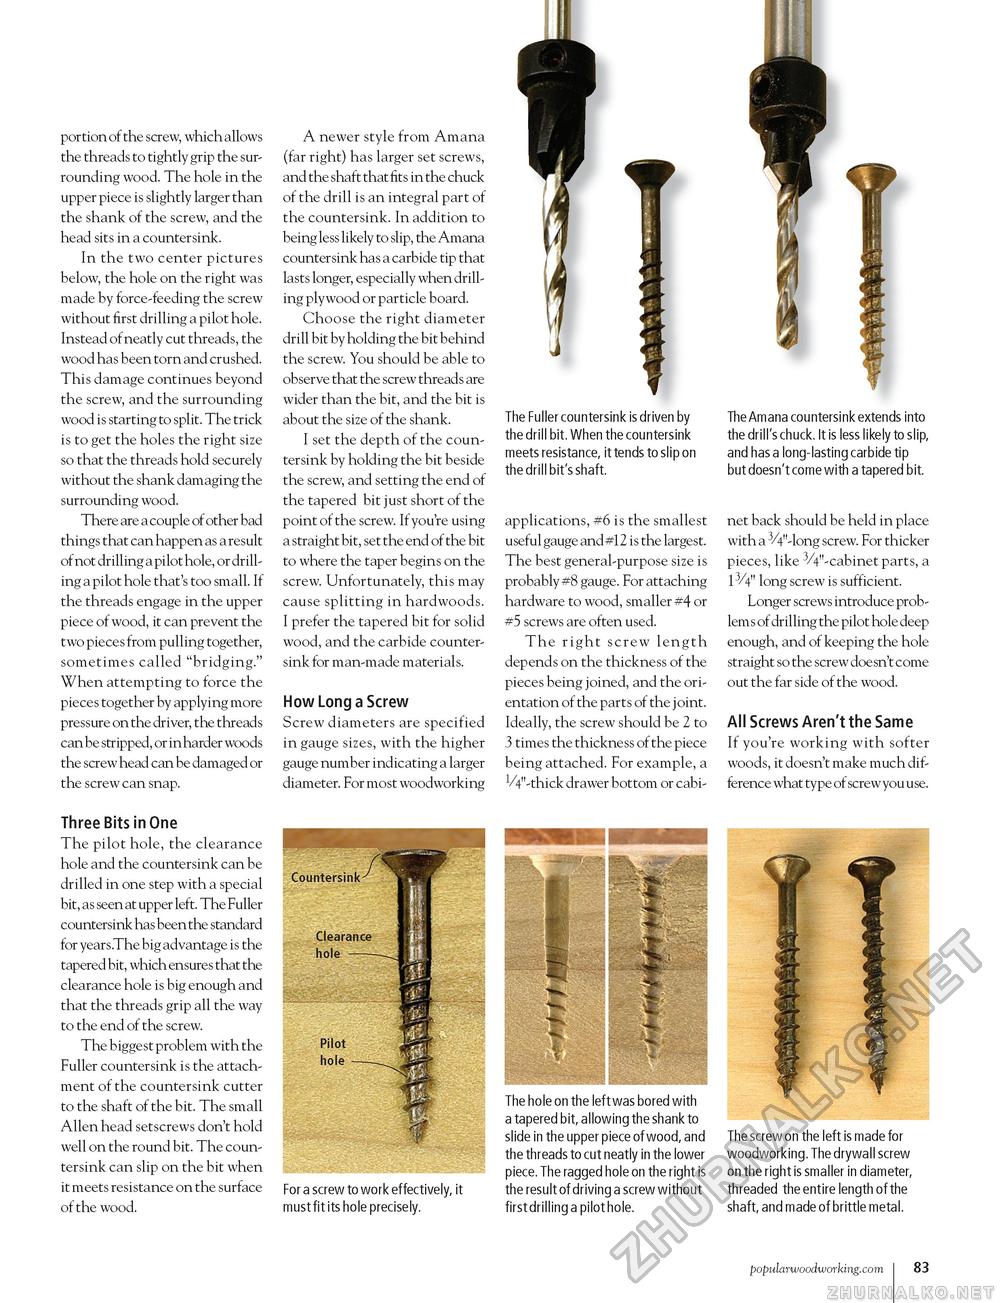
portion of the screw, which allows the threads to tightly grip the surrounding wood. The hole in the upper piece is slightly larger than the shank of the screw, and the head sits in a countersink. In the two center pictures below, the hole on the right was made by force-feeding the screw without first drilling a pilot hole. Instead of neatly cut threads, the wood has been torn and crushed. This damage continues beyond the screw, and the surrounding wood is starting to split. The trick is to get the holes the right size so that the threads hold securely without the shank damaging the surrounding wood. There are a couple of other bad things that can happen as a result of not drilling a pilot hole, or drilling a pilot hole that's too small. If the threads engage in the upper piece of wood, it can prevent the two pieces from pulling together, sometimes called "bridging." When attempting to force the pieces together by applying more pressure on the driver, the threads can be stripped, or in harder woods the screw head can be damaged or the screw can snap. Three Bits in One The pilot hole, the clearance hole and the countersink can be drilled in one step with a special bit, as seen at upper left. The Fuller countersink has been the standard for years.The big advantage is the tapered bit, which ensures that the clearance hole is big enough and that the threads grip all the way to the end of the screw. The b igge st problem with the Fuller countersink is the attachment of the countersink cutter to the shaft of the bit. The small Allen head setscrews don't hold well on the round bit. The countersink can slip on the bit when it meets resistance on the surface of the wood. A newer style from Amana (far right) has larger set screws, and the shaft that fits in the chuck of the drill is an integral part of the countersink. In addition to being less likely to slip, the Amana countersink has a carbide tip that lasts longer, especially when drilling plywood or particle board. Choose the right diameter drill bit by holding the bit behind the screw. You should be able to observe that the screw threads are wider than the bit, and the bit is about the size of the shank. I set the depth of the countersink by holding the bit beside the screw, and setting the end of the tapered bit just short of the point of the screw. If you're using a straight bit, set the end of the bit to where the taper begins on the screw. Unfortunately, this may cause splitting in hardwoods. I prefer the tapered bit for solid wood, and the carbide countersink for man-made materials. How Long a Screw Screw diameters are specified in gauge sizes, with the higher gauge number indicating a larger diameter. For most woodworking For a screw to work effectively, it must fit its hole precisely. The Fuller countersink is driven by the drill bit. When the countersink meets resistance, it tends to slip on the drill bit's shaft. applications, #6 is the smallest useful gauge and #12 is the largest. The best general-purpose size is probably #8 gauge. For attaching hardware to wood, smaller #4 or #5 screws are often used. The right screw length depends on the thickness of the pieces being joined, and the orientation of the parts of the joint. Ideally, the screw should be 2 to 3 times the thickness of the piece being attached. For example, a V4"-thick drawer bottom or cabi- The hole on the left was bored with a tapered bit, allowing the shank to slide in the upper piece of wood, and the threads to cut neatly in the lower piece. The ragged hole on the right is the result of driving a screw without first drilling a pilot hole. The Amana countersink extends into the drill's chuck. It is less likely to slip, and has a long-lasting carbide tip but doesn't come with a tapered bit. net back should be held in place with a 3/4"-long screw. For thicker pieces, like 3/4"-cabinet parts, a 13/4" long screw is sufficient. Longer screws introduce problem s of drilling the pilot hole deep enough, and of keeping the hole straight so the screw doe sn't come out the far side of the wood. All Screws Aren't the Same If you're working with softer woods, it doesn't make much difference what type of screw you use. The screw on the left is made for woodworking. The drywall screw on the right is smaller in diameter, threaded the entire length of the shaft, and made of brittle metal. popularwoodworking.com I 103 |


