Popular Woodworking 2006-04 № 154, страница 87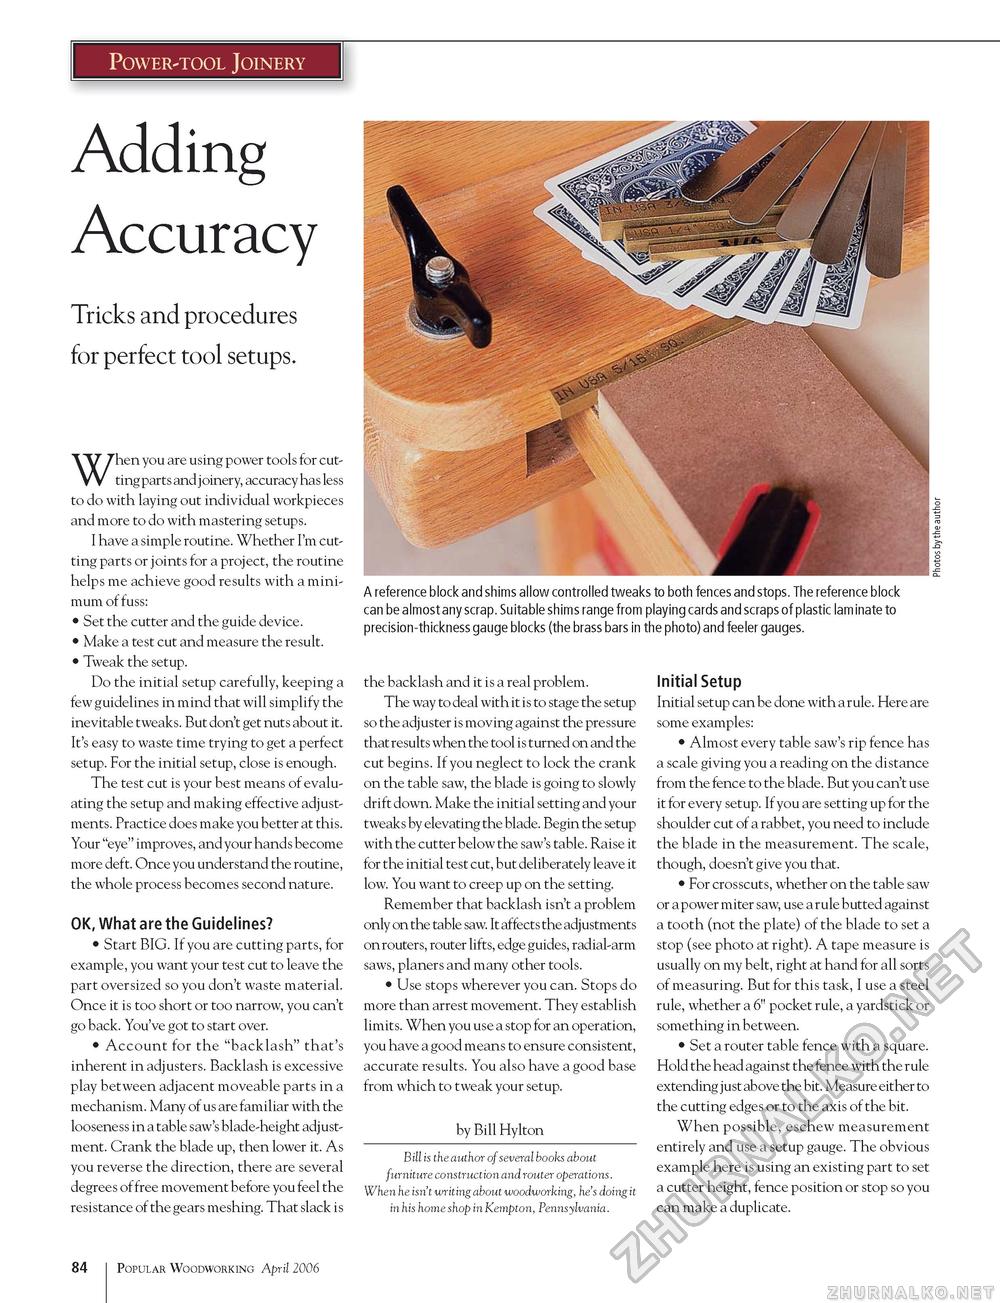
Power-tool Joinery AddingAccuracyTricks and procedures for perfect tool setups. A reference block and shims allow controlled tweaks to both fences and stops. The reference block can be almost any scrap. Suitable shims range from playing cards and scraps of plastic laminate to precision-thickness gauge blocks (the brass bars in the photo) and feeler gauges. When you are using power tools for cutting parts and joinery, accuracy has less to do with laying out individual workpieces and more to do with mastering setups. I have a simple routine. Whether I'm cutting parts or joints for a project, the routine helps me achieve good results with a minimum of fuss: • Set the cutter and the guide device. • Make a test cut and measure the result. • Tweak the setup. Do the initial setup carefully, keeping a few guidelines in mind that will simplify the inevitable tweaks. But don't get nuts about it. It's easy to waste time trying to get a perfect setup. For the initial setup, close is enough. The test cut is your best means of evaluating the setup and making effective adjustments. Practice does make you better at this. Your "eye" improves, and your hands become more deft. Once you understand the routine, the whole process becomes second nature. OK, What are the Guidelines? • Start BIG. If you are cutting parts, for example, you want your test cut to leave the part oversized so you don't waste material. Once it is too short or too narrow, you can't go back. You've got to start over. • Account for the "backlash" that's inherent in adjusters. Backlash is excessive play between adjacent moveable parts in a mechanism. Many of us are familiar with the looseness in a table saw's blade-height adjustment. Crank the blade up, then lower it. As you reverse the direction, there are several degrees of free movement before you feel the resistance of the gears meshing. That slack is the backlash and it is a real problem. The way to deal with it is to stage the setup so the adjuster is moving against the pressure that results when the tool is turned on and the cut begins. If you neglect to lock the crank on the table saw, the blade is going to slowly drift down. Make the initial setting and your tweaks by elevating the blade. Begin the setup with the cutter below the saw's table. Raise it for the initial test cut, but deliberately leave it low. You want to creep up on the setting. Remember that backlash isn't a problem only on the table saw. It affects the adjustments on routers, router lifts, edge guides, radial-arm saws, planers and many other tools. • Use stops wherever you can. Stops do more than arrest movement. They establish limits. When you use a stop for an operation, you have a good means to ensure consistent, accurate results. You also have a good base from which to tweak your setup. by Bill Hylton Bill is the author of several books about furniture construction and router operations. When he isn't writing about woodworking, he's doing it in his home shop in Kempton, Pennsylvania. Initial Setup Initial setup can be done with a rule. Here are some examples: • Almost every table saw's rip fence has a scale giving you a reading on the distance from the fence to the blade. But you can't use it for every setup. If you are setting up for the shoulder cut of a rabbet, you need to include the blade in the measurement. The scale, though, doesn't give you that. • For crosscuts, whether on the table saw or a power miter saw, use a rule butted against a tooth (not the plate) of the blade to set a stop (see photo at right). A tape measure is usually on my belt, right at hand for all sorts of measuring. But for this task, I use a steel rule, whether a 6" pocket rule, a yardstick or something in between. • Set a router table fence with a square. Hold the head against the fence with the rule extending just above the bit. Measure either to the cutting edges or to the axis of the bit. When possible, eschew measurement entirely and use a setup gauge. The obvious example here is using an existing part to set a cutter height, fence position or stop so you can make a duplicate. 84 Popular Woodworking April 2006 |


