Popular Woodworking 2007-08 № 163, страница 60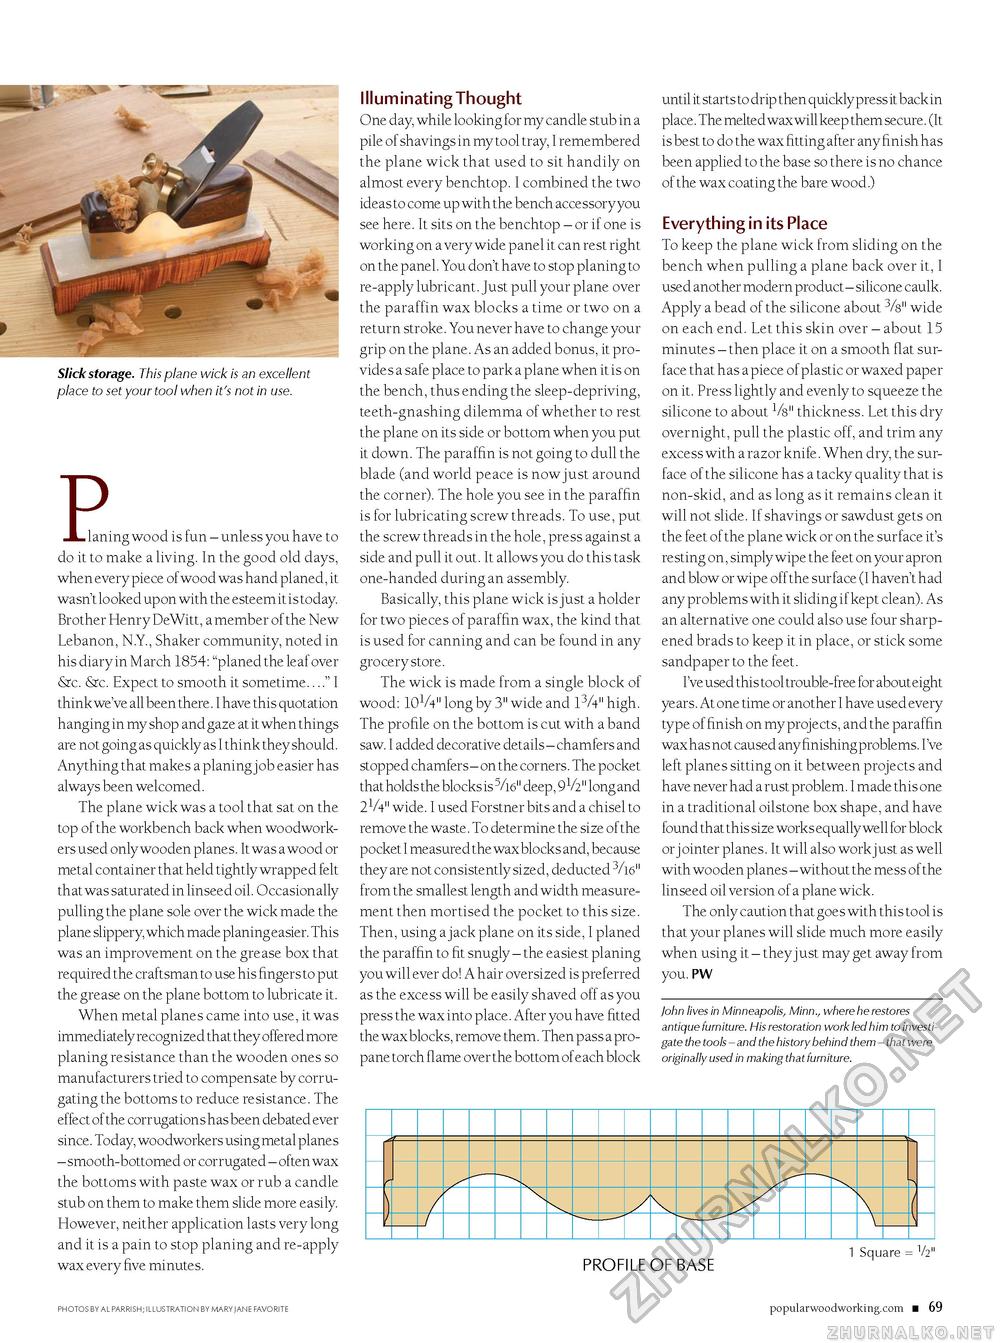
Slick storage. This plane wick is an excellent place to set your tool when it's not in use. P lanii laning wood is fun - unless you have to do it to make a living. In the good old days, when every piece of wood was hand planed, it wasn't looked upon with the esteem it is today. Brother Henry DeWitt, a member of the New Lebanon, N.Y., Shaker community, noted in his diary in March 1854: "planed the leaf over &c. &c. Expect to smooth it sometime...." I think we've all been there. I have this quotation hanging in my shop and gaze at it when things are not going as quickly as I think they should. Anything that makes a planing job easier has always been welcomed. The plane wick was a tool that sat on the top of the workbench back when woodworkers used only wooden planes. It was a wood or metal container that held tightly wrapped felt that was saturated in linseed oil. Occasionally pulling the plane sole over the wick made the plane slippery, which made planing easier. This was an improvement on the grease box that required the craftsman to use his fingers to put the grease on the plane bottom to lubricate it. When metal planes came into use, it was immediately recognized that they offered more planing resistance than the wooden ones so manufacturers tried to compensate by corrugating the bottoms to reduce resistance. The effect of the corrugations has been debated ever since. Today, woodworkers using metal planes - smooth-bottomed or corrugated - often wax the bottoms with paste wax or rub a candle stub on them to make them slide more easily. However, neither application lasts very long and it is a pain to stop planing and re-apply wax every five minutes. Illuminating Thought One day, while looking for my candle stub in a pile of shavings in my tool tray, I remembered the plane wick that used to sit handily on almost every benchtop. I combined the two ideas to come up with the bench accessory you see here. It sits on the benchtop - or if one is working on a very wide panel it can rest right on the panel. You don't have to stop planing to re-apply lubricant. Just pull your plane over the paraffin wax blocks a time or two on a return stroke. You never have to change your grip on the plane. As an added bonus, it provides a safe place to park a plane when it is on the bench, thus ending the sleep-depriving, teeth-gnashing dilemma of whether to rest the plane on its side or bottom when you put it down. The paraffin is not going to dull the blade (and world peace is now just around the corner). The hole you see in the paraffin is for lubricating screw threads. To use, put the screw threads in the hole, press against a side and pull it out. It allows you do this task one-handed during an assembly. Basically, this plane wick is just a holder for two pieces of paraffin wax, the kind that is used for canning and can be found in any grocery store. The wick is made from a single block of wood: 10V4" long by 3" wide and 13/4" high. The profile on the bottom is cut with a band saw. I added decorative details - chamfers and stopped chamfers - on the corners. The pocket that holds the blocks is 5/l6" deep, 9V2" long and 2V4" wide. I used Forstner bits and a chisel to remove the waste. To determine the size of the pocket I measured the wax blocks and, because they are not consistently sized, deducted 3/16" from the smallest length and width measurement then mortised the pocket to this size. Then, using a jack plane on its side, I planed the paraffin to fit snugly - the easiest planing you will ever do! A hair oversized is preferred as the excess will be easily shaved off as you press the wax into place. After you have fitted the wax blocks, remove them. Then pass a propane torch flame over the bottom of each block until it starts to drip then quickly press it back in place. The melted wax will keep them secure. (It is best to do the wax fitting after any finish has been applied to the base so there is no chance of the wax coating the bare wood.) Everything in its Place To keep the plane wick from sliding on the bench when pulling a plane back over it, I used another modern product - silicone caulk. Apply a bead of the silicone about 3/8" wide on each end. Let this skin over - about 15 minutes - then place it on a smooth flat surface that has a piece of plastic or waxed paper on it. Press lightly and evenly to squeeze the silicone to about 1/8" thickness. Let this dry overnight, pull the plastic off, and trim any excess with a razor knife. When dry, the surface of the silicone has a tacky quality that is non-skid, and as long as it remains clean it will not slide. If shavings or sawdust gets on the feet of the plane wick or on the surface it's resting on, simply wipe the feet on your apron and blow or wipe off the surface (I haven't had any problems with it sliding if kept clean). As an alternative one could also use four sharpened brads to keep it in place, or stick some sandpaper to the feet. I've used this tool trouble-free for about eight years. At one time or another I have used every type of finish on my projects, and the paraffin wax has not caused any finishing problems. I've left planes sitting on it between projects and have never had a rust problem. I made this one in a traditional oilstone box shape, and have found that this size works equally well for block or jointer planes. It will also work just as well with wooden planes - without the mess of the linseed oil version of a plane wick. The only caution that goes with this tool is that your planes will slide much more easily when using it - they just may get away from you. PW fohn lives in Minneapolis, Minn., where he restores antique furniture. His restoration work led him to investigate the tools - and the history behind them - that were originally used in making that furniture. profile of base 1 Square = photos by al parrish; illustration by mary jane favorite popularwoodworking.com ■ 69 |


