Popular Woodworking 2007-11 № 165, страница 101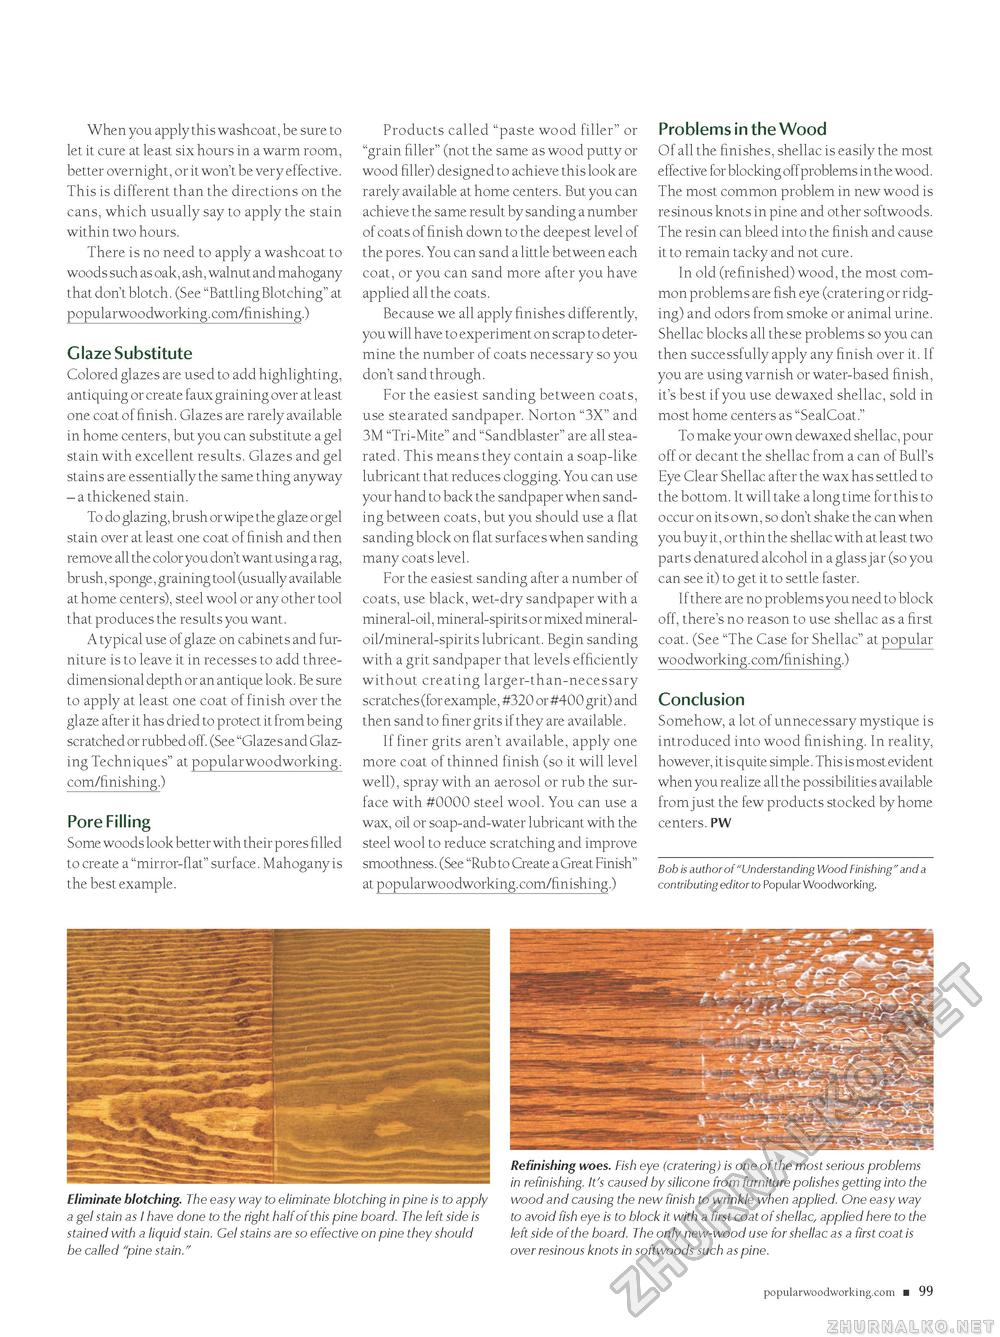
When you apply this washcoat, be sure to let it cure at least six hours in a warm room, better overnight, or it won't be very effective. This is different than the directions on the cans, which usually say to apply the stain within two hours. There is no need to apply a washcoat to woods such as oak, ash, walnut and mahogany that don't blotch. (See "Battling Blotching" at popularwoodworking.com/finishing.) Glaze Substitute Colored glazes are used to add highlighting, antiquing or create faux graining over at least one coat of finish. Glazes are rarely available in home centers, but you can substitute a gel stain with excellent results. Glazes and gel stains are essentially the same thing anyway - a thickened stain. To do glazing, brush or wipe the glaze or gel stain over at least one coat of finish and then remove all the color you don't want using a rag, brush, sponge, graining tool (usually available at home centers), steel wool or any other tool that produces the results you want. A typical use of glaze on cabinets and furniture is to leave it in recesses to add three-dimensional depth or an antique look. Be sure to apply at least one coat of finish over the glaze after it has dried to protect it from being scratched or rubbed off. (See "Glazes and Glazing Techniques" at popularwoodworking. com/finishing.) Pore Filling Some woods look better with their pores filled to create a "mirror-flat" surface. Mahogany is the best example. Products called "paste wood filler" or "grain filler" (not the same as wood putty or wood filler) designed to achieve this look are rarely available at home centers. But you can achieve the same result by sanding a number of coats of finish down to the deepest level of the pores. You can sand a little between each coat, or you can sand more after you have applied all the coats. Because we all apply finishes differently, you will have to experiment on scrap to determine the number of coats necessary so you don't sand through. For the easiest sanding between coats, use stearated sandpaper. Norton "3X" and 3M "Tri-Mite" and "Sandblaster" are all stearated. This means they contain a soap-like lubricant that reduces clogging. You can use your hand to back the sandpaper when sanding between coats, but you should use a flat sanding block on flat surfaces when sanding many coats level. For the easiest sanding after a number of coats, use black, wet-dry sandpaper with a mineral-oil, mineral-spirits or mixed mineral-oil/mineral-spirits lubricant. Begin sanding with a grit sandpaper that levels efficiently without creating larger-than-necessary scratches (for example, #320 or #400 grit) and then sand to finer grits if they are available. If finer grits aren't available, apply one more coat of thinned finish (so it will level well), spray with an aerosol or rub the surface with #0000 steel wool. You can use a wax, oil or soap-and-water lubricant with the steel wool to reduce scratching and improve smoothness. (See "Rub to Create a Great Finish" at popularwoodworking.com/finishing.) Problems in the Wood Of all the finishes, shellac is easily the most effective for blocking offproblems in the wood. The most common problem in new wood is resinous knots in pine and other softwoods. The resin can bleed into the finish and cause it to remain tacky and not cure. In old (refinished) wood, the most common problems are fish eye (cratering or ridging) and odors from smoke or animal urine. Shellac blocks all these problems so you can then successfully apply any finish over it. If you are using varnish or water-based finish, it's best if you use dewaxed shellac, sold in most home centers as "SealCoat." To make your own dewaxed shellac, pour off or decant the shellac from a can of Bull's Eye Clear Shellac after the wax has settled to the bottom. It will take a long time for this to occur on its own, so don't shake the can when you buy it, or thin the shellac with at least two parts denatured alcohol in a glass jar (so you can see it) to get it to settle faster. If there are no problems you need to block off, there's no reason to use shellac as a first coat. (See "The Case for Shellac" at popular woodworking.com/finishing.) Conclusion Somehow, a lot of unnecessary mystique is introduced into wood finishing. In reality, however, it is quite simple. This is most evident when you realize all the possibilities available from just the few products stocked by home centers. PW Bob is author of "Understanding Wood Finishing" and a contributing editor to Popular Woodworking. Eliminate blotching. The easy way to eliminate blotching in pine is to apply a gel stain as I have done to the right half of this pine board. The left side is stained with a liquid stain. Gel stains are so effective on pine they should be called "pine stain." Refinishing woes. Fish eye (cratering) is one of the most serious problems in refinishing. It's caused by silicone from furniture polishes getting into the wood and causing the new finish to wrinkle when applied. One easy way to avoid fish eye is to block it with a first coat of shellac, applied here to the left side of the board. The only new-wood use for shellac as a first coat is over resinous knots in softwoods such as pine. popularwoodworking.com ■ 99 |


