Popular Woodworking 2008-04 № 168, страница 22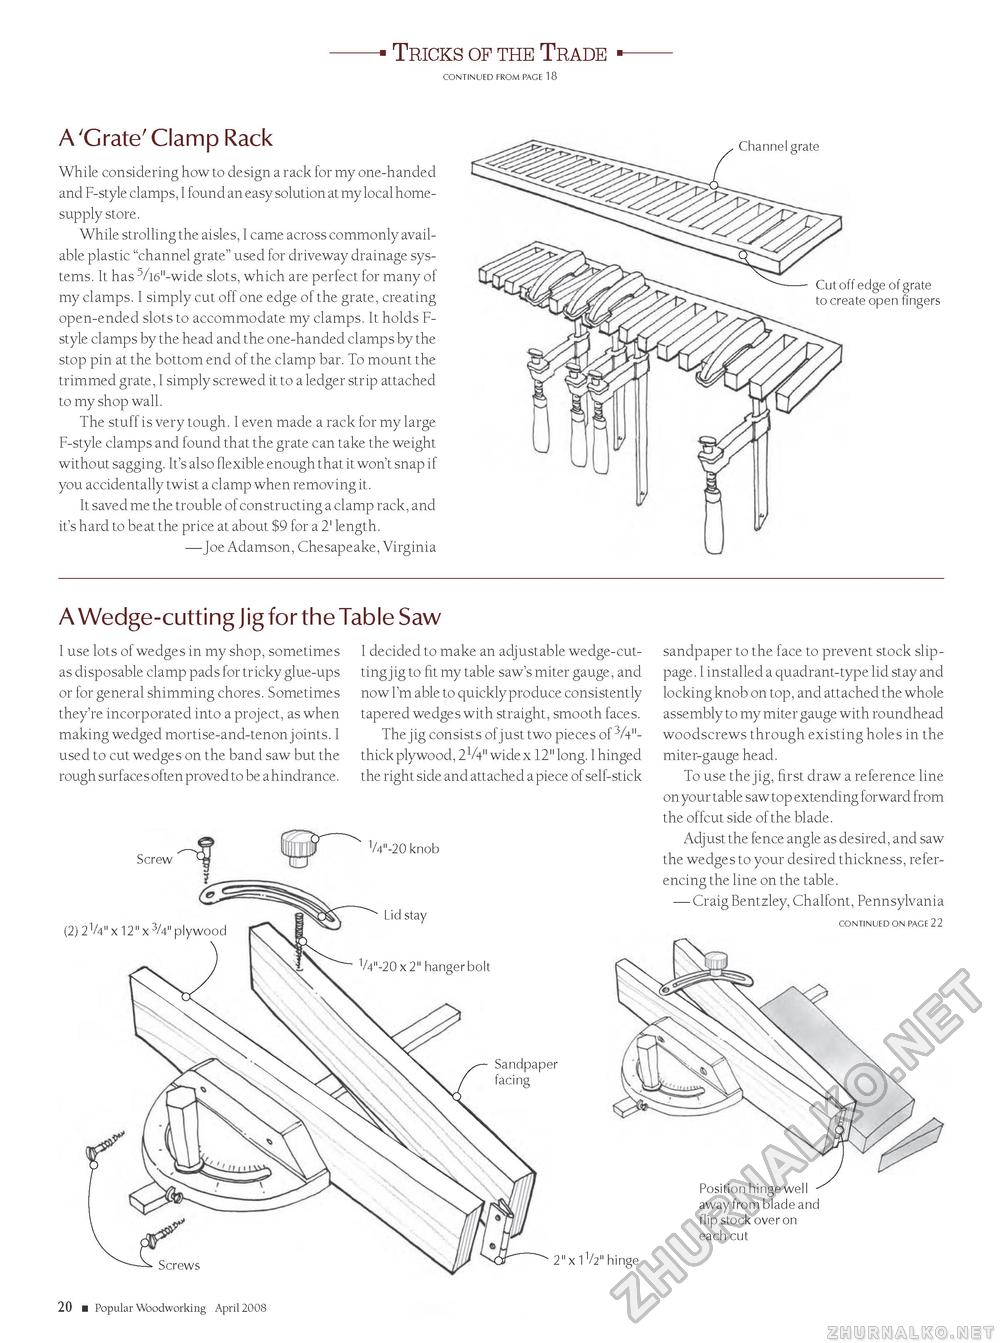
Tricks of the Trade CONTINUED FROM PAGE 1 8 A 'Grate' Clamp Rack Channel grate While considering how to design a rack for my one-handed and F-style clamps, I found an easy solution at my local home-supply store. While strolling the aisles, I came across commonly available plastic "channel grate" used for driveway drainage systems. It has 5/l6"-wide slots, which are perfect for many of my clamps. I simply cut off one edge of the grate, creating open-ended slots to accommodate my clamps. It holds F-style clamps by the head and the one-handed clamps by the stop pin at the bottom end of the clamp bar. To mount the trimmed grate, I simply screwed it to a ledger strip attached to my shop wall. The stuff is very tough. I even made a rack for my large F-style clamps and found that the grate can take the weight without sagging. It's also flexible enough that it won't snap if you accidentally twist a clamp when removing it. It saved me the trouble of constructing a clamp rack, and it's hard to beat the price at about $9 for a 2' length. —Joe Adamson, Chesapeake, Virginia Cut off edge of grate to create open fingers A Wedge-cutting Jig for the Table Saw I use lots of wedges in my shop, sometimes as disposable clamp pads for tricky glue-ups or for general shimming chores. Sometimes they're incorporated into a project, as when making wedged mortise-and-tenon joints. I used to cut wedges on the band saw but the rough surfaces often proved to be a hindrance. Screw I decided to make an adjustable wedge-cutting jig to fit my table saw's miter gauge, and now I'm able to quickly produce consistently tapered wedges with straight, smooth faces. The jig consists of just two pieces of 3A"-thick plywood, 2V4" wide x 12" long. I hinged the right side and attached a piece of self-stick 1/4"-20 knob (2) 21/4" x 12" x 3/4" plywood 1/4"-20 x 2" hanger bolt Sandpaper facing sandpaper to the face to prevent stock slippage. I installed a quadrant-type lid stay and locking knob on top, and attached the whole assembly to my miter gauge with roundhead woodscrews through existing holes in the miter-gauge head. To use the jig, first draw a reference line on your table saw top extending forward from the offcut side of the blade. Adjust the fence angle as desired, and saw the wedges to your desired thickness, referencing the line on the table. — Craig Bentzley, Chalfont, Pennsylvania CONTINUED ON PAGE 22 Position hinge well away from blade and flip stock over on each cut 2" x 1V2" hinge 20 ■ Popular Woodworking April 2008 MX |


