65 - Our Best Bench Yet, страница 30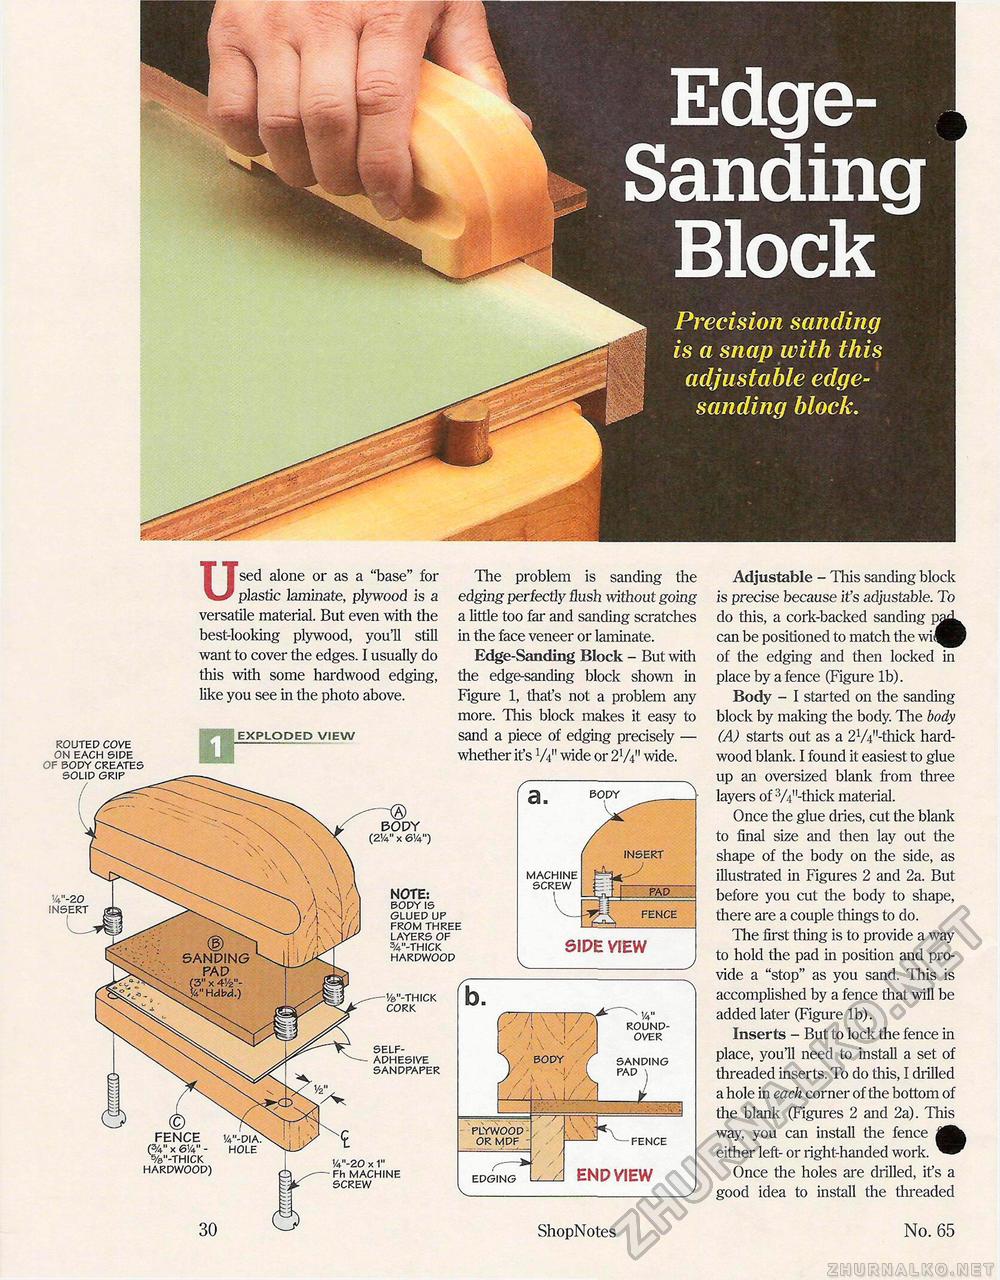
Edge-Sanding BlockPrecision sanding is a snap with this adjustable edge-sanding block. ROUTED COVE ON EACH SIDE OF BODY CREATES SOLID GRIP Osed alone or as a "base" for plastic laminate, plywood is a versatile material. But even with the best-looking plywood, you'll still want to cover the edges. I usually do this with some hardwood edging, like you see in the photo above. EXPLODED VIEW The problem is sanding the edging perfectly flush without going a little too far and sanding scratches in the face veneer or laminate. Edge-Sanding Block - But with the edge-sanding block shown in Figure 1, that's not a problem any more. This block makes it easy to sand a piece of edging precisely — whether it's W wide or 2V4" wide. 3) BODY (2!4" x 614") NOTE: BODY IS GLUED UP FROM THREE LAYERS OF 3/4m-THICK HARDWOOD SIDE VIEW SELF- ADHESIVE SANDPAPER (c FENCE (3/4" x 6V4" -%"-THICK HARDWOOD) !4"-20 x 1" .J -Fh MACHINE -y SCREW b. "7T t I , BODY X W ROUND-OVER SANDING PAD \ PLYWOOD OR MDF - r ■ EDGING i / / FENCE END VIEW 30 & ShopNotes Adjustable - This sanding block is precise because it's adjustable. To do this, a cork-backed sanding p^L can be positioned to match the wid^P of the edging and then locked in place by a fence (Figure lb). Body - I started on the sanding block by making the body. The body (A) starts out as a 21/4,l-thick hardwood blank. I found it easiest to glue up an oversized blank from three layers of :W'-thick material. Once the glue dries, cut the blank to final size and then lay out the shape of the body on the side, as illustrated in Figures 2 and 2a. But before you cut the body to shape, there are a couple things to do. The first thing is to provide a way to hold the pad in position and provide a "stop" as you sand. This is accomplished by a fence that will be added later (Figure lb). Inserts - But to lock the fence in place, you'll need to install a set of threaded inserts. To do this, I drilled a hole in each corner of the bottom of the blank (Figures 2 and 2a). This way, you can install the fence either left- or right-handed work. Once the holes are drilled, it's a good idea to install the threaded No. 65 |


