84, страница 36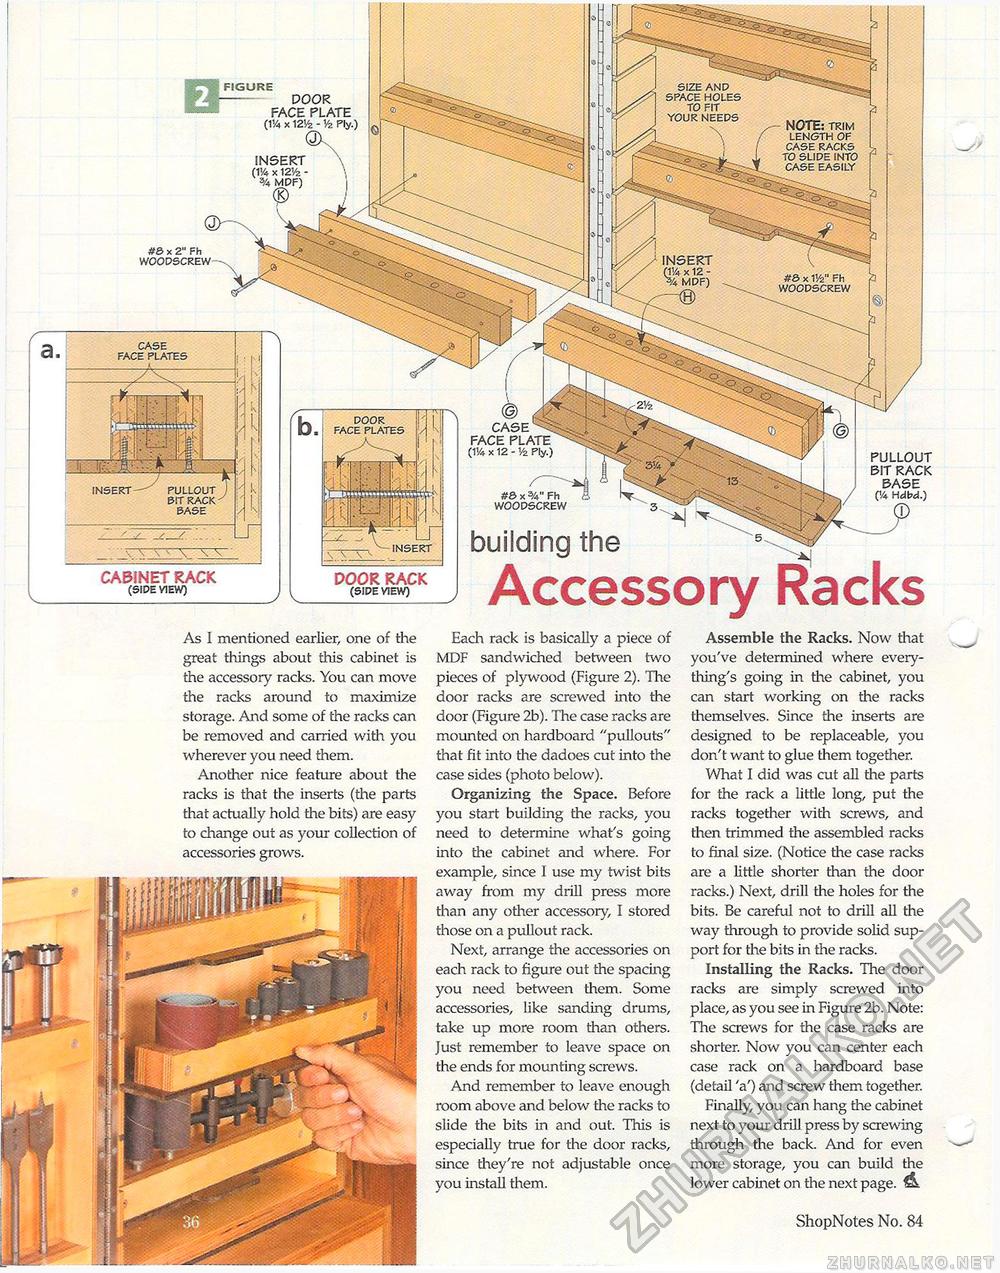
DOOR FACE PLATES DOOR RACK (SIDE VIEW) FIGURE door face plate (154 x 1216 - Vz Ply.) insert (154 x #& x 2" Fh CABINET RACK (SIDE VIEW) case face plate (154 x 12 - Vz Ply.) x %" Fh WOODSCREW pullout sit rack base (54 Hdbd.) building the Accessory Racks Each rack is basically a piece of MDF sandwiched between two pieces of plywood (Figure 2). The door racks are screwed into the door (Figure 2b). The case racks are mounted on hardboard "pullouts" that fit into the dadoes cut into the case sides (photo below). Organizing the Space. Before you start building the racks, you need to determine what's going into the cabinet and where. For example, since I use my twist bits away from my drill press more than any other accessory, I stored those on a pullout rack. Next, arrange the accessories on each rack to figure out the spacing you need between them. Some accessories, like sanding drums, take up more room than others. Just remember to leave space on the ends for mounting screws. And remember to leave enough room above and below the racks to slide the bits in and out. This is especially true for the door racks, since they're not adjustable once you install them. Assemble the Racks. Now that you've determined where everything's going in die cabinet, you can start working on the racks themselves. Since the inserts are designed to be replaceable, you don't want to glue them together. What I did was cut all the parts for the rack a little long, put the racks together with screws, and then trimmed the assembled racks to final size. (Nodce the case racks are a little shorter than the door racks.) Next, drill the holes for the bits. Be careful not to drill all the way through to provide solid support for the bits in the racks. Installing the Racks. The door racks are simply screwed into place, as you see in Figure 2b. Note: The screws for the case racks are shorter. Now you can center each case rack on a hardboard base (detail 'a') and screw them together. Finally, you can hang the cabinet next to your drill press by screwing through the back. And for even more storage, you can build the lower cabinet on the next page. A 36 ShopNotes No. 84 As I mentioned earlier, one of the great things about this cabinet is the accessor^' racks. You can move the racks around to maximize storage. And some of the racks can be removed and carried widi you wherever you need them. Another nice feature about the racks is that the inserts (the parts that actually hold the bits) are easy to change out as your collection of accessories grows. CASE FACE INSERT BIT RACK BASE |


