86, страница 45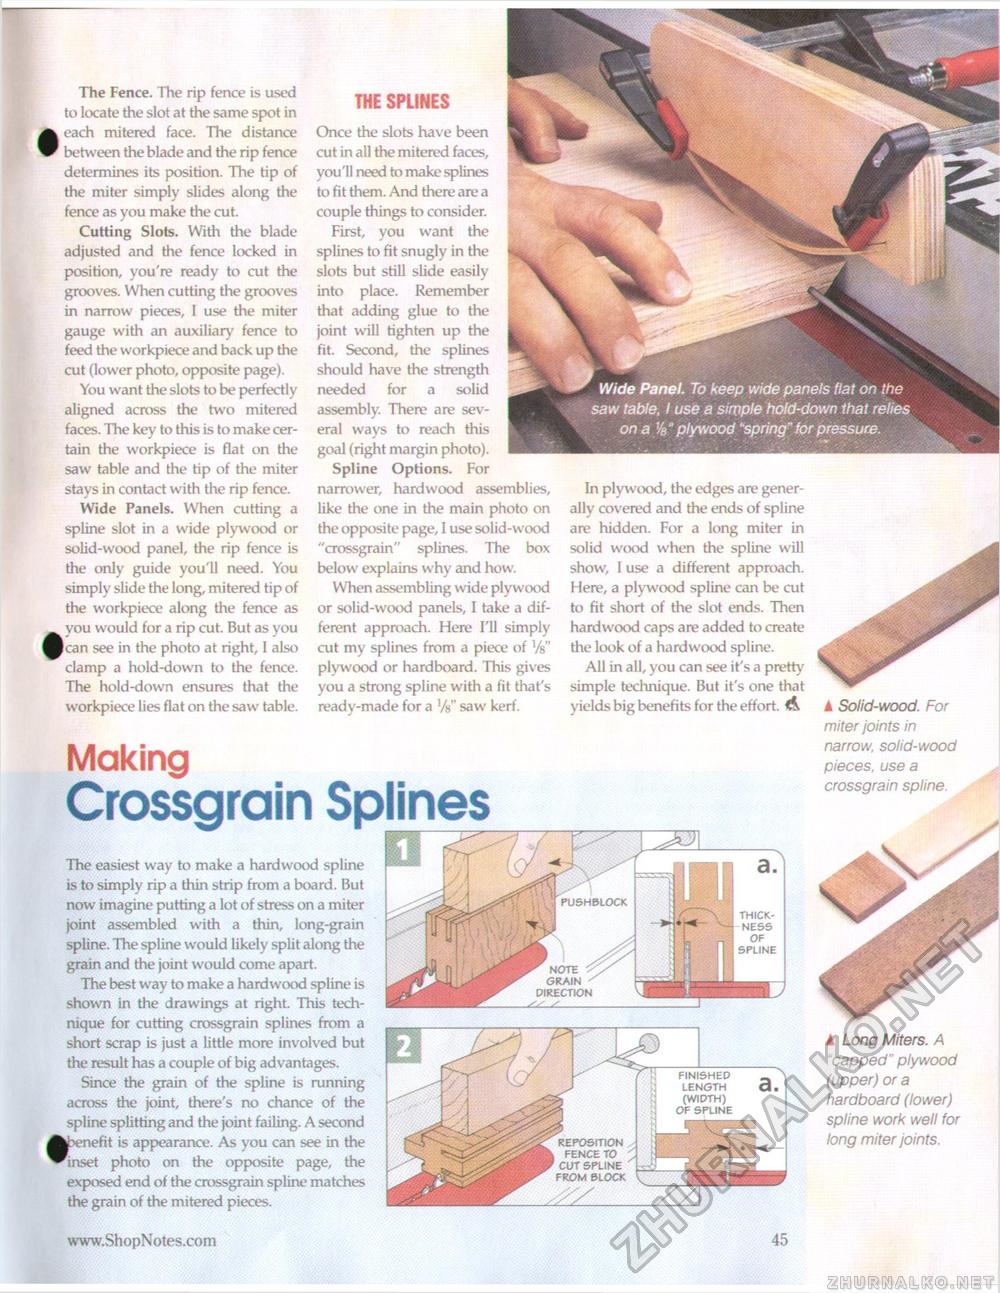
THE SPLINES The Fence. The rip fence is used to locate the slot at the same spot in each mitered face. The distance between the blade and the rip fence determines its position. The tip of the miter simply slides along the fence as you make the cut. Cutting Slots. With the blade adjusted and the fence locked in position, you're ready to cut the grooves. When cutting the grooves in narrow pieces, I use the miter gauge with an auxiliary fence to feed the workpiece and back up the cut (lower photo, opposite page). You want the slots to be perfectly aligned across the two mitered faces. The key to this is to make certain the workpiece is flat on the saw table and the tip of the miter stays in contact with the rip fence. Wide Panels. When cutting a spline slot in a wide plywood or solid-wood panel, the rip fence is the only guide you'll need. You simply slide the long, mitered tip of the workpiece along the fence as you would for a rip cut. But as you }can see in the photo at right, I also clamp a hold-down to the fence. The hold-down ensures that the workpiece lies flat on the saw table. Once the slots have been cut in all the mitered faces, you'll need to make splines to fit them. And there are a couple things to consider. First, you want the splines to fit snugly in the slots but still slide easily into place. Remember that adding glue to the joint will tighten up the fit. Second, the splines should have the strength needed for a solid assembly. There are several ways to reach this goal (right margin photo). Spline Options. For narrower, hardwood assemblies, like the one in the main photo on the opposite page, I use solid-wood "crossgrain" splines. The box below explains why and how. When assembling wide plywood or solid-wood panels, I take a different approach. Here I'll simply cut my splines from a piece of Vs" plywood or hardboard. This gives you a strong spline with a fit that's ready-made for a Vs" saw kerf. Making Crossgrain Splines In plywood, the edges are generally covered and the ends of spline are hidden. For a long miter in solid wood when the spline will show, I use a different approach. Here, a plywood spline can be cut to fit short of the slot ends. Then hardwood caps are added to create the look of a hardwood spline. All in all, you can see it's a pretty simple technique. But it's one that yields big benefits for the effort. A ▲ Solid-wood. For miter joints in narrow, solid-wood pieces, use a crossgrain spline. The easiest way to make a hardwood spline is to simply rip a thin strip from a board. But now imagine putting a lot of stress on a miter joint assembled with a thin, long-grain spline. The spline would likely split along the grain and the joint would come apart. The best way to make a hardwood spline is shown in the drawings at right. This technique for cutting crossgrain splines from a short scrap is just a little more involved but the result has a couple of big advantages. Since the grain of the spline is running across the joint, there's no chance of the spline splitting and the joint failing. A second [benefit is appearance. As you can see in the inset photo on the opposite page, the exposed end of the crossgrain spline matches the grain of the mitered pieces. note grain DIRECTION ^ ^_ FINISHED LENGTH a. (WIDTH) THICKNESS OF SPLINE ▲ Long Miters. A "capped" plywood (upper) or a hardboard (lower) spline work well for long miter joints. 45 |


