87, страница 28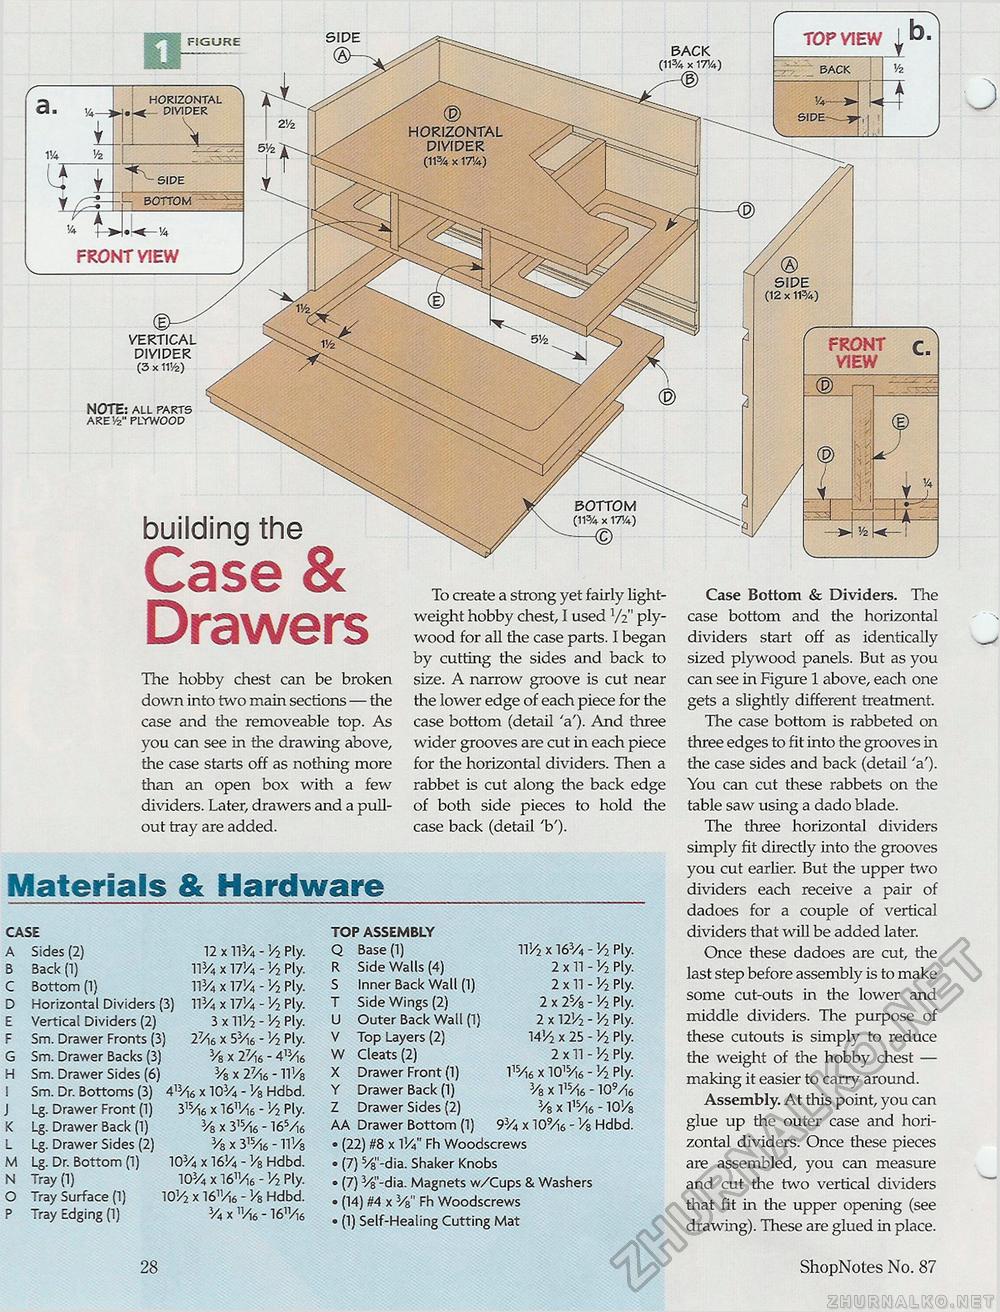
VERTICAL DIVIDER (3 x 11V2) NOTE: all parts are'/2" plywood horizontal <— divider side bottom FRONT VIEW CASE A Sides (2) 12 x ll3/4 - H Ply. B Back (1) ll3/, x WV4 - V2 Ply. C Bottom (1) ll3/4 x 17'/4 - V2 Ply. D Horizontal Dividers (3) 113/4 x 17'/4 - V2 Ply. E Vertical Dividers (2) 3 x ll!/> - V2 Ply. F Sm. Drawer Fronts (3) 27/,6 x SVn - V2 Ply. G Sm. Drawer Backs (3) 3/8 x 27/]6 - 4% H Sm. Drawer Sides (6) 3/s x 27/,6 -11 Vg I Sm. Dr. Bottoms (3) 4% x 103/4 - '/8 Hdbd. J Lg. Drawer Front (1) 3ls/]6 x 16"/i6 - H Ply. K Lg. Drawer Back (1) 3/8 x 3'5/i6 - 16V,6 L Lg. Drawer Sides (2) 3/8 x 315/,6 - llV8 M Lg. Dr. Bottom (1) 103/4 x 16>/4 - V8 Hdbd. N Tray (1) 103/4 x 16nA6 - V2 Ply. O Tray Surface (1) 10V2 x l^Vis - Vs Hdbd. P Tray Edging (1) 3/4 x - 16"/,6 TOP ASSEMBLY Q Base (1) R Side Walls (4) S Inner Back Wall (1) T Side Wings (2) U Outer Back Wall (1) V Top Layers (2) W Cleats (2) X Drawer Front (1) Y Drawer Back (1) Z Drawer Sides (2) lf/2 x 163/4 - V2 Ply. 2 x 11 - V2 Ply. 2 x 11 - V2 Ply. 2 x 25/8 - V2 Ply. 2 x 12'/2 -16 Ply. 14'/2 x 25 - V2 Ply. 2 x 11 - V2 Ply. VSA6 x 1015/k - '/2 Ply. 3/8 x I15/,6 - 109/i6 3/8 x VV]6 - lO'/s AA Drawer Bottom (1) 93/4 x lO'/is - Vs Hdbd. • (22) ttS x V/4" Fh Woodscrews • (7) 5/8"-dia. Shaker Knobs • (7) Vg-dia. Magnets w/Cups & Washers • (14) #4 x 3/8" Fh Woodscrews • (1) Self-Healing Cutting Mat Case Bottom & Dividers. The case bottom and the horizontal dividers start off as identically sized plywood panels. But as you can see in Figure 1 above, each one gets a slightly different treatment. The case bottom is rabbeted on three edges to fit into the grooves in the case sides and back (detail 'a'). You can cut these rabbets on the table saw using a dado blade. The three horizontal dividers simply fit directly into the grooves you cut earlier. But the upper two dividers each receive a pair of dadoes for a couple of vertical dividers that will be added later. Once these dadoes are cut, the last step before assembly is to make some cut-outs in the lower and middle dividers. The purpose of these cutouts is simply to reduce the weight of the hobby chest — making it easier to carry around. Assembly. At this point, you can glue up the outer case and horizontal dividers. Once these pieces are assembled, you can measure and cut the two vertical dividers that fit in the upper opening (see drawing). These are glued in place. BACK x17!4) TOP VIEW back FRONT r VIEW building the Case & Drawers The hobby chest can be broken down into two main sections — the case and the removeable top. As you can see in the drawing above, the case starts off as nothing more than an open box with a few dividers. Later, drawers and a pull-out tray are added. Materials & Hardware To create a strong yet fairly lightweight hobby chest, I used V2" plywood for all the case parts. I began by cutting the sides and back to size. A narrow groove is cut near the lower edge of each piece for the case bottom (detail 'a'). And three wider grooves are cut in each piece for the horizontal dividers. Then a rabbet is cut along the back edge of both side pieces to hold the case back (detail 'b'). 90 ShoDNotes No. 87 |


