Woodworker's Journal 1992-16-6, страница 42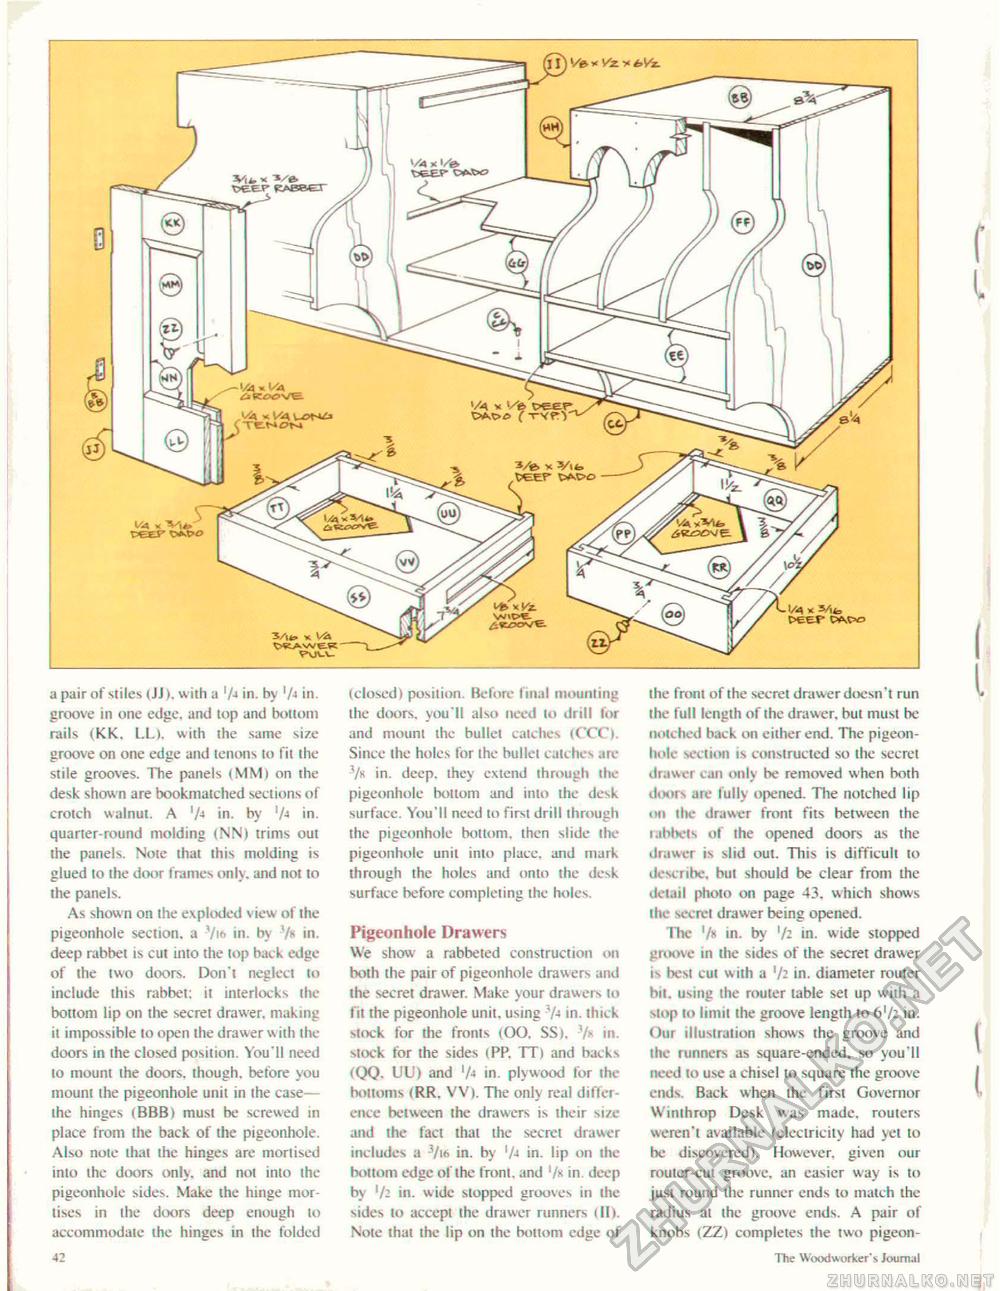
V.4 « VJ^XS' >o 3/lto * V* WW£K pyv-l- a pair of stiles (JJ >. with a 7-* in. hy 7* in. groove in one edge, and top and bottom rails <KK. LL), with the same size groove on one edge and tenons to fit the stile grooves. The panels (MM) on the desk shown are bookmatched sections of crotch walnut. A 'A in. by 'A in. quarter-round molding (NN) trims out the panels. Note that this molding is glued (o the door frames only, and not to the panels. As show n on the exploded view of the pigeonhole section, a Via in. by 7» in, deep rabbet is cut into the top back edge of the two doors. Don't neglect to include this rabbet: it interlocks the bottom lip on (he secret drawer, making it impossible to open the drawer with the doors in the closed position. You'll need to mount the doors, though, before you mount (he pigeonhole unit in the case— the hinges (BBB) musi be screwed in place from the back of the pigeonhole. Also note that the hinges are mortised into the doors only, and not into the pigeonhole sides. Make the hinge mortises in the doors deep enough to accommodate the hinges in the folded •4K (closed) position. Before final mounting the doors, you'll also need to drill for and mount the bullet catches {('CC). Since ihe holes for the hullel catches are V« in. deep, they extend through ihe pigeonhole bottom and into the desk surface. You'll need to first drill through the pigeonhole bottom, then slide the pigeonhole unit into place, and mark through the holes and onto the desk surface before completing ihe holes. Pigeonhole Drawers We show a rabbeted construction on both the pair of pigeonhole drawers and the secret drawer. Make your drawers io fit the pigeonhole unit, using 3A in. thick stock for (he fronts (OO, SS), 7* in. stock for the sides (PP. IT) and backs <QQ. UU) and lA in. plywood for the bottoms (RR. VV). The only real differ ence between the drawers is their size and the fact thai the secret drawer includes a 3/t6 in. by 'A in. lip on the bottom edge of the front, and '/k in. deep by 7- in. wide slopped grooves in the sides to accept (he drawer runners (II). Note that the lip on the bottom edge of J/-H * 3/lfa tee*" wsfo the front of the secret drawer doesn't run ihe lull length of the drawer, but must be notched back on either end. The pigeonhole section is constructed so the secret drawer can only be removed when both doors are lully opened. The notched lip on the drawer front fits between the rabbets ol the opened doors as the drawer is slid out. This is difficult to describe, bui should be clear from the detail photo on page 43. which shows the secret drawer being opened. The 7* in. by 7z in. wide stopped gjwve in the sides of ihe secret drawer is best cut wiih a in. diameter rouler bit. using (he router table set up w iih a stop to limit the groove length to 67- in. Our illustration shows the groove and the runners as square-ended, so you'll need to use a chisel to square ihe groove ends. Back when the first Governor Winthrop Desk was made, routers weren't available (electricity had yel to be discovered). However, given our router-cut groove, an easier way is to just round llie runner ends to match the radius al the groove ends. A pair of knobs (ZZ) completes the two pigeon- The Woodworker's Journal f I |


