Woodworker's Journal 1992-16-6, страница 46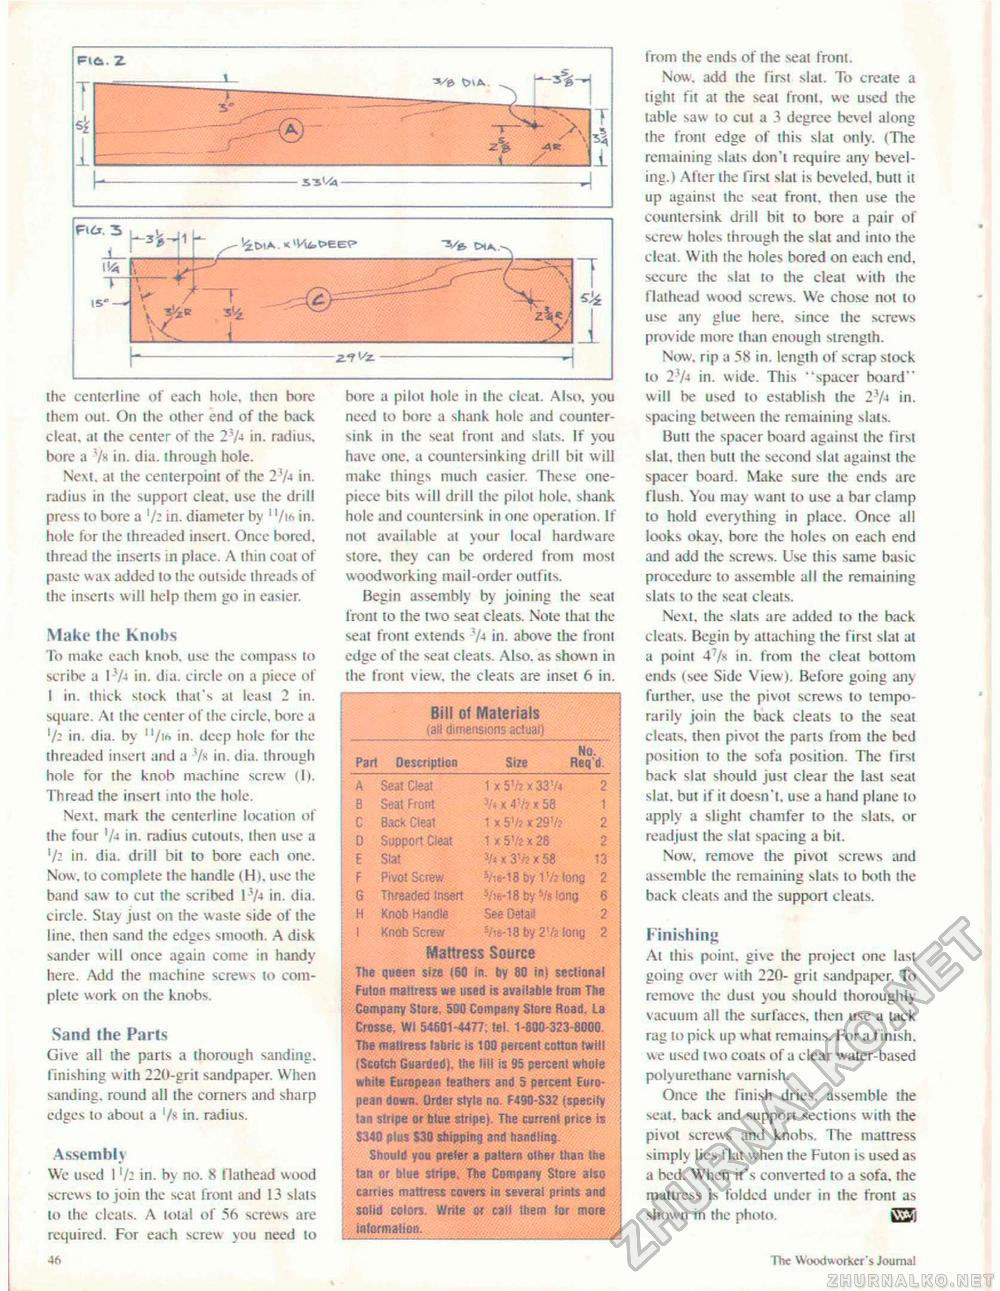
the centerline of each hole, ihcn bore them out. On the other end of the hack cleat, at the center of the 2JA in- radius, bore a 7® in. dia. through hole. Next, at the centerpoint of the 27* in. radius in the support cleat, use the drill press to bore a 7- in. diameler by ' '/w> in. hole for ihe threaded insert. Once bored, thread the inserts in place. A thin coal of paste wax added to the outside Ihreads of the inserts w ill help them go in easier. Make the Knobs To make each knob, use the compass to scribe a 1-7-t in. dia. circle on a piece of I in. thick stock that's at least 2 in. square. At the center of the circle, bore a l/z in. dia. by n/1<> in. deep hole for the threaded insert and a 7* in. dia. through hole for the knob machine screw (1). Thread the insert into ihe hole. Next, mark the centerline location of the four 7* in. radius cutouts, then use a 72 in. dia. drill bit to bore each one. Now. to complete the handle (Hi. use the band saw to cut the scribed l7» in. dia. circle. Stay just 011 the waste side of the line, then sand ihe edges smooth. A disk sander will once again come in handy here. Add the machine screws to complete work on the knobs, Sand (he Parts Give all the parts a thorough sanding, finishing w ith 220-grii sandpaper. When sanding, round all the corners and sharp edges to about a 7* in. radius. Assembly We used I 7i in. by no. 8 flathead wood screw s to join the seal front and 13 slats to ihe deals. A tola! of 56 screws are required. For each screw you need lo •4K bore a pilot hole in the cleat. Also, you need lo bore a shank hole and countersink in ihe seat front and slats. If you have one, a countersinking drill bit will make ihings much easier. These one-piece bils will drill the pilot hole, shank hole and countersink in one operation. If not available at your local hardware store, they can be ordered from most woodworking mail-order outfits. Begin assembly by joining the seal front to the two seat cleats. Note that the seat front extends '/4 in. above the front edge of the seat cleats. Also, as shown in the from view, the cleats are inset 6 in. Bill of Materials (all dimensions actual} No. No.
Mattress Source The queen sin (60 in. tiy 80 in) sectional Fulon mattress we used is available from The Company Store, 500 Company Store Road. Ls Crosse, Wl 54601-4477; tel. 1-800-323-8000 The mattress fabric is 100 percent cotton twilt (Scotch Guarded). Ihe Till is 95 percent whole while European feathers and 5 percent European down. Order style no. F490-S32 (specify tan slripe or blue stripe). The current price is $340 plus $30 shipping ant) handling. Should you preler a pattern other than Ihe lan or blue stripe The Company Store also carries mattress covers in several prints and solid colors- Write o< call them lor more inlormaiion. from the ends of the seat front. Now. add ihe first slai. To create a tight fit at the seat front, we used the table saw to cut a 3 degree bevel along the front edge of this slat only. (The remaining slats don't require any beveling.) Alter the first slat is beveled, bull ii up against the seat front, then use the countersink drill bit to bore a pair of screw holes through the slat and into the cleat. With the holes bored on each end. secure the slat to the cleat with the flathead wood screws. We chose not to use any glue here, since the screws provide more lhan enough sirenglh. Now, rip a 58 in. length of scrap stock to 27* in. wide. This "spacer board" will be used to establish the 2iM in. spacing between ihe remaining slats. Bull the spacer board against the first slat, then butt ihe second slat against the spacer board. Make sure the ends are flush. You may want to use a bar clamp to hold everything in place. Once all looks okay, bore ihe holes on each end and add the screws. Use this same basic procedure to assemble all the remaining slats lo the seat cleats. Next, the slats are added lo the back deals. Begin by attaching the first slal al a point 47s in. from the cleat bottom ends (see Side View). Before going any further, use the pivot screws 10 temporarily join the back cleats to the seal cleats, then pivot the parts from the bed position to the sofa position. The lirsi back slat should just clear the last seat slat, but if it doesn't, use a hand plane 10 apply a slight chamfer to the slats, or readjust the slat spacing a bit. Now, remove the pivot screws and assemble the remaining slats to both the back cleats and the support cleats. Finishing Al this point, give the project one last going over with 220- grit sandpaper. To remove the dusi you should ihoroughly vacuum all the surfaces, then use a tack rag lo pick up what remains. For a finish, we used two coats of a clear water-based polyurethane vamish. Once the finish dries, assemble the seat, back and support sections with the pivot screws and knobs. The maitress simply lies flat when the Futon is used as a bed. When it's converted to a sofa, the mattress is folded under in the front as shown in the photo. The Woodworker's Journal |
|||||||||||||||||||||||||||||||||||||||||||||||||||||


