Woodworker's Journal 1992-16-6, страница 57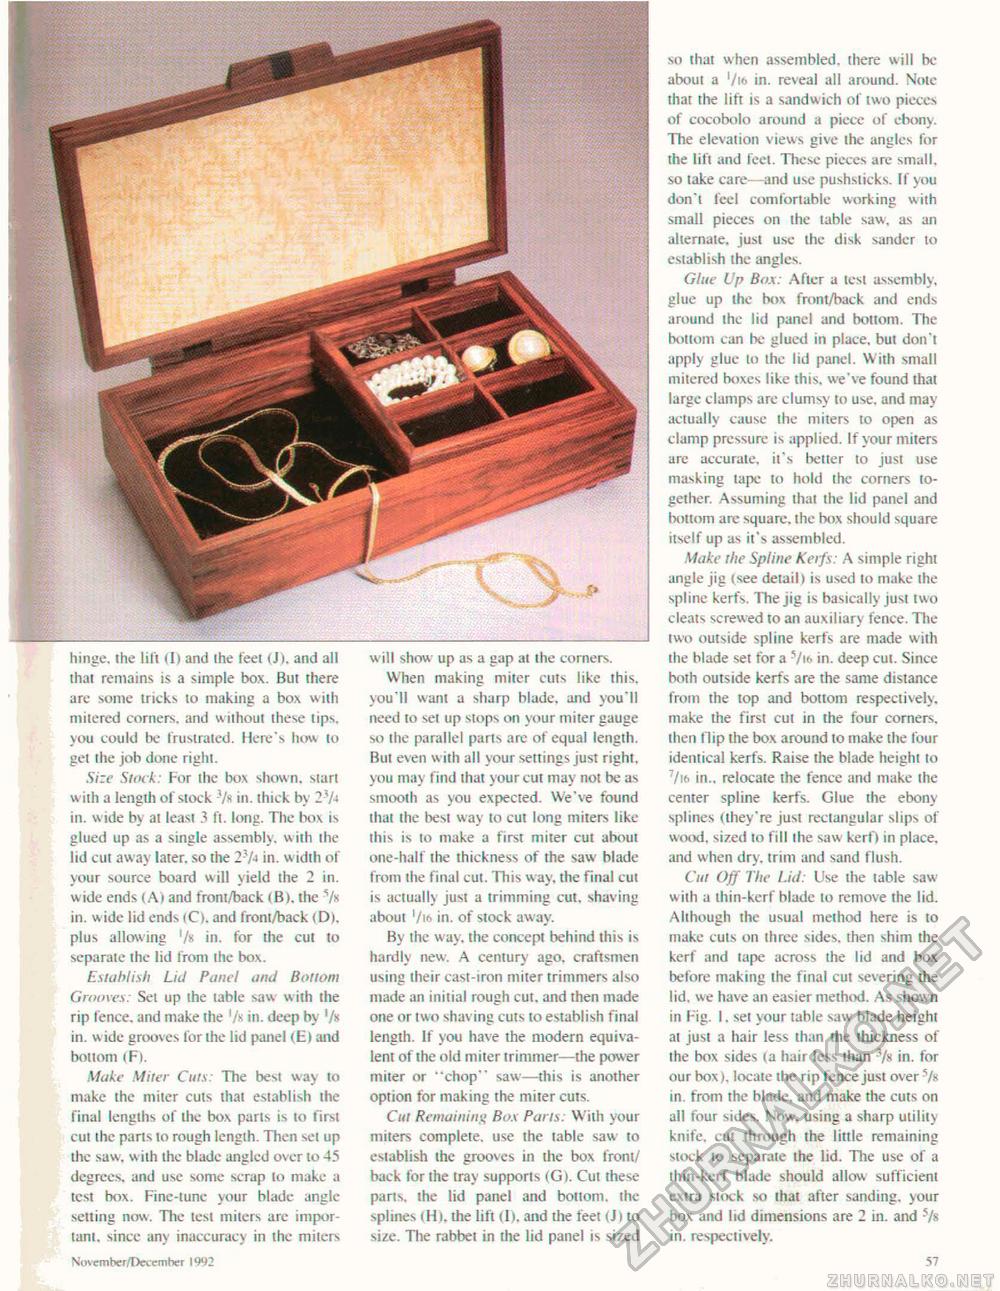
hinge, the lilt (I) and the feet (J). and all that remains is a simple box. But there are some tricks to making a box with mitered corners, and without these tips, you could be frustrated. Here's how to get the job done right. Size Slock: For the box shown, start w ith a length of stock -/«in. thick by 2 V* in. wide by at least 3 ft. long. The box is glued up as a single assembly, w ith the lid cut away later, so the 2}H in. w idth of your source board will yield the 2 in. wide ends (A) and front/back <B|. the Vs in. wide lid ends (C), and front/back (D), plus allowing '/« in. for the cut to separate the lid front the box. Establish Lid PaneI and Bottom Grooves: Sel up ihe table saw w ith the rip fence, and make the in. deep by '/» in. wide grooves for the lid panel (E)and bottom < Pi. Make Miter Cuts: The best way to make the miter cuts thai establish ihe final lengths of ihe box parts is to first cut the parts to rough length. Then set up the saw. with the blade angled over to 45 degrees, and use sonic scrap to make a test box. Fine-tune your blade angle setting now. The lest miters are important. since any inaccuracy in the milers Nov ember/December 1992 will show up as a gap at the corners. When making miter cuts like this, you'll want a sharp blade, and you'll need to set up stops on your miter gauge so the parallel parts are of equal length. Rut even with all your settings just right, you may find that your cui may not be as smooth as you expected. We've found thai the best way to cut long miters like this is to make a first miter cut about one-half the thickness of the saw blade from the final cut. This way, the final cui is actually jusl a trimming cut. shaving about '/tt in. of stock away. By the w ay. the concept behind this is hardly new. A century ago. craftsmen using their cast-iron miter trimmers also made an initial rough cut. and then made one or two shaving curs to establish final lenglh. If you have the modern equivalent of the old miter trimmer—the power miter or "chop" saw—this is another option for making the miter cuts. Cut Remaining Box Parts: With your miters complete, use the table saw to establish the grooves in ihe box front/ back for (he tray supports (G). Cut these parts, the lid panel and bottom, the splines (Hi. ihe lift (1). and the feet (J) to size. The rabbet in the lid panel is sized so that when assembled, there will be about a '/i& in. reveal all around. Note that the lift is a sandwich of two pieces of cocobolo around a piece of ebony. The elevation views give the angles for the lift and feel. These pieces are small, so take care—and use pushsticks. If you don'i feel comfortable working with small pieces on the table saw, as an alternate, jusl use ihe disk sander to establish the angles. Glue Up Box: Afler a test assembly, glue up the box front/back and ends around the lid panel and bottom. The bottom can be glued in place, but don't apply glue lo the lid panel. With small mitered boxes like this, we've found that large clamps arc clumsy to use, and may actually cause ihe miters to open as clamp pressure is applied. If your miters are accurate, it's better to just use masking tape to hold the corners together. Assuming that the lid panel and bottom are square, ihe box should square itself up as it's assembled. Make the Spline Keifs: A simple right angle jig (see detail) is used to make ihe spline kerfs. The jig is basically jusi two cleats screwed to an auxiliary fence. The two outside spline kerfs are made with ihe blade set for a s/i6 in. deep cut. Since both outside kerfs are the same distance from the top and bottom respectively, make the first cut in the four corners, ihen flip the box around to make the four identical kerfs. Raise the blade height 10 7/i& in., relocate the fence and make ihe center spline kerfs. Glue the ebony splines (they're just rectangular slips of wood, sized to fill ihe saw kerf) in place, and when dry. trim and sand flush. Cut Off The Lid: Use the table saw w ith a thin-kerf blade to remove the lid. Although the usual method here is to make cuts on Ihree sides, then shim the kerf and (ape across the lid and box before making ihe final cut severing the lid. we have an easier method. As shown in Fig. 1. sel your tahle saw blade height at jusl a hair less than the thickness of the box sides (a hair less lhan */s in. for our box), locale the rip fence just over Vs in. from the blade, and make the cuts on all four sides. Now. using a sharp utility knife, cut through the little remaining slock lo separate the lid. The use of a (hin-kerf blade should allow sufficient extra slock so lhat after sanding, your box and lid dimensions are 2 in. and 5/s in. respeciively. 57 |


