Woodworker's Journal 2006-30-2, страница 93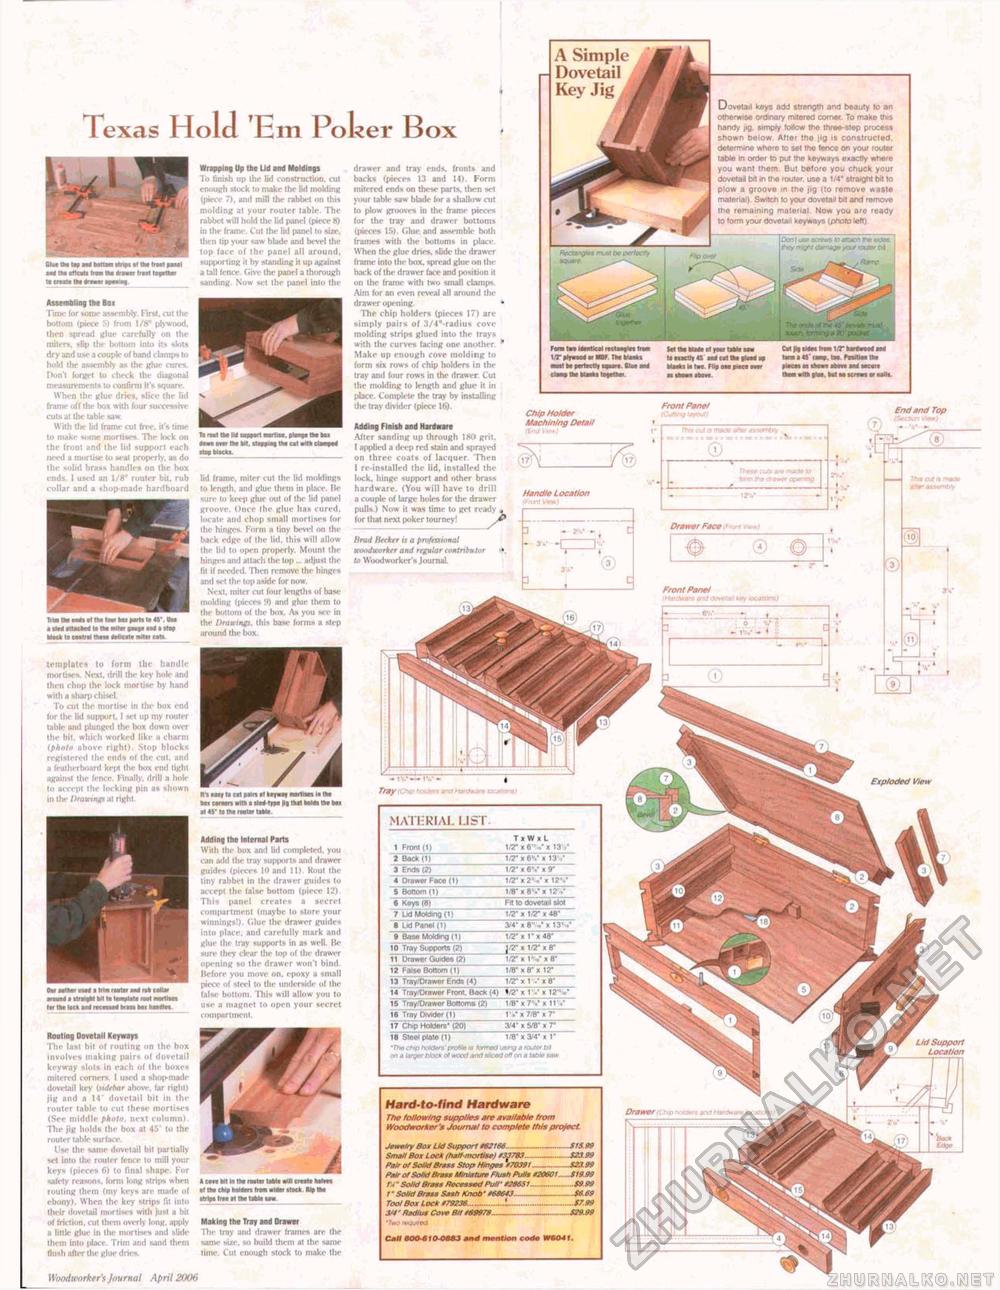
I exas Hold Em Poker Box Assembling the Box Time for some assembly. First. cut the bottom (piece 5> from 1/8" plywood, then spread glue can-fully on the mitt-r-. slip the bottom into its slots dry and use a couple of band clamps to h<t3d the assembly as the ghie cures. Don't forget to check ibt- diagonal measurement* to confirm it's square. When the glue dries, slice the lid frame off thr box with four successive cuts al Ihc table saw. With the lid frame col free, it's time to make some mortises The kick on the front and the lid support each need a mortise to seal property as do the solid bra** handles on the box ends, I used an 1/6" router bit, rub collar and a shop made hardboard Wrapping Up the Ud and Moldings To finish up the lid construction, cut enough stock to make the fid molding (piece 7), and mill the rabbet on this molding at your router table. The rabbet will hold the lid panel (piece S) in the frame. Cut the ltd panel to size, then lip your saw blade anil bevel the top face of the panel all around. ftup(*]«i.ni» it by standing it up against ft tall fence Give the panel a thorough sanding- Now set the panel into the Ud frame, miter cut the lid moldings to length, and glue them in place. Be sure to keep glue out of tile Ud panel groove. Once the glue lias cured, locate and chop small mortise*, for the hlryfnw. Form n tiny bevel on the back edge of the lid, this will allow I lie Ud (o open pro perly. Mo u nt the hinge* and attach the top... adjust the fit if needed. Thai remove the hinges and «et the lop aside for now Next, miter cut four lengths of base molding (pieces if) and glue them to the bottom of the box. As you nee in the Dmwingi. this base forms a step around the box. templates to form the handle mortise*. Next, drill the key hole and then chop the lock mortise by hand with a sharp chisd To cut the mortise in Ihc box end for the lid support. I set up my router table and plunged the box down over the bit. which worked like n charm fphoto above right). Stop blocks registered the ends of the cut, and: a Iruiht'rbuwrd kept the box endl light against the ferver Finally, drill a bole to accept the locking as shown in the Dramas ai right The last bit of routing on. the box involve* waking pairs of dovetail koywnty slot* In each of the boxes mitered corners 1 used a shop-mode dovetail key isidtber above, far right! jig and a 14* dovetail bil in the router table to cut these mortises (See middle f>hvlt». next column). Hie Jig hold* the box at 45* to the rooter table surface. Use the same dovetail bit partially set into the router fem e to mill your key* (pieces 6) to final shape. For safety reasons, form long strips when routing litem fmy keys are made of ebony). When the key strips fit Into their dovetail mortises with Just a bit of friction, cut them overly long, apply ci little glue in the mortise* ami slide them fnto place. Trim and sand them flush after the glue drip*. Wiiotiwm-ker's journal April 2006 drawer and tray ends, fronts and backs (pieces 13 and 14), Form mirered ends on these parts, then set wour table saw blade for a shallow cut to ptow grooves in the frame pieces fur the tray and drawer bottoms (pieces 15). Glue and assemble both frames with the bottom* in place. When the glue dries, slide the drawer frame into the box, spread glue on the back of the drawer face Jircct position it on the frame with two small clamps Aim for an even reveal all around the The chip holders {pieces 17) are simply pairs ol S/^-radius cove molding strips glued into the trays with the curves facing one another, s Make up enough cove molding to form six rows of chip holders in the tray and four rows in the drawer. Cut the molding to length and glue it in place. Complete the tray by installing the fray divider (piece Adding Finish and Hardware After sanding up through ISO grit, f applied a deep red slain ami sprayed on three coats of lacquer Then 1 re installed the Ud, iustalled the lock, hinge support and other brass hardware. (You will have to drill a couple of large holies for the drawer pulls,) Now it was time to get ready * for that next poker tourney!' ^ Brad fitrktr is a pTwfrssiuttaS wmdworitrr and regular t/mtribuivr ■ to Woodworker s Journal. A Simple Dovetail Key Jig[/ Dovetail keys add strength and beauty to an otherwise ordinary mdcred comer. To make this handy jig, simply follow tho throe-stop process shown netow Alter the jig is constructed, detemrina when* to set the fence on your router tabic m order to put the keyways exactfy where you want them. But before you chuck your dovetail bit (o tho router, use a 1/4* straight bit to ptow a groove in (he jig (to remove waste rnatertaS) Swrtch to your dovetail bit and remove the remaining mat oriel. Now you are ready to toon your dovetail keyways (photo left) trrphrmMderMOF n«bUM« «a encOt «V an* cat tt» must tw parfvcUf upuu. Glut and MMki Ml two. Fttp Ml flieff Chip Hold** Machining Detail End and Top © ® Front Panel i HarrtW* <*"*! OstWiaiT i Front Panel i HarrtW* <*"*! OstWiaiT i
® I ,, i ? ' T 1>B IMI l»l*» tut tool Adding the Internal Parts With the box and lid completed, you can add the tray supports and drawer guide* (pieces l» and 11). Rout the tiny rabbet in the drawer guides to accept the false bottom (piece 12). This panel creates a secrel compartment (maybe to store your winnings!), Glue the drawer guides Into place, and carefully mark and glue the fray supports in as well. Be sure they clear the top of the drawer npetting so the drawer won't bind. Before you move on, rpoxy a small piece of steel to the underside of the false bottom, Thi* will allow you to use a magnet to open your secret couipartraent
Making the fray and Drawer The tray ami drawer frames are the same sine, so build them at the same time. Cut enough stock to make the Hard-to-find Hardware The following supplies are available front Woodworker's Journal to complete thin project Jew+fry Box Ud Support 6t2t66^...-------------------St A 99 Small Box Lock (hstlniortise) 033783-----------$23 99 Pair of SoUd Brass Stop Hinges '70391...........J23 99 P/ttr of Solid Brass Miniature Flush Putts 920601---$19.99 fJ" Solid Brass Recessed Puff' 929651—......S9.99 t ■ Solid Brass Sxs/j Knob' 463643 ——..... $6.69 Tool Box Lock f?9236................................S7.99 3M' Radius Co ve BU *6997S---„-------------------629,99 4 mention coefc W604 f. CMU BOO-6IO-OM3 » |
||||||||||||||||||||||||||||||||||||||||||||||||||||||||||||||||||||


