Woodworker's Journal 2008-32-4, страница 54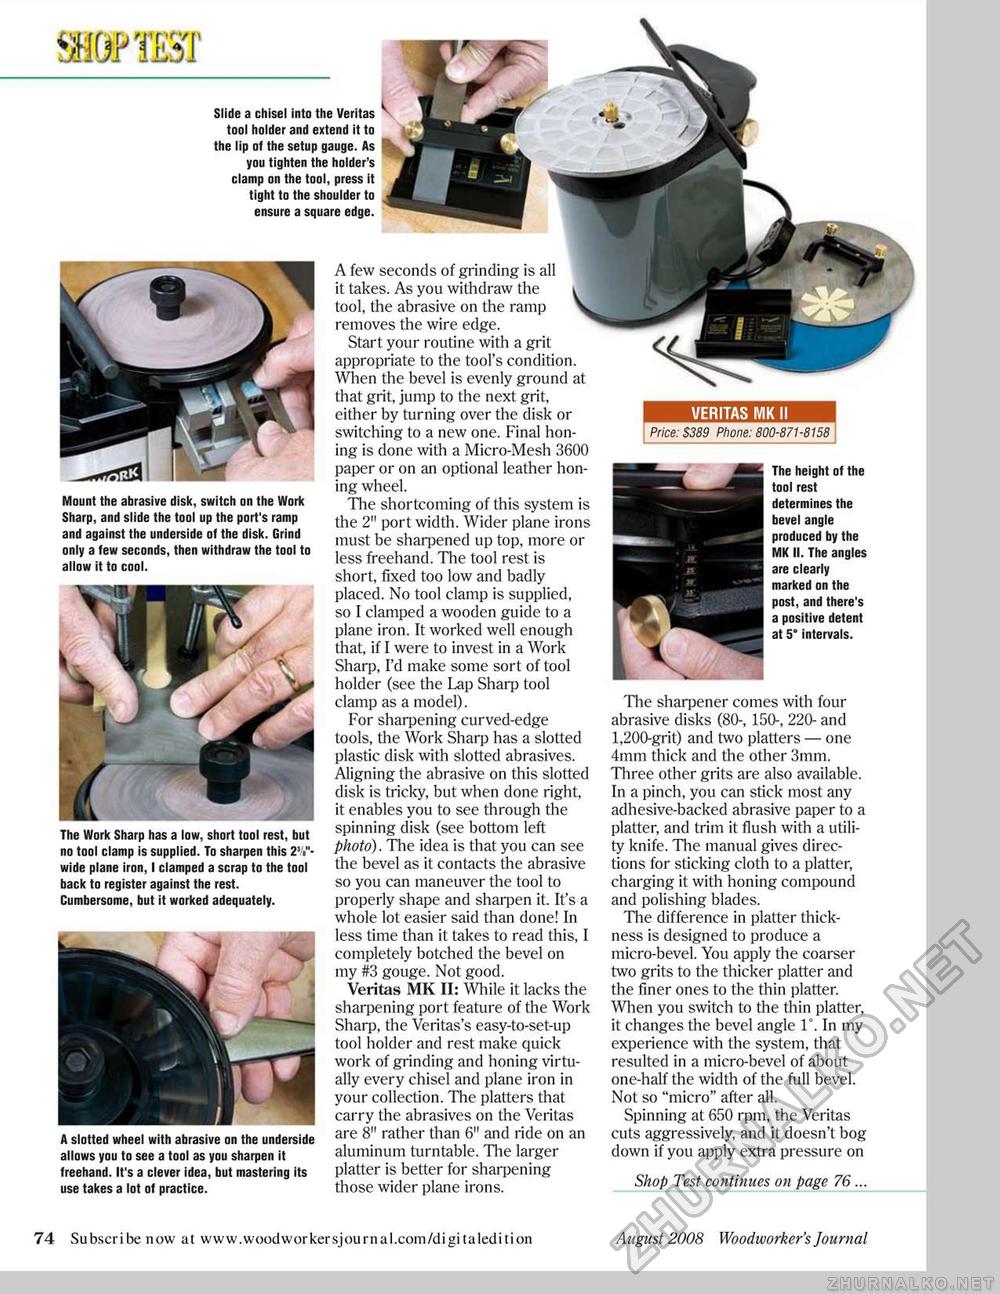
VERITAS MK II Price: S389 Phone: 800-871-8158 SH&pmr Slide a chisel into the Veritas tool holder and extend it to the lip of the setup gauge. As you tighten the holder's clamp on the tool, press it tight to the shoulder to ensure a square edge. A few seconds of grinding is all it takes. As you withdraw the tool, the abrasive on the ramp removes the wire edge. Start your routine with a grit appropriate to the tool's condition. When the bevel is evenly ground at that grit, jump to the next grit, either by turning over the disk or switching to a new one. Final honing is done with a Micro-Mesh 3600 paper or on an optional leather honing wheel. The shortcoming of this system is the 2" port width. Wider plane irons must be sharpened up top, more or less freehand. The tool rest is short, fixed too low and badly placed. No tool clamp is supplied, so I clamped a wooden guide to a plane iron. It worked well enough that, if I were to invest in a Work Sharp, I'd make some sort of tool holder (see the Lap Sharp tool clamp as a model). For sharpening curved-edge tools, the Work Sharp has a slotted plastic disk with slotted abrasives. Aligning the abrasive on this slotted disk is tricky, but when done right, it enables you to see through the spinning disk (see bottom left photo). The idea is that you can see the bevel as it contacts the abrasive so you can maneuver the tool to properly shape and sharpen it. It's a whole lot easier said than done! In less time than it takes to read this, I completely botched the bevel on my #3 gouge. Not good. Veritas MK II: While it lacks the sharpening port feature of the Work Sharp, the Veritas's easy-to-set-up tool holder and rest make quick work of grinding and honing virtually every chisel and plane iron in your collection. The platters that carry the abrasives on the Veritas are 8" rather than 6" and ride on an aluminum turntable. The larger platter is better for sharpening those wider plane irons. Mount the abrasive disk, switch on the Work Sharp, and slide the tool up the port's ramp and against the underside of the disk. Grind only a few seconds, then withdraw the tool to allow it to cool. The Work Sharp has a low, short tool rest, but no tool clamp is supplied. To sharpen this 2"»"-wide plane iron, I clamped a scrap to the tool back to register against the rest. Cumbersome, but it worked adequately. A slotted wheel with abrasive on the underside allows you to see a tool as you sharpen it freehand. It's a clever idea, but mastering its use takes a lot of practice. The height of the tool rest determines the bevel angle produced by the MK II. The angles are clearly marked on the post, and there's a positive detent at 5° intervals. The sharpener comes with four abrasive disks (80-, 150-, 220- and 1,200-grit) and two platters — one 4mm thick and the other 3mm. Three other grits are also available. In a pinch, you can stick most any adhesive-backed abrasive paper to a platter, and trim it flush with a utility knife. The manual gives directions for sticking cloth to a platter, charging it with honing compound and polishing blades. The difference in platter thickness is designed to produce a micro-bevel. You apply the coarser two grits to the thicker platter and the finer ones to the thin platter. When you switch to the thin platter, it changes the bevel angle 1°. In my experience with the system, that resulted in a micro-bevel of about one-half the width of the full bevel. Not so "micro" after all. Spinning at 650 rpm, the Veritas cuts aggressively, and it doesn't bog down if you apply extra pressure on Shop Test continues on page 76... 74 Subscribe now at www.woodworkersjournal.com/digitaledition August 2008 Woodworker's Journal |


