Woodworker's Journal fall-2010, страница 52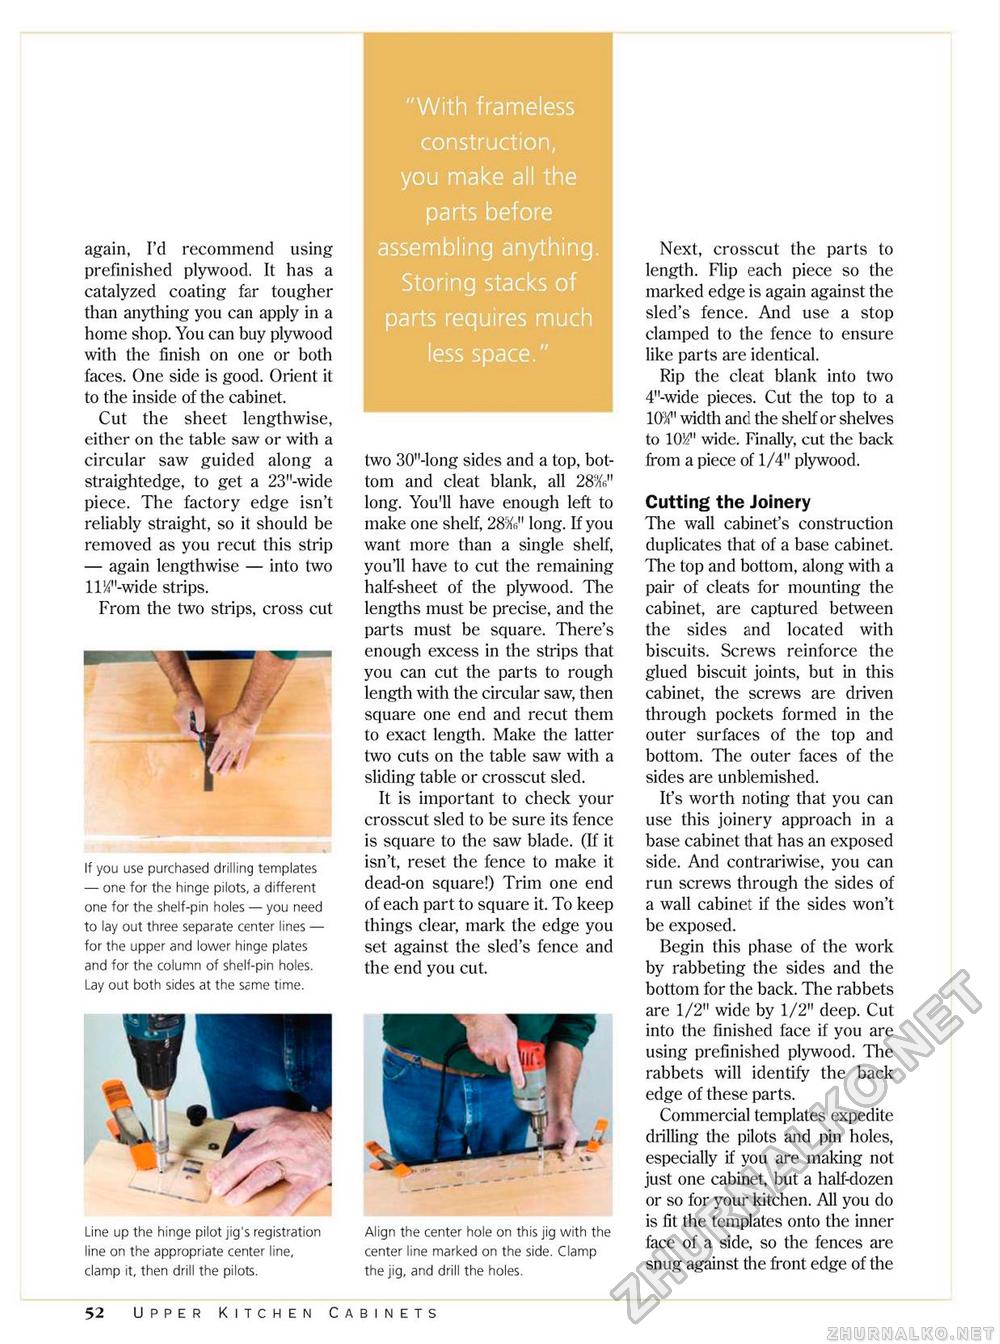
"With frameless construction, you make all the parts before assembling anything. Storing stacks of parts requires much less space." again, Pd recommend using prefinished plywood. It has a catalyzed coating far tougher than anything you can apply in a home shop. You can buy plywood with the finish on one or both faces. One side is good. Orient it to the inside of the cabinet. Cut the sheet lengthwise, either on the table saw or with a circular saw guided along a straightedge, to get a 23"-wide piece. The factory edge isn't reliably straight, so it should be removed as you recut this strip — again lengthwise — into two ll^'-wide strips. From the two strips, cross cut V If you use purchased drilling templates — one for the hinge pilots, a different one for the shelf-pin holes — you need to lay out three separate center lines — for the upper and lower hinge plates and for the column of shelf-pin holes. Lay out both sides at the same time. Line up the hinge pilot jig's registration line on the appropriate center line, clamp it, then drill the pilots. two 30"-long sides and a top, bottom and cleat blank, all 28V} long. You'll have enough left to make one shelf, 28rX6M long. If you want more than a single shelf, you'll have to cut the remaining half-sheet of the plywood. The lengths must be precise, and the parts must be square. There's enough excess in the strips that you can cut the parts to rough length with the circular saw, then square one end and recut them to exact length. Make the latter two cuts on the table saw with a sliding table or crosscut sled. It is important to check your crosscut sled to be sure its fence is square to the saw blade. (If it isn't, reset the fence to make it dead-on square!) Trim one end of each part to square it. To keep things clear, mark the edge you set against the sled's fence and the end you cut. Align the center hole on this jig with the center line marked on the side. Clamp the jig, and drill the holes. Next, crosscut the parts to length. Flip each piece so the marked edge is again against the sled's fence. And use a stop clamped to the fence to ensure like parts are identical. Rip the cleat blank into two 4''-wide pieces. Cut the top to a 1W width and the shelf or shelves to wide. Finally, cut the back from a piece of 1/4" plywood. Cutting the Joinery The wall cabinet's construction duplicates that of a base cabinet. The top and bottom, along with a pair of cleats for mounting the cabinet, are captured between the sides and located with biscuits. Screws reinforce the glued biscuit joints, but in this cabinet, the screws are driven through pockets formed in the outer surfaces of the top and bottom. The outer faces of the sides are unblemished. It's worth noting that you can use this joinery approach in a base cabinet that has an exposed side. And contrariwise, you can run screws through the sides of a wall cabinet if the sides won't be exposed. Begin this phase of the work by rabbeting the sides and the bottom for the back. The rabbets are 1/2" wide by 1/2" deep. Cut into the finished face if you are using prefinished plywood. The rabbets will identify the back edge of these parts. Commercial templates expedite drilling the pilots and pin holes, especially if you are making not just one cabinet, but a half-dozen or so for your kitchen. All you do is fit the templates onto the inner face of a side, so the fences are snug against the front edge of the 52 Upper Kitchen Cabinets |


