Creative Woodworks & crafts 1997-08, страница 29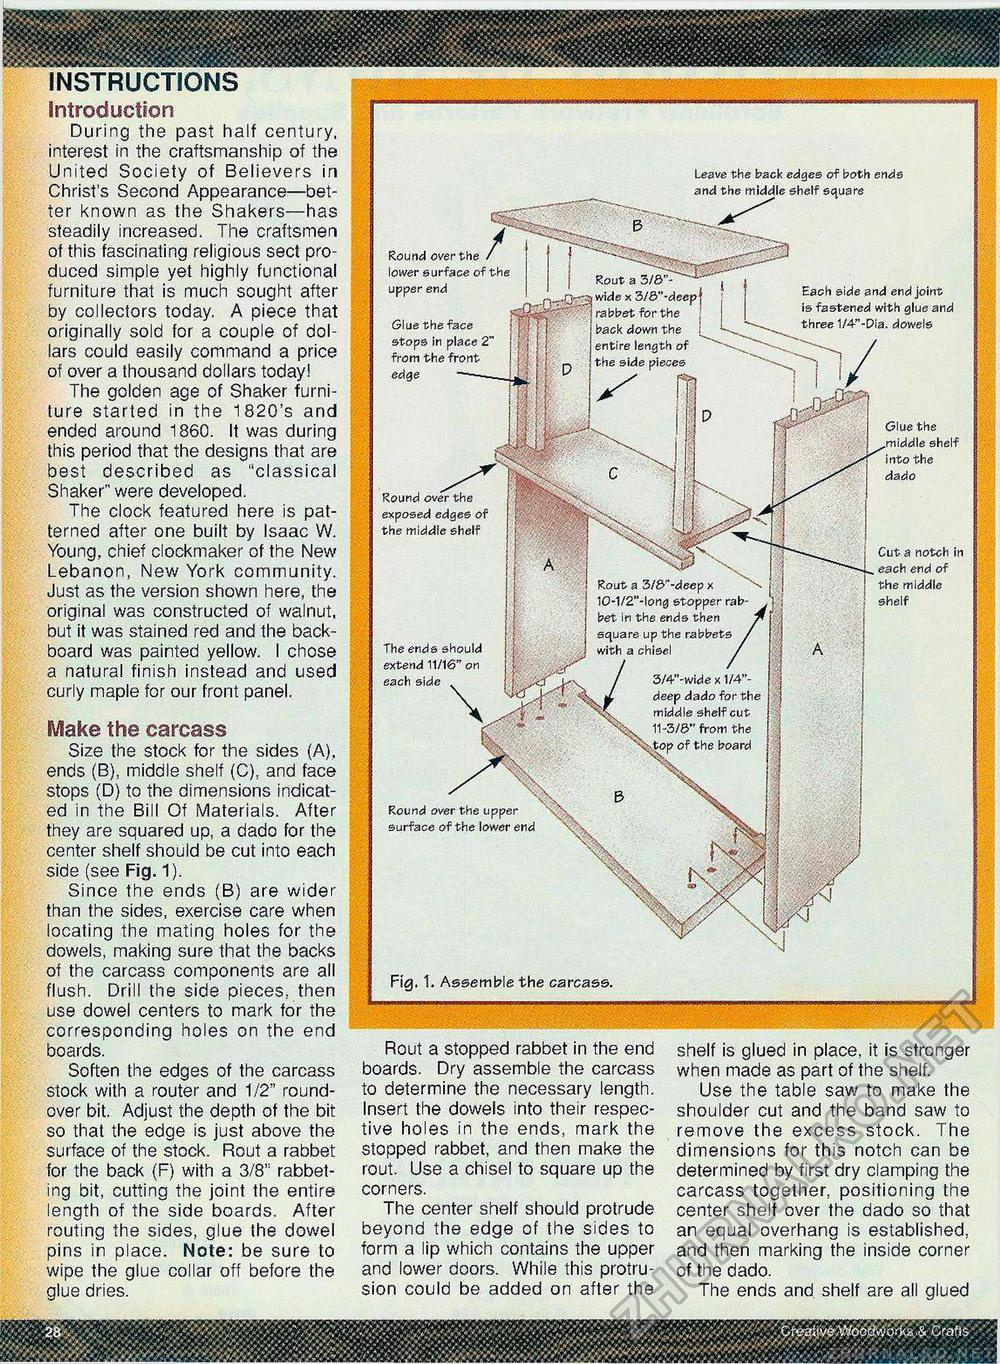
INSTRUCTIONS Introduction During the past half century, interest in the craftsmanship of the United Society of Believers in Christ's Second Appearance—better known as the Shakers—has steadily increased. The craftsmen of this fascinating religious sect produced simple yet highly functional furniture that is much sought after by collectors today. A piece that originally sold for a couple of dollars could easily command a price of over a thousand dollars today! The golden age of Shaker furniture started in the 1820's and ended around 1860. It was during this period that the designs that are best described as "classical Shaker" were developed. The clock featured here is patterned after one built by Isaac W. Young, chief clockmaker of the New Lebanon, New York community. Just as the version shown here, the original was constructed of walnut, but it was stained red and the backboard was painted yellow. I chose a natural finish instead and used curly maple for our front panel. Make the carcass Size the stock for the sides (A), ends (B), middle shelf (C), and face stops (D) to the dimensions indicated in the Bill Of Materials. After they are squared up, a dado for the center shelf should be cut into each side (see Fig. 1). Since the ends (B) are wider than the sides, exercise care when locating the mating holes for the dowels, making sure that the backs of the carcass components are all flush. Drill the side pieces, then use dowel centers to mark for the corresponding holes on the end boards. Soften the edges of the carcass stock with a router and 1/2" round-over bit. Adjust the depth of the bit so that the edge is just above the surface of the stock. Rout a rabbet for the back (F) with a 3/8" rabbeting bit, cutting the joint the entire length of the side boards. After routing the sides, glue the dowel pins in place. Note: be sure to wipe the glue collar off before the glue dries. Round over the lower surface of the upper end Glue the face stops in place 2' from the front edge wide x 3/6"-deep] rabbet for the back down the i entire length of the side pieces Round over the exposed edges of the middle shelf The ends should extend 11/16" on each side Leave the back edges of both ends and the middle shelf square Each side and end joint is fastened with glue and three 1/4"-Dia. dowels Rout a 3/&"-deep x \ 10-1/2"-long stopper rabbet in the ends then square up the rabbets with a chisel 3/4"-wide x 1/4"-deep dado for the middle shelf cut 11-3/S" from the Round over the upper surface of the lower end Cut a notch in each end of the middle shelf Fig. 1. Assemble the carcass. ——■— KM Rout a stopped rabbet in the end boards. Dry assemble the carcass to determine the necessary length. Insert the dowels into their respective holes in the ends, mark the stopped rabbet, and then make the rout. Use a chisel to square up the corners. The center shelf should protrude beyond the edge of the sides to form a lip which contains the upper and lower doors. While this protrusion could be added on after the shelf is glued in place, it is stronger when made as part of the shelf. Use the table saw to make the shoulder cut and the band saw to remove the excess stock. The dimensions for this notch can be determined by first dry clamping the carcass together, positioning the center shelf over the dado so that an equal overhang is established, and then marking the inside corner of the dado. The ends and shelf are all glued ';dt^ye.WddtJvJorki. & C'a'ts. saSBSWBSBSB |


