Creative Woodworks & crafts 1997-08, страница 30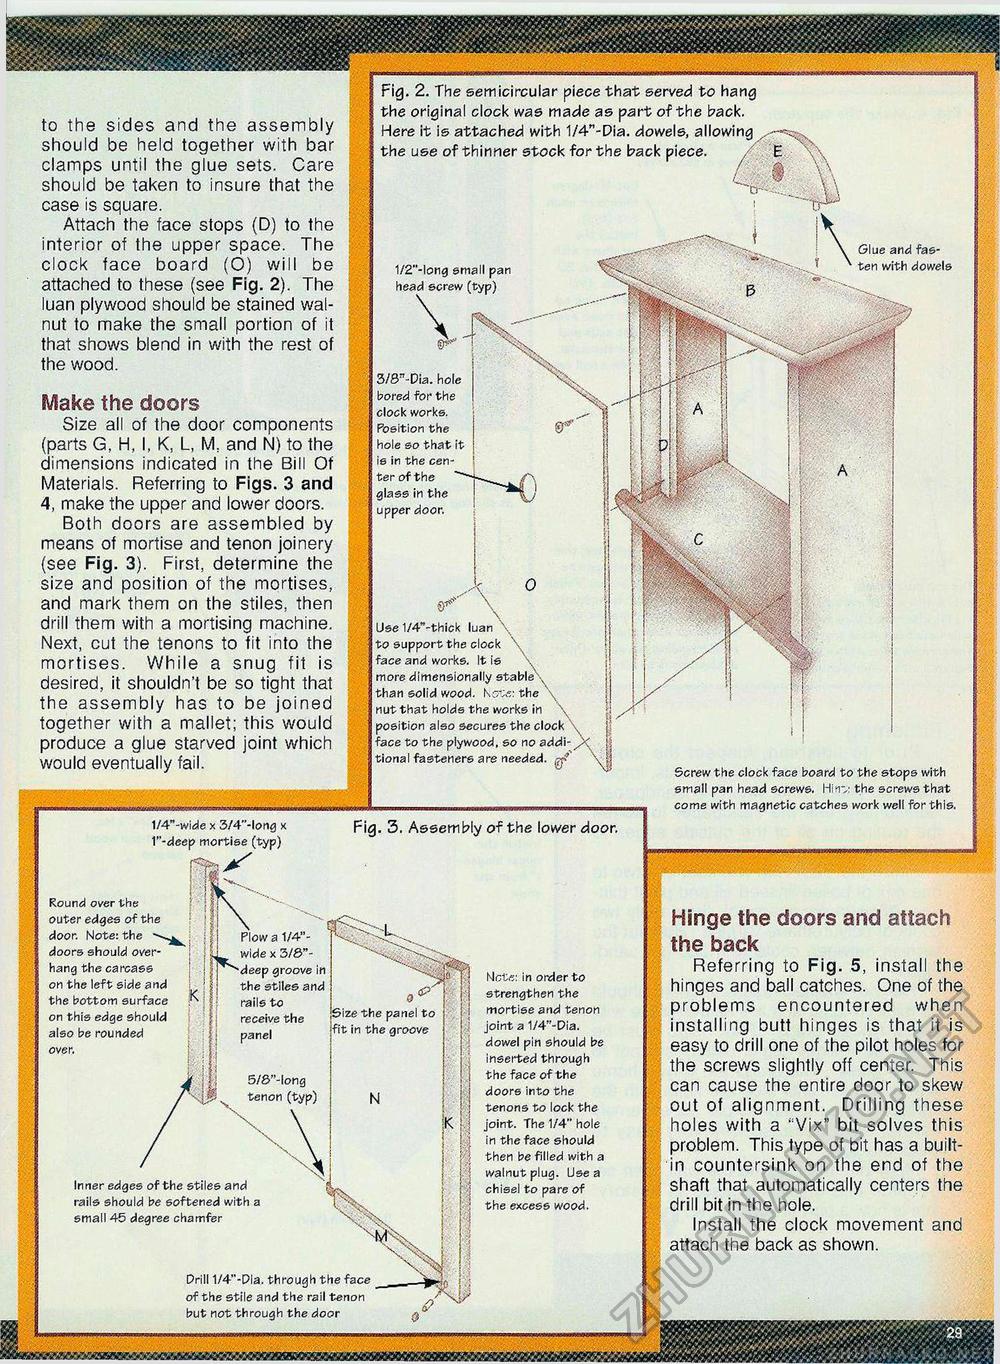
1/4"-wide x 3/4"-long x 1"-deep mortise (typ) Fig. 3. Assembly of the lower door. Round over the outer edges of the door. Note: the doors should overhang the carcass on the left side and the bottom surface on this edge should also be rounded a 1/4"-x 3/&"-groove in the stiles and rails to receive the panel 5/S"-long Size the panel to fit in the groove Inner edges of the stiles and rails should be softened with a small 45 degree chamfer Note: in order to strengthen the mortise and tenon joint a 1/4"-Dia. dowel pin should be inserted through the face of the doors into the tenons to lock the joint. The 1/4" hole in the face should then be filled with a walnut plug. Use a chisel to pare of the excess wood. Prill 1/4"-Dla. through the face of the stile and the rail tenon but not through the door Hinge the doors and attach the back Referring to Fig. 5, install the hinges and ball catches. One of the problems encountered when installing butt hinges is that it is easy to drill one of the pilot holes for the screws slightly off center. This can cause the entire door to skew out of alignment. Drilling these holes with a "Vix" bit solves this problem. This type of bit has a built-in countersink on the end of the shaft that automatically centers the drill bit in the hole. Install the clock movement and attach the back as shown. to the sides and the assembly should be held together with bar clamps until the glue sets. Care should be taken to insure that the case is square. Attach the face stops (D) to the interior of the upper space. The clock face board (O) will be attached to these (see Fig. 2). The luan plywood should be stained walnut to make the small portion of it that shows blend in with the rest of the wood. Make the doors Size all of the door components (parts G, H, I, K, L, M, and N) to the dimensions indicated in the Bill Of Materials. Referring to Figs. 3 and 4, make the upper and lower doors. Both doors are assembled by means of mortise and tenon joinery (see Fig. 3). First, determine the size and position of the mortises, and mark them on the stiles, then drill them with a mortising machine. Next, cut the tenons to fit into the mortises. While a snug fit is desired, it shouldn't be so tight that the assembly has to be joined together with a mallet; this would produce a glue starved joint which would eventually fail. Fig. 2. The semicircular piece that served to hang the original clock was made as part of the back. Here it is attached with 1/4"-Dia. dowels, allowing the use of thinner stock for the back piece. E Glue and fasten with dowels 1/2 -long small pan head screw (typ) \ 3/S -Pia. hole bored for the clock works. Position the hole so that it is in the center of the glass in the upper door. \ Use 1/4"-thick luan \ to support the clock \ face and works. It is more dimensionally stable • than solid wood. Kots: the \ nut that holds the works in position also secures the clock face to the plywood, so no addi tional fasteners are needed. Screw the clock face board to the stops with small pan head screws. Hi try. the screws that come with magnetic catches work well for this. |


