Creative Woodworks & crafts 1999-10, страница 50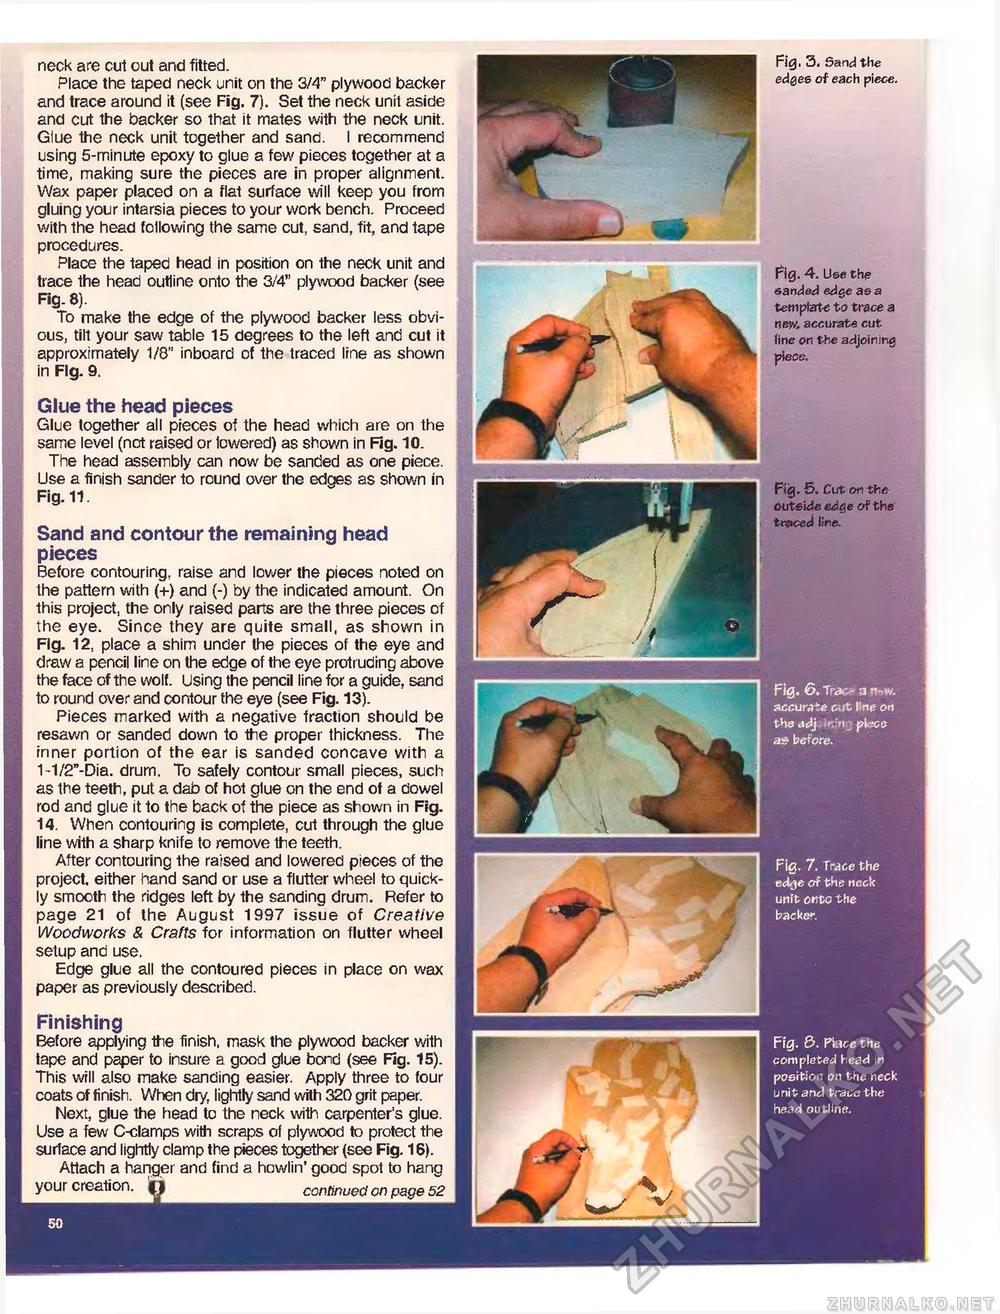
neck are cut out and fitted. Place the taped neck unit on the 3/4" plywood backer and trace around it (see Fig. 7). Set the neck unit aside and cut the backer so that it mates with the neck unit. Glue the neck unit together and sand. I recommend using 5-minute epoxy to glue a few pieces together at a time, making sure the pieces are in proper alignment. Wax paper placed on a flat surface will keep you from gluing your intarsia pieces to your work bench. Proceed with the head following the same cut, sand, fit, and tape procedures. Place the taped head in position on the neck unit and trace the head outline onto the 3/4" plywood backer (see Fig. 8). To make the edge of the plywood backer less obvious, tilt your saw table 15 degrees to the left and cut it approximately 1/8" inboard of the traced line as shown in Fig. 9. Glue the head pieces Glue together all pieces of the head which are on the same level (not raised or lowered) as shown in Fig. 10. The head assembly can now be sanded as one piece. Use a finish sander to round over the edges as shown in Fig. 11. Sand and contour the remaining head pieces Before contouring, raise and lower the pieces noted on the pattern with (+) and (-) by the indicated amount. On this project, the only raised parts are the three pieces of the eye. Since they are quite small, as shown in Fig. 12, place a shim under the pieces of the eye and draw a pencil line on the edge of the eye protruding above the face of the wolf. Using the pencil line for a guide, sand to round over and contour the eye (see Fig. 13). Pieces marked with a negative fraction should be resawn or sanded down to the proper thickness. The inner portion of the ear is sanded concave with a j 1-1/2"-Dia. drum. To safely contour small pieces, such ■ as the teeth, put a dab of hot glue on the end of a dowel rod and glue it to the back of the piece as shown in Fig. j 14. When contouring is complete, cut through the glue line with a sharp knife to remove the teeth. After contouring the raised and lowered pieces of the project, either hand sand or use a flutter wheel to quick-, ly smooth the ridges left by the sanding drum. Refer to j page 21 of the August 1997 issue of Creative Woodworks & Crafts for information on flutter wheel I setup and use, Edge glue all the contoured pieces in place on wax paper as previously described. Finishing ■ Before applying the finish, mask the plywood backer with tape and paper to insure a good glue bond (see Fig. 15). This will also make sanding easier. Apply three to four coats of finish. When dry, lightly sand with 320 grit paper. Next, glue the head to the neck with carpenter's glue. Use a few C-clamps with scraps of plywood to protect the surface and lightly clamp the pieces together (see Fig. 16). Attach a hanger and find a howlin' good spot to hang your creation. |J continued on page 52 50 Fig. 3. Sand the edges of each piece. Fig. 7. Trace the edge of the neck unit onto the baeke*. Fig. &. Piace the completed head in position on the neck unit and trace the head outline. Fig. 4. Use the sanded edge as a template to trace a new, accurate cut line on the adjoining piece. Fig. 6. Trac> a n- w. accurate cut ISne on theadj ' pk?ee as before. Fig. 5. Cut on the outside edge of the traced line. |


