Creative Woodworks & crafts 1999-11, страница 58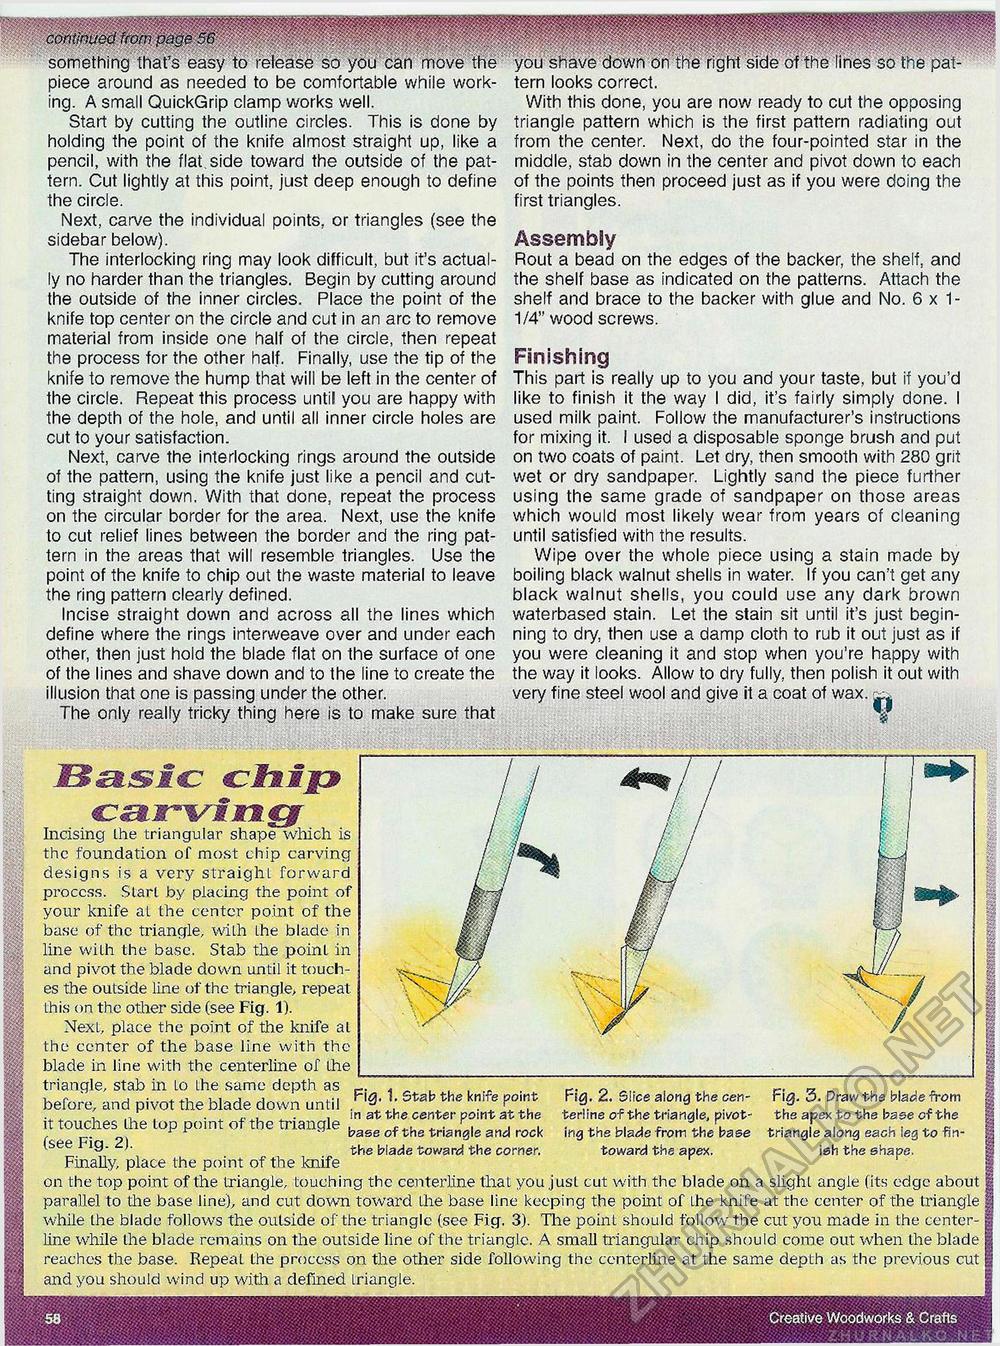
continued from page 56 * ■ : ' something that's easy to release so you can move the piece around as needed to be comfortable while working. A small QuickGrip clamp works well. Start by cutting the outline circles. This is done by holding the point of the knife almost straight up, like a pencil, with the flat side toward the outside of the pattern. Cut lightly at this point, just deep enough to define the circle. Next, carve the individual points, or triangles (see the sidebar below). The interlocking ring may look difficult, but it's actually no harder than the triangles. Begin by cutting around the outside of the inner circles. Place the point of the knife top center on the circle and cut in an arc to remove material from inside one half of the circle, then repeat the process for the other half. Finally, use the tip of the knife to remove the hump that will be left in the center of the circle. Repeat this process until you are happy with the depth of the hole, and until all inner circle holes are cut to your satisfaction. Next, carve the interlocking rings around the outside of the pattern, using the knife just like a pencil and cutting straight down. With that done, repeat the process on the circular border for the area. Next, use the knife to cut relief lines between the border and the ring pattern in the areas that will resemble triangles. Use the point of the knife to chip out the waste material to leave the ring pattern clearly defined. Incise straight down and across all the lines which define where the rings interweave over and under each other, then just hold the blade flat on the surface of one of the lines and shave down and to the line to create the illusion that one is passing under the other. The only really tricky thing here is to make sure that you shave down on the right side of the lines so the pattern looks correct. With this done, you are now ready to cut the opposing triangle pattern which is the first pattern radiating out from the center. Next, do the four-pointed star in the middle, stab down in the center and pivot down to each of the points then proceed just as if you were doing the first triangles. Assembly Rout a bead on the edges of the backer, the shelf, and the shelf base as indicated on the patterns. Attach the shelf and brace to the backer with glue and No. 6 x 1-1/4" wood screws. Finishing This part is really up to you and your taste, but if you'd like to finish it the way I did, it's fairly simply done. I used milk paint. Follow the manufacturer's instructions for mixing it. I used a disposable sponge brush and put on two coats of paint. Let dry, then smooth with 280 grit wet or dry sandpaper. Lightly sand the piece further using the same grade of sandpaper on those areas which would most likely wear from years of cleaning until satisfied with the results. Wipe over the whole piece using a stain made by boiling black walnut shells in water. If you can't get any black walnut shells, you could use any dark brown waterbased stain. Let the stain sit until it's just beginning to dry, then use a damp cloth to rub it out just as if you were cleaning it and stop when you're happy with the way it looks. Allow to dry fully, then polish it out with very fine steel wool and give it a coat of wax. 9 Bas/c cAiFjp Incising the triangular shape which is the foundation of most chip carving designs is a very straight forward proccss. Start by placing the point of your knife aL the center point of the base of the triangle, with Ihe blade in line with the base. Stab the point in and pivot the blade down until it touches the outside line of the triangle, repeat this on the other side (see Fig. 1). Next, place the point of the knife at the center of the base line with the blade in line with the centerline of the triangle, stab in to the same depth as before, and pivot the blade down until Fig, 1. Stab the knife point , ,, . n . j_. , ,n at the center point at the it touches the top point of the triangle bgse ? d k (see Fig. 2). 53 the blade toward the corner. Pig. 2. Slice along the centerline of the triangle, pivoting the blade from the base toward the apex. Fig. 3. Praw the blade from the apex to the base of the triangle along each ieg to finish the shape. Finally, place the point of the knife on the top point of the triangle, touching the centerline that you just cut with the blade on a slight angle (its edge about ] parallel to the base line), and cut down toward the base line keeping the point of the knife at the center of the triangle ] while the blade follows the outside of the triangle (see Fig. 3). The point should follow the cut you made in the center-line while the blade remains on the outside line of the triangle. A small triangular chip should come out when the blade I reaches the base. Repeat the process on the other side following the centerline at the same depth as the previous cut j and you should wind up with a defined triangle. 56 Creative Woodworks & Crafts |


