Creative Woodworks & crafts 2000-04, страница 12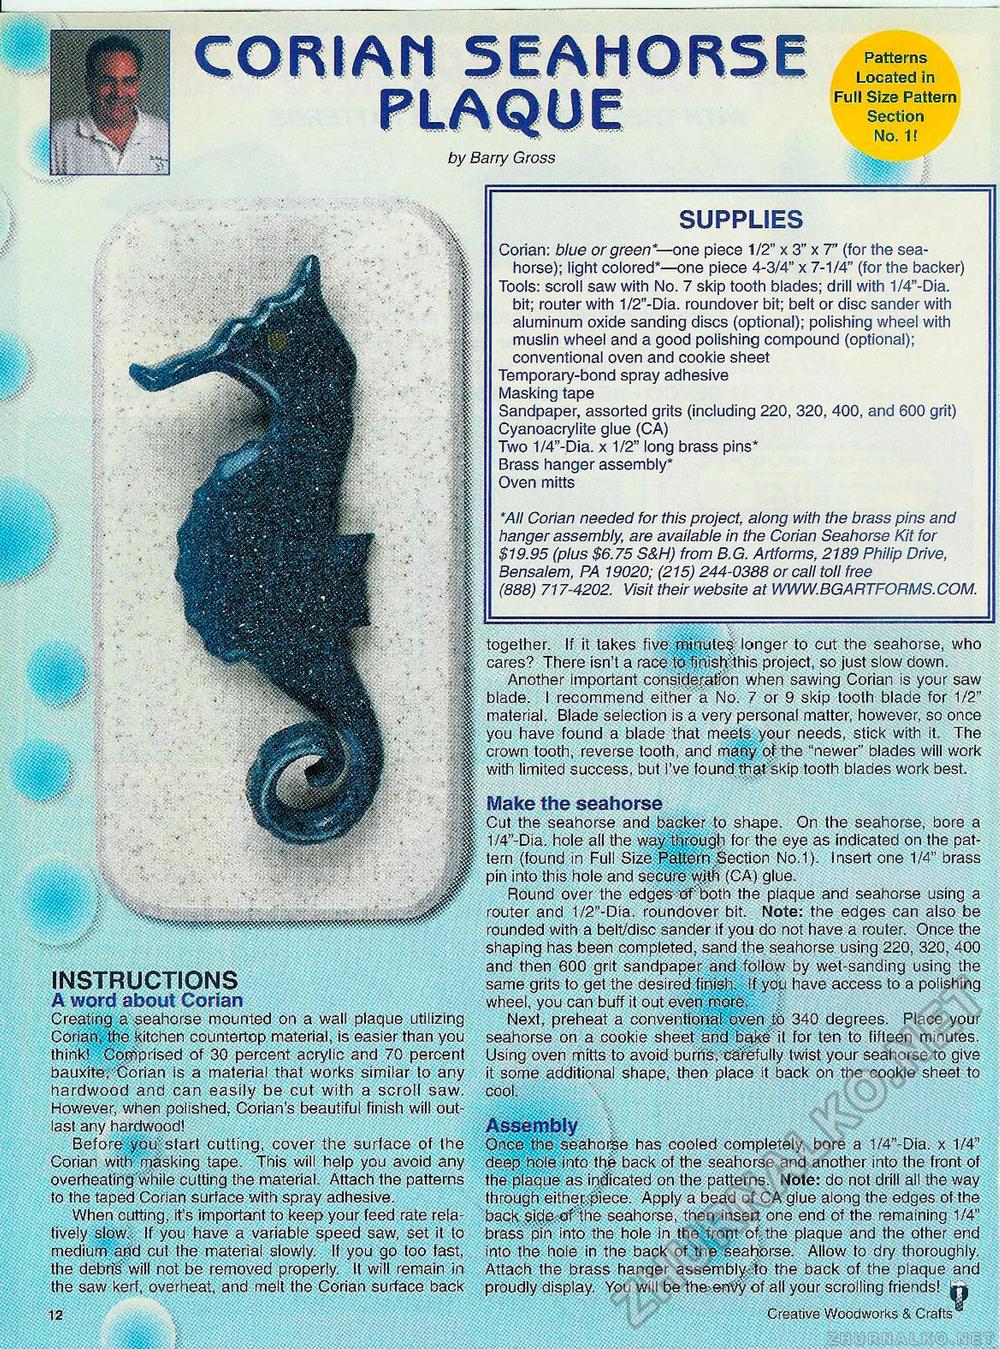
together. If it takes five minutes. longer to cut the seahorse, who cares? There isn't a race totj^h this project, so just slow down. Another important consideration when sawing Corian is your saw blade. I recommend either a No. 7 or 9 skip tooth blade for 1/2" material. Blade selection is a very personal matter, however, so once you have found a blade that meets your needs, stick with it. The crown tooth, reverse tooth, and many of the "newer" blades will work with limited success, but I've found that skip tooth blades work best. Make the seahorse Cut the seahorse and backer to shape. On the seahorse, bore a 1/4"-Dia. hole all the way through for the eye as indicated on the pattern (found in Full Size Pattern Section No.1). Insert one 1/4" brass pin into this hole and secure with (CA) glue. Round over the edges of: both the plaque and seahorse using a router and 1/2"-Dia. roundover bit. Note: the edges can also be rounded with a belt/disc sander if you do not have a router. Once the shaping has been completed, sand the seahorse using 220, 320, 400 and then 600 grit sandpaper and follow by wet-sanding using the same grits to get the desired finish, if.you have access to a polishing wheel, you can buff it out even more. I Next, preheat a conventional.oven to 340 degrees. Place your seahorse on a cookie sheet and bake it for ten to fifteen minutes. Using oven mitts to avoid burns.:'cai%fully twist your seahorse to give it some additional shape, then place it back on the cookie sheet to cool. INSTRUCTIONS A word about Corian Creating a seahorse mounted on a wall plaque utilizing Cotian, the kitchen countertop material, is easier than you think! Comprised of 30 percent acrylic and 70 percent bauxite,-Sorian is a material that works similar to any hardwood and can easily be cut with a scroll saw. However, when polished. Corian's beautiful finish will outlast any hardwood! Before you' start cutting, cover the surface of the Corian with masking tape. This will help you avoid any overheatihgwhile cutting the material. Attach the patterns to the taped Corian surface with spray adhesive. When cutting, it's important to keep your feed rate relatively slow.'-: If you have a variable speed saw, set it to medium-aSd cut the material slowly, if you go too fast, the debits will not be removed properly. It will remain in the saw kerf, overheat, and melt the Corian surface back Assembly Oace. tKe seahorse has cooled completely, bore a 1/4"-Dia. x 1/4" deep hole into th£ back of the seahorse and another into the front of the plaque as indicated on the patterns. Note: do not drill all the way through eithec$iece. Apply a bead of CA glue along the edges of the back sid.e of the seahorse, then insert one end of the remaining 1/4" brass pin into the hole in the; front of. the plaque and the other end into the hole in the back of the seahorse. Allow to dry thoroughly. Attach the brass hanger assemblyJo the back of the plaque and proudly display. You will be ther-en^ of all your scrolling friends! |-j Creative Woodworks & Crafts SUPPLIES Corian: blue or green*— one piece 1/2" x 3" x 7" (for the seahorse); light colored*—one piece 4-3/4" x 7-1/4" (for the backer) Tools: scroll saw with No. 7 skip tooth blades; drill with 1/4"-Dia. bit; router with 1/2"-Dia. roundover bit; belt or disc sander with aluminum oxide sanding discs (optional); polishing wheel with muslin wheel and a good polishing compound (optional); conventional oven and cookie sheet Temporary-bond spray adhesive Masking tape Sandpaper, assorted grits (including 220, 320, 400, and 600 grit) Cyanoacrylite glue (CA) Two 1/4"-Dia. x 1/2" long brass pins* Brass hanger assembly* Oven mitts *All Corian needed for this project, along with the brass pins and hanger assembly, are available in the Corian Seahorse Kit for $19.95 (plus $6.75 S&H) from B.G. Artforms, 2189 Philip Drive, Bensalem, PA 19020; (215) 244-0388 or call toil free (888) 717-4202. Visit their website at WWW.BGARTFORMS. COM. Patterns Located in Full Size Pattern Section No. 1! by Barry Gross |


