Creative Woodworks & crafts 2001-04, страница 22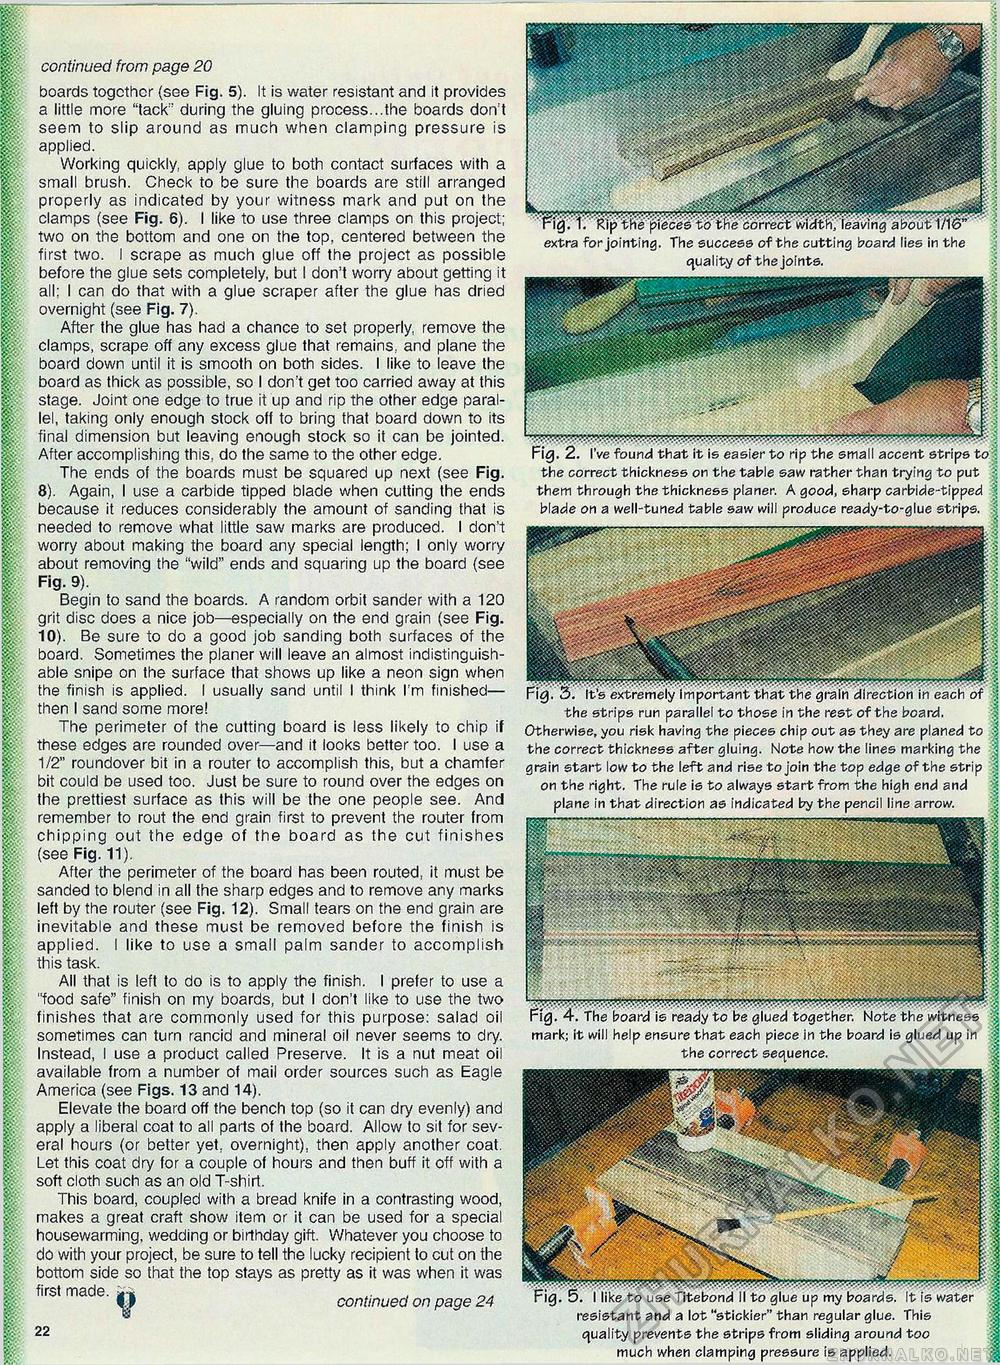
continued from page 20 boards together (see Fig. 5). It is water resistant and it provides a little more "tack" during the gluing process...the boards don't seem to slip around as much when clamping pressure is applied. Working quickly, apply glue to both contact surfaces with a small brush. Check to be sure the boards are still arranged properly as indicated by your witness mark and put on the clamps (see Fig. 6). I like to use three clamps on this project; two on the bottom and one on the top, centered between the first two. I scrape as much glue off the project as possible before the glue sets completely, but I don't worry about getting it all: I can do that with a glue scraper after the glue has dried overnight (see Fig. 7). After the glue has had a chance to set properly, remove the clamps, scrape off any excess glue that remains, and plane the board down until it is smooth on both sides. I like to leave the board as thick as possible, so I don't get too carried away at this stage. Joint one edge to true it up and rip the other edge parallel, taking only enough stock off to bring that board down to its final dimension but leaving enough stock so it can be jointed. After accomplishing this, do the same to the other edge. The ends of the boards must be squared up next (see Fig. 8). Again, I use a carbide tipped blade when cutting the ends because it reduces considerably the amount of sanding that is needed to remove what little saw marks are produced. I don't worry about making the board any special length; I only worry about removing the "wild" ends and squaring up the board (see Fig. 9). Begin to sand the boards. A random orbit sander with a 120 grit disc does a nice job—especially on the end grain (see Fig. 10). Be sure to do a good job sanding both surfaces of the board. Sometimes the planer will leave an almost indistinguishable snipe on the surface that shows up like a neon sign when the finish is applied. I usually sand until I think I'm finished— then I sand some more! The perimeter of the cutting board is less likely to chip if these edges are rounded over—and it looks better too. I use a 1/2" roundover bit in a router to accomplish this, but a chamfer bit could be used too. Just be sure to round over the edges on the prettiest surface as this will be the one people see. And remember to rout the end grain first to prevent the router from chipping out the edge of the board as the cut finishes (see Fig. 11). After the perimeter of the board has been routed, it must be sanded to blend in all the sharp edges and to remove any marks left by the router (see Fig. 12). Small tears on the end grain are inevitable and these must be removed before the finish is applied. I like to use a small palm sander to accomplish this task. All that is left to do is to apply the finish. I prefer to use a "food safe" finish on my boards, but I don't like to use the two finishes that are commonly used for this purpose: salad oil sometimes can turn rancid and mineral oil never seems to dry. Instead, I use a product called Preserve. It is a nut meat oil available from a number of mail order sources such as Eagle America (see Figs. 13 and 14). Elevate the board off the bench top (so it can dry evenly) and apply a liberal coat to all parts of the board. Allow to sit for several hours (or better yet, overnight), then apply another coat. Let this coat dry for a couple of hours and then buff it off with a soft cloth such as an old T-shirt. This board, coupled with a bread knife in a contrasting wood, makes a great craft show item or it can be used for a special housewarming, wedding or birthday gift. Whatever you choose to do with your project, be sure to tell the lucky recipient to cut on the bottom side so that the top stays as pretty as it was when it was first made, i-i , M continued on page 24 22 mmm WlmlBm Wmmm 'rig. T. Rip trie pi ece's WifieSoir^'M&n;'ieavihg avoui vVcT extra for jointing. The success of the cutting board lies in the quality of the joints. Fig. 2. I've found that it is easier to rip the small accent strips to the correct thickness 011 the table saw rather than trying to put them through the thickness planer. A good, sharp carbide-tipped blade on a well-tuned table saw will produce ready-to-glue strips. Fig. 3. It's extremely Important that the grain direction in each of the strips run parallel to those in the rest of the board. Otherwise, you risk having the pieces chip out as they are planed to the correct thickness after gluing. Note how the lines marking the grain start low to the left and rise to join the top edge of the strip on the right. The rule is to always start from the high end and plane in that direction as indicated by the pencil line arrow. Fig. 4. The board is ready to be glued together. Note the witness mark; it will help ensure that each piece in the board is glued up in the correct sequence. Fig. 5. I like to use Titebond II to glue up my boards. It is water resistant and a lot "stickier" than regular glue. This quality prevents the strips from sliding around too much when clamping pressure is applied. |


