Creative Woodworks & crafts 2001-10, страница 28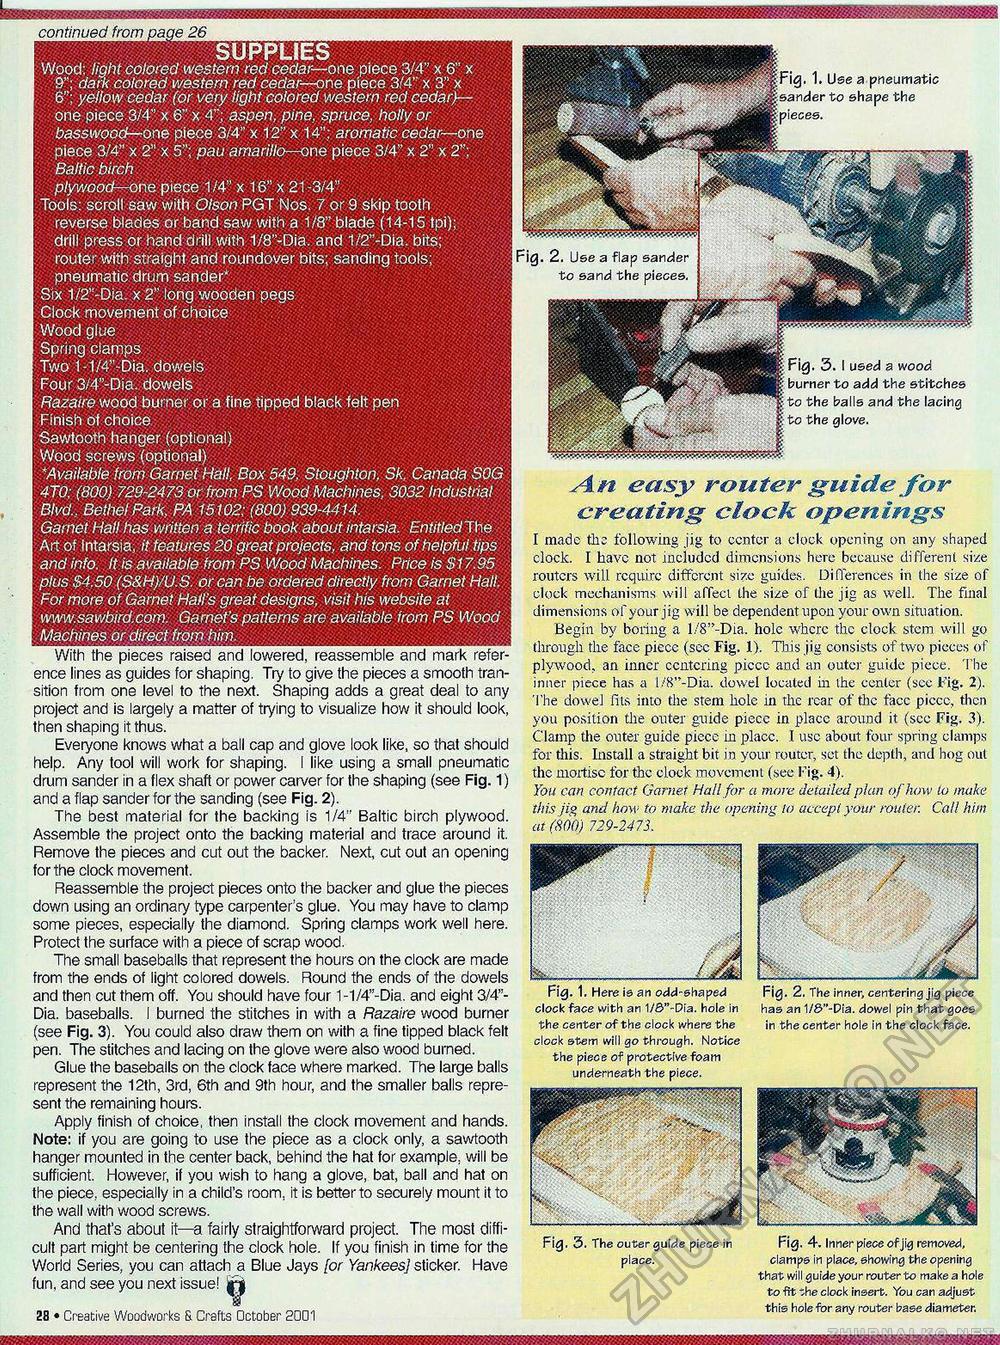
continued from paae 26 SUPPLIES Wood: light colored western red cedar—one piece 3/4" x 6" x 9"; dark colored western red cedar—one piece 3/4" x 3" x 6"; yellow cedar (or very tight colored western red cedar)— one piece 3/4" x 6" x 4"; aspen, pine, spruce, holly or basswood—one piece 3/4" x 12" x 14": aromatic cedar— one piece 3/4" x 2" x 5"; pau amarillo—one piece 3/4" x 2" x 2"; Baltic birch plywood—one piece 1 /4" x 16" x 21 -3/4" Tools: scroll saw with Olson PGT Nos. 7 or 9 skip tooth reverse blades or band saw with a 1/8" blade (14-15 tpi); drill press or hand drill with 1/8"-Dia. and 1/2"-Dia. bits; router with:straight and roundover bits; sanding tools; pneumatic drum sander" Six 1/2"-Dia. x 2" long wooden pegs Clock movement of choice Wood glue Spring clamps Two t-1/4"-Dia. dowels Four 3/4"-Dia. dowels Razaire wood burner or a fine tipped black felt pen Finish of choice Sawtooth hanger (optional) Wood screws (optional) *Available from Garnet Hall, Box 549. Stoughton, Sk, Canada SOG 4T0; (800) 729-2473 or from PS Wood Machines, 3032 Industrial Blvd., Bethel Park, PA 15102; (800) 939-4414. Garnet Hall has written a terrific book about intarsia. Entitled The Art of Intarsia, it features 20 great projects, and tons of helpful tips and info. It is available from PS Wood Machines. Price is $17.95 plus $4,50 (S&H)/U.S. or can be ordered directly from Garnet Hall. For more of Garnet Hail's great designs, visit his website at www.sawbird.com. Garnet's patterns are available from PS Wood Machines or direct from him.__ With the pieces raised and lowered, reassemble and mark reference lines as guides for shaping. Try to give the pieces a smooth transition from one level to the next. Shaping adds a great deal to any project and is largely a matter of trying to visualize how it should look, then shaping it thus. Everyone knows what a ball cap and glove look like, so that should help. Any tool will work for shaping. I like using a small pneumatic drum sander in a flex shaft or power carver for the shaping (see Fig. 1) and a flap sander for the sanding (see Fig. 2). The best material for the backing is 1/4" Baltic birch plywood. Assemble the project onto the backing material and trace around it. Remove the pieces and cut out the backer. Next, cut out an opening for the clock movement. Reassemble the project pieces onto the backer and glue the pieces down using an ordinary type carpenter's glue. You may have to clamp some pieces, especially the diamond. Spring clamps work well here. Protect the surface with a piece of scrap wood. The small baseballs that represent the hours on the clock are made from the ends of light colored dowels. Round the ends of the dowels and then cut them off. You should have four 1-1/4"-Dia. and eight 3/4"-Dia. baseballs. I burned the stitches in with a Razaire wood burner (see Fig. 3). You could also draw them on with a fine tipped black felt pen. The stitches and lacing on the glove were also wood burned. Glue the baseballs on the clock face where marked. The large balls represent the 12th, 3rd, 6th and 9th hour, and the smaller balls represent the remaining hours. Apply finish of choice, then install the clock movement and hands. Note: if you are going to use the piece as a clock only, a sawtooth hanger mounted in the center back, behind the hat for example, will be sufficient. However, if you wish to hang a glove, bat, ball and hat on the piece, especially in a child's room, it is better to securely mount it to the wall with wood screws. And that's about it—a fairly straightforward project. The most difficult part might be centering the clock hole. If you finish in time for the World Series, you can attach a Blue Jays [or Yankees] sticker. Have fun, and see you next issue! j|| 12 • Creative Woodworks & Crafts October- 2001 A.n easy router guide for creating clock openings I made the following jig to center a clock opening on any shaped clock. I have not included dimensions here because different size routers will require different size guides. Differences in the size of clock mechanisms will affect the size of the jig as well. The final dimensions of your jig will be dependent upon your own situation. Begin by boring a l/8"-Dia. hole where the clock stem will go through the face piece (sec Fig. 1). This jig consists of two pieces of plywood, an inner centering piece and an outer guide piece. The inner piece has a l/8"-Dia. dowel located in the center (see l-'ig. 2). The dowel fits into the stem hole in the rear of the face piece, then you position the outer guide piece in place around it (see Fig. 3). Clamp the outer guide piccc in place. I use about four spring clamps for this. Install a straight bit in your router, set the depth, and hog out the mortise for the clock movement (see Fig. 4). You can contact Garnet Hail for a more, detailed plan of how to make this jig and how to make the opening to accept your router. Call him at (800) 729-2473. 1. Use a pneumatic to shape the Fig. 2. Use a flap sander to sand the pieces. 3.I used a wood to add the stitches the balls and the lacing to the glove. Fig. 3. The outer guide piece in Fig. 4. Inner piece of jig removed, place. clamp® in place, showing the opening that will guide your router to make a hole to fit -he clock insert. You can adjust this hole for any router base diameter. Fig. 1. Here is an odd-shaped clock face with an 1/S"-Dia. hole in the center of the clock where the clock stem will go through. Notice the piece of protective foam underneath the piece. Fig. 2. The inner, centering jig piece has an 1/8"-Dia. dowel pin that goes in the center hole in the clock face. mmmmmmmmmmmmmm |


