Creative Woodworks & crafts 2001-11, страница 50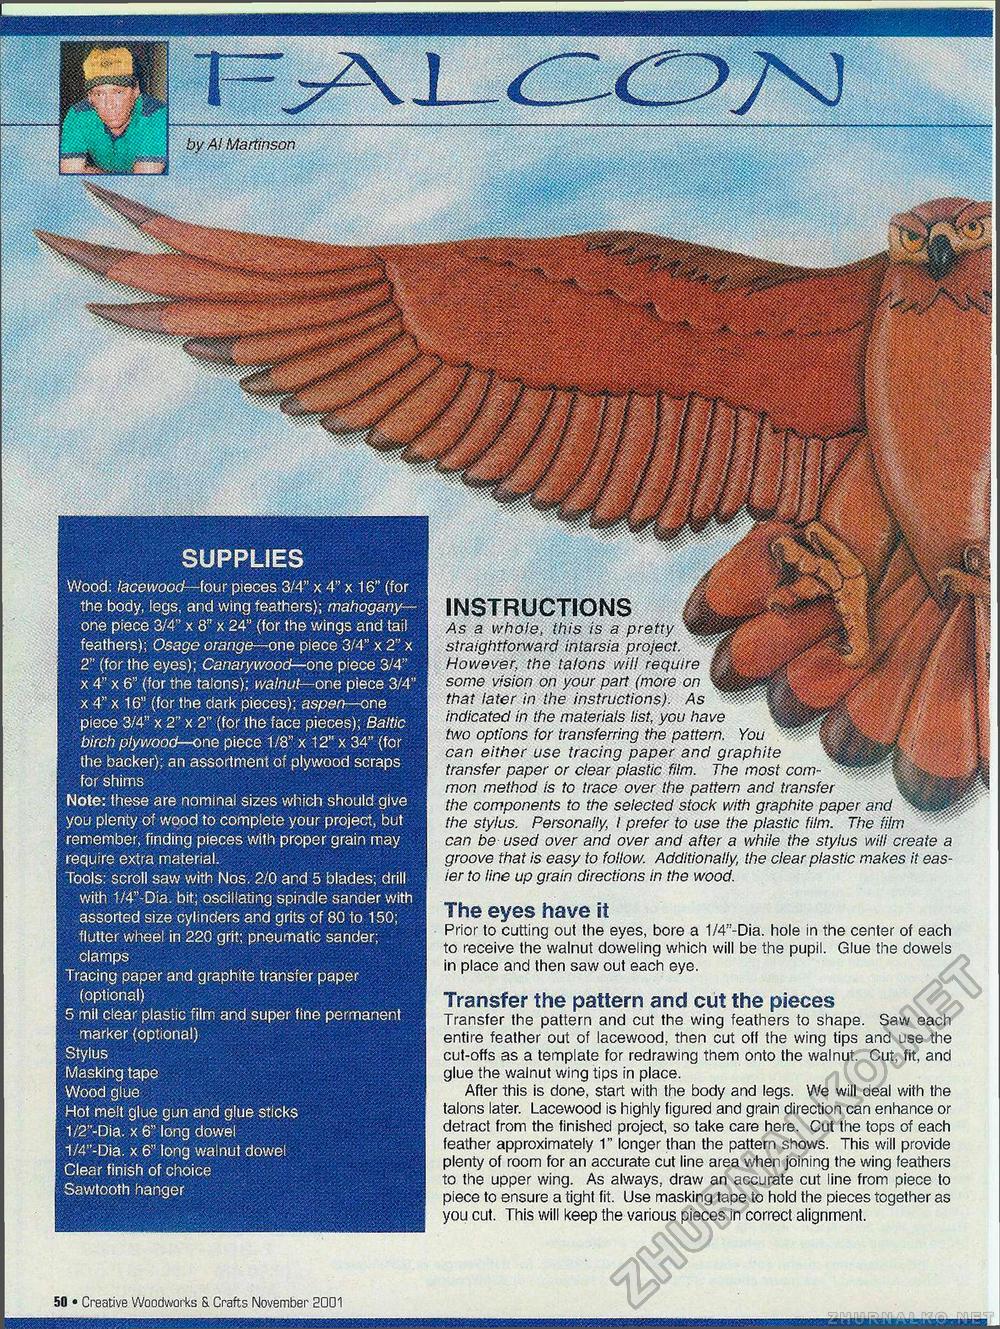
SUPPLIES Wood: lacewood— four pieces 3/4" x 4" x 16" (for the body, legs, and wirtg feathers); mahogany-one piece 3/4" x 8" x 24" (for the wings and tail feathers); Osage orange—one piece 3/4" x 2" x 2" (for the eyes); Canarywood—one piece 3/4" x 4" x 6" (for the talons); walnut—one piece 3/4" x 4" x 16" (for the dark pieces); aspen—one piece 3/4" x 2" x 2" (for the face pieces); Baltic birch plywood—one piece 1/8" x 12" x 34" {for the backer); an assortment of plywood scraps for shims Note: these are nominal sizes which should give you plenty of wood to complete your project, but remember, finding pieces with proper grain may require extra material. Tools: scroll saw with Nos. 2/0 and 5 blades; drill with 1/4"-Dia. bit; oscillating spindle sander with assorted size cylinders and grits of 80 to 150; flutter wheel in 220 grit; pneumatic sander; clamps Tracing paper and graphite transfer paper (optional) 5 mil clear plastic film and super fine permanent marker (optional) Stylus Masking tape Wood glue Hot melt glue gun and glue sticks 1/2"-Dia. x 6" long dowel 1/4"-Dia. x 6" long walnut dowel Clear finish of choice Sawtooth hanger by A! Martinson INSTRUCTIONS As a whole, this is a pretty straightforward intarsia project. v However, the talons will require some vision on your part (more on that later in the instructions). -4s indicated in the materials list, you have two options for transferring the pattern. You can either use tracing paper and graphite transfer paper or clear plastic film. The most common method is to trace over the pattern and transfer the components to the selected stock with graphite paper and the stylus. Personally, I prefer to use the plastic film. The film can be used over and over and after a while the stylus will create a groove that is easy to follow. Additionally, the clear plastic makes it easier to line up grain directions in the wood. The eyes have it Prior to cutting out the eyes, bore a 1/4"-Dia. hole in the center of each to receive the walnut doweling which will be the pupil. Glue the dowels in place and then saw out each eye. Transfer the pattern and cut the pieces Transfer the pattern and cut the wing feathers to shape. Saw each entire feather out of lacewood, then cut off the wing tips and use the cut-offs as a template for redrawing them onto the walnut. Cut, fit, and glue the walnut wing tips in place. After this is done, start with the body and legs. We will deal with the talons later. Lacewood is highly figured and grain direction can enhance or detract from the finished project, so take care here. Cut the tops of each feather approximately 1" longer than the pattern shows. This will provide plenty of room for an accurate cut line area when joining the wing feathers to the upper wing. As always, draw an accurate cut line from piece to piece to ensure a tight fit. Use masking tape to hold the pieces together as you cut. This will keep the various pieces in correct alignment. 50 • Creative Woodworks & Crafts November 2001 continued on page 18 |


