Creative Woodworks & crafts 2001-11, страница 63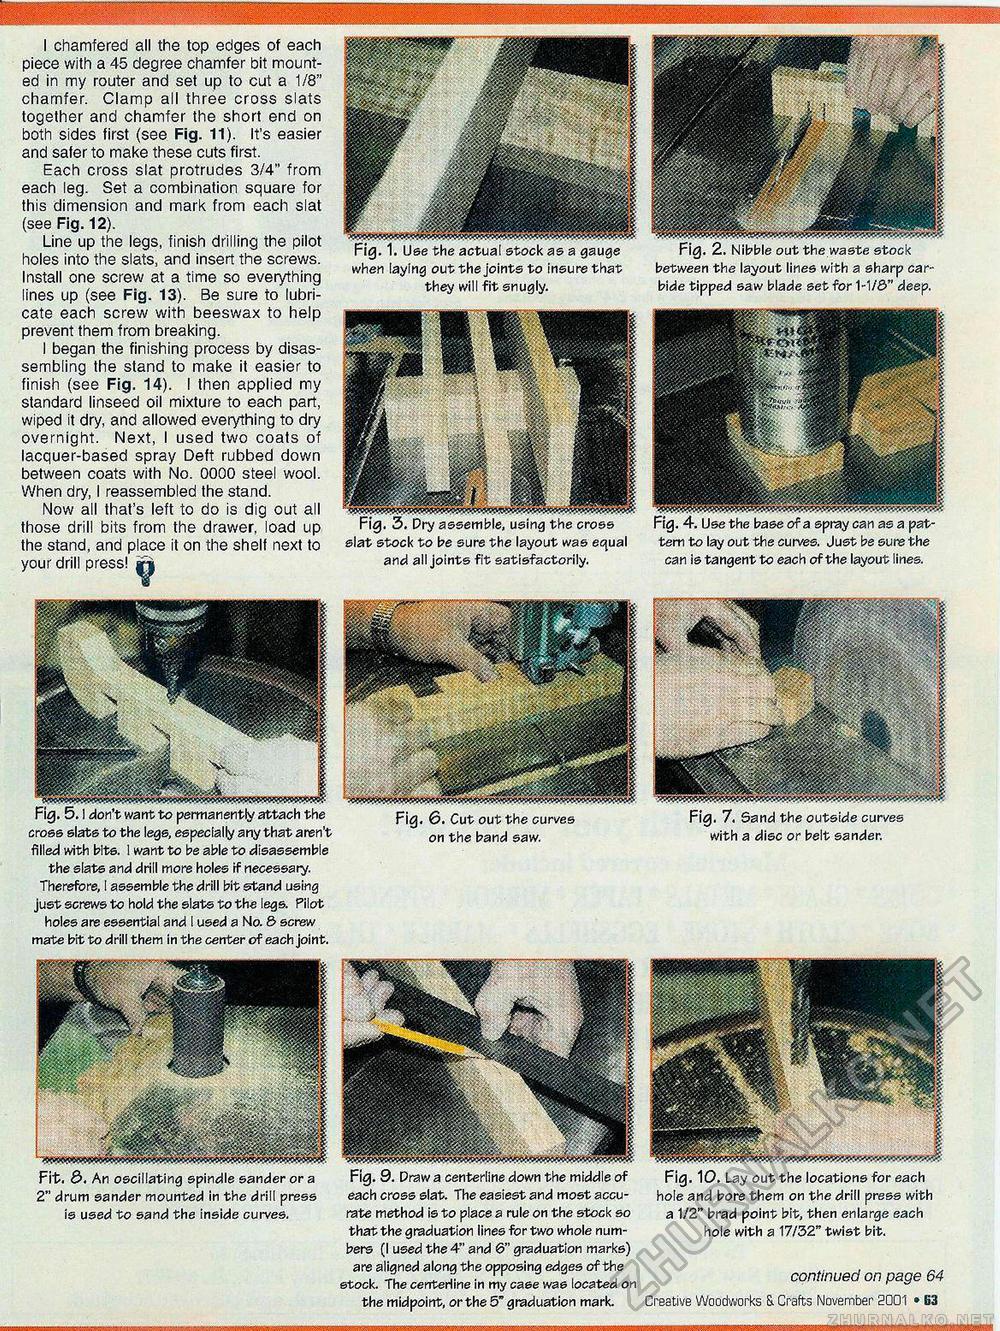
...... . .... . . . . .. .... ,■ . nggBBj!^^ I chamfered all the top edges of each piece with a 45 degree chamfer bit mounted in my router and set up to cut a 1/8" chamfer. Clamp ali three cross slats together and chamfer the short end on both sides first (see Fig. 11). It's easier and safer to make these cuts first. Each cross slat protrudes 3/4" from each leg. Set a combination square for this dimension and mark from each slat (see Fig. 12). Line up the legs, finish drilling the pilot holes into the slats, and insert the screws. Install one screw at a time so everything lines up (see Fig. 13). Be sure to lubricate each screw with beeswax to help prevent them from breaking. I began the finishing process by disassembling the stand to make it easier to finish (see Fig. 14). I then applied my standard linseed oil mixture to each part, wiped it dry, and allowed everything to dry overnight. Next, I used two coats of lacquer-based spray Deft rubbed down between coats with No. 0000 steel wool. When dry, I reassembled the stand. Now all that's left to do is dig out ali those drill bits from the drawer, load up the stand, and place it on the shelf next to your drill press! slat stock to be sure the layout was equal tem to lay out the curves. Just be sure the and all joints fit satisfactorily. can is tangent to each of the layout lines. when laying out the joints to insure that they will fit snugly. Fig. 2. Nibble out the waste stock between the layout lines with a sharp carbide tipped saw blade set for 1-1/5" deep. Fit. 3. An oscillating spindle sander or a 2" drum sander mounted in the drill press is used to sand the inside curves. Fig. 9. Draw a centerline down the middle of each cross slat. The easiest and most accurate method is to place a rule on the stock so that the graduation lines for two whole numbers (I used the 4" and 6" graduation marks) are aligned along the opposing edges of the stock, the cerrteriine in my case was located on the midpoint, or the 5" graduation mark. Fig. 10. Lay out the locations for each hole and bore them on the drill press with a 1/2" brad point bit, then enlarge each hole with a 17/32" twist bit. continued on page 64 Creative Woodworks & Crafts November 2001 » 63 cross slats to the legs, especially any that aren't filled with bits. I want to be able to disassemble the slats and drill more holes if necessary. Therefore, I assemble the drill bit stand using just screws to hold the slats to the legs. Pilot holes are essential and I used a No. & screw mate bit to drill them in the center of each joint. Fig. 6. Cut out the curves on the band saw. Fig. 7. Sand the outside curves with a disc or belt sander. |


