Creative Woodworks & crafts 2002-01, страница 59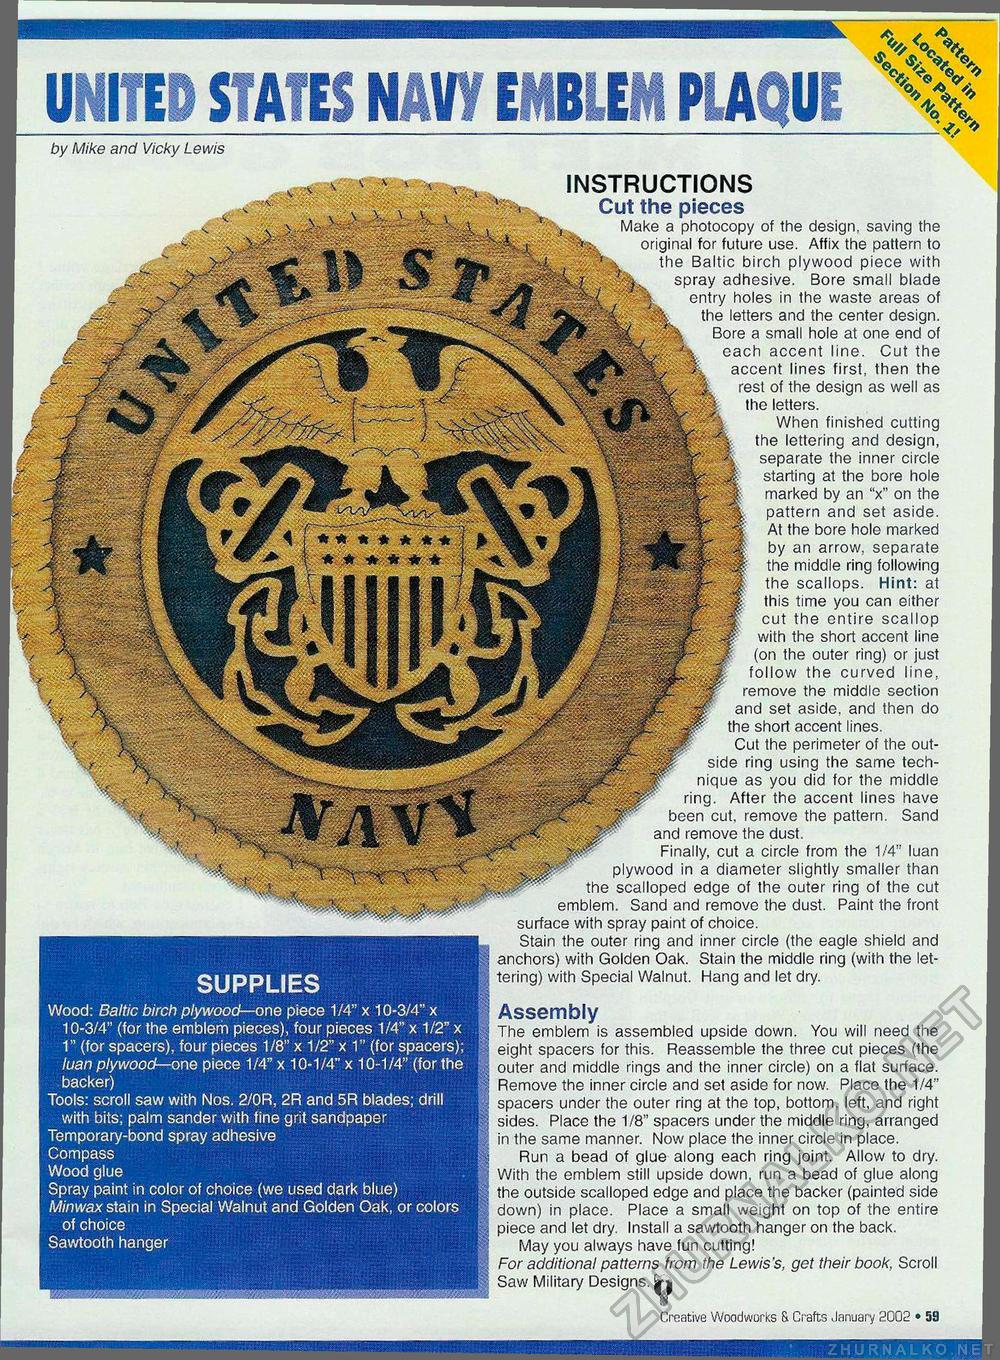
SUPPLIES Wood: Baltic birch plywood— one piece 1/4" x 10-3/4" x 10-3/4" (for the emblem pieces), four pieces 1/4" x 1/2" x 1" (for spacers), four pieces 1/8" x 1/2" x 1" (for spacers); luan plywood—one piece 1/4" x 10-1/4" x 10-1/4" (for the backer) Tools: scroll saw with Nos. 2/OR, 2R and 5R blades; drill with bits; palm sander with fine grit sandpaper Temporary-bond spray adhesive Compass Wood glue Spray paint in color of choice (we used dark blue) Minwax stain in Special Walnut and Golden Oak, or colors of choice Sawtooth hanger ■HBHi INSTRUCTIONS Cut the pieces Make a photocopy of the design, saving the original for future use. Affix the pattern to the Baltic birch plywood piece with spray adhesive. Bore small blade entry holes in the waste areas of the letters and the center design. Bore a small hole at one end of cach accent line. Cut the accent lines first, then the rest of the design as well as the letters. When finished cutting the lettering and design, separate the inner circle starting at the bore hole marked by an "x" on the pattern and set aside. At the bore hole marked by an arrow, separate the middle ring following the scallops. Hint: at this time you can either cut the entire scallop with the short accent line (on the outer ring) or just follow the curved line, remove the middle section and set aside, and then do the short accent lines. Cut the perimeter of the outside ring using the same technique as you did for the middle ring. After the accent lines have been cut. remove the pattern. Sand and remove the dust. Finally, cut a circle from the 1/4" luan plywood in a diameter slightly smaller than the scalloped edge of the outer ring of the cut emblem. Sand and remove the dust. Paint the front surface with spray paint of choice. Stain the outer ring and inner circle (the eagle shield and anchors) with Golden Oak. Stain the middle ring (with the lettering) with Special Walnut. Hang and let dry. Assembly The emblem is assembled upside down. You will need the eight spacers for this. Reassemble the three cut pieces (the outer and middle rings and the inner circle) on a flat surface. Remove the inner circle and set aside for now. Place the 1/4" spacers under the outer ring at the top, bottom, left, and right sides. Place the 1/8" spacers under the middle ring, arranged in the same manner. Now place the inner circle in place. Run a bead of glue along each ring joint. Allow to dry. With the emblem still upside down, run a bead of glue along the outside scalloped edge and place the backer (painted side down) in place. Place a small weight on top of the entire piece and let dry. Install a sawtooth hanger on the back. May you always have fun cutting! For additional patterns from the Lewis's, get their book, Scroll Saw Military Designs, jrj by Mike and Vicky Lewis Creative Woodworks S. Crafts January 2002 • 59 |


