Creative Woodworks & crafts 2003-01, страница 38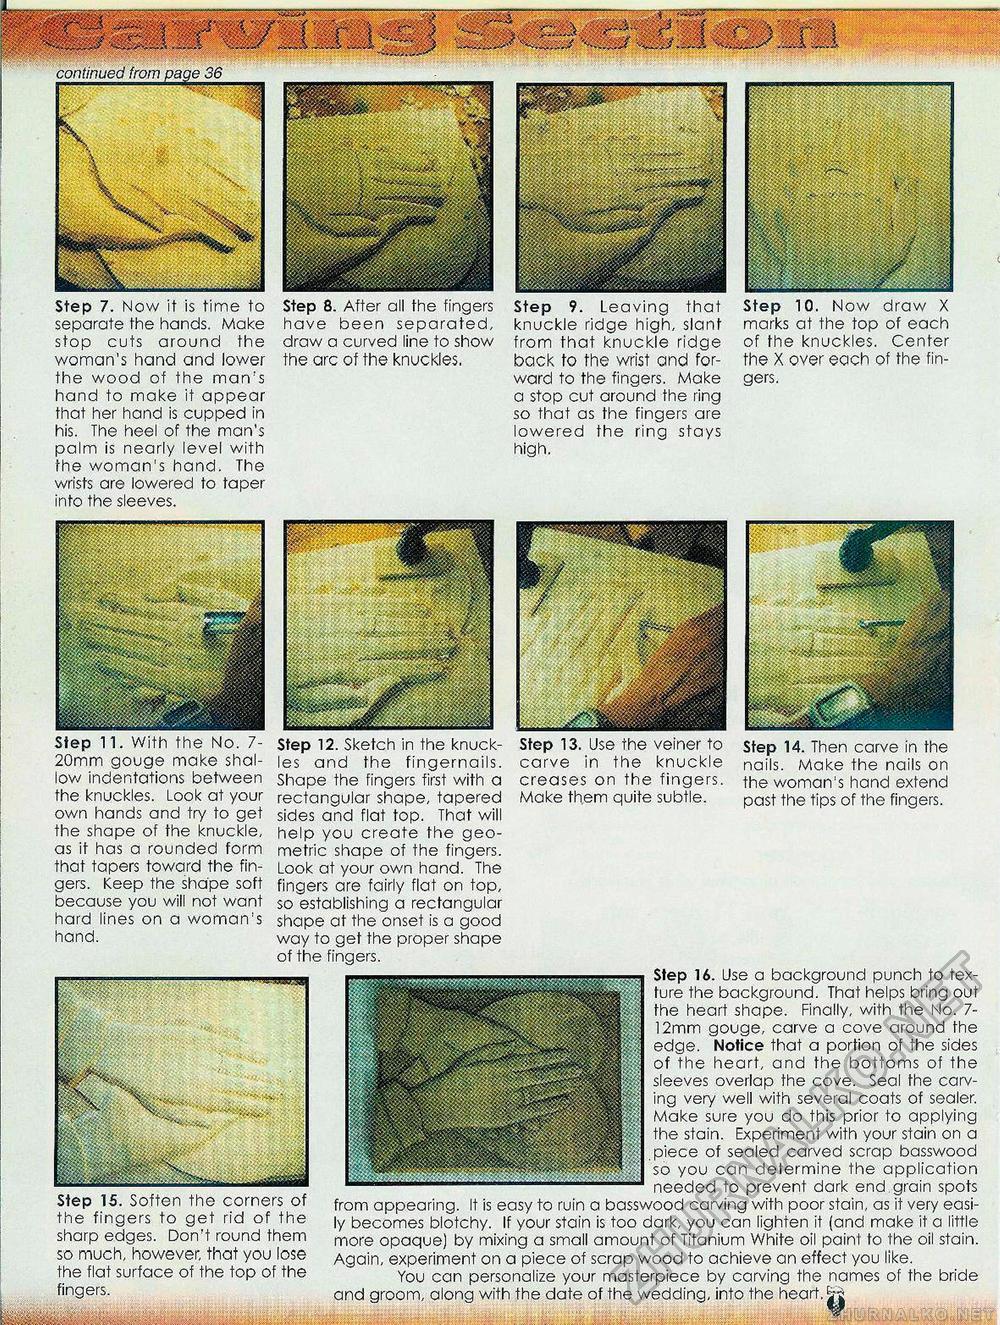
Step 11. With the No. 7- 20mm gouge make shallow indentations between the knuckles. Look at your own hands and try to get the shape of the knuckle, as if has a rounded form that tapers toward the fingers. Keep the shape soft because you will not want hard lines on a woman's hand. Step 14. Then carve in the nails. Make the nails on the woman's hand extend past the tips of the fingers. Step IS. Soften the corners of the fingers to get rid of the sharp edges. Don't round them so much, however, that you lose the flat surface of the top of the fingers. Step 12. Sketch in the knuck- Step 13. Use the veiner to les and the fingernails, carve in the knuckle Shape the fingers first with a creases on the fingers, rectangular shape, tapered Make them quite subtle, sides and flat top. That will help you create the geometric shape of the fingers. Look at your own hand. The fingers are fairly flat on top, so establishing a rectangular shape at the onset is a good way to get the proper shape of the fingers. Step 16. Use a background punch to texture the background. That helps bring out the heart shape. Finally, with the No. 7-12mm gouge, carve a cove around the edge. Notice that a portion of the sides of the heart, and the bottoms of the sleeves overlap the cove. Seal the carving very well with several coats of sealer. Make sure you do this prior to applying the stain. Experiment with your stain on a piece of sealed carved scrap basswood so you can determine the application needed to prevent dark end grain spots from appearing. It is easy to ruin a basswood can/ing with poor stain, as it very easily becomes blotchy. If your stain is too dark, you can lighten it (and make it a little more opaque) by mixing a small amount of Titanium White oil paint to the oil stain. Again, experiment on a piece of scrap wood to achieve an effect you like. You can personalize your masterpiece by carving the names of the bride and groom, along with the date of the wedding, into the heart. Step 8. After all the fingers have been separated, draw a curved line to show the arc of the knuckles. Step 9. Leaving that knuckle ridge high, slant from that knuckle ridge back to the wrist and forward to the fingers. Make a stop cut around the ring so that as the fingers are lowered the ring stays high. Step 10. Now draw X marks at the top of each of the knuckles. Center the X over each of the fingers. Step 7. Now it is time to separate the hands. Make stop cuts around the woman's hand and lower the wood of the man's hand to make it appear that her hand is cupped in his. The heel of the man's palm is nearly level with the woman's hand. The wrists are lowered to taper into the sleeves. |


