Creative Woodworks & crafts 2003-01, страница 42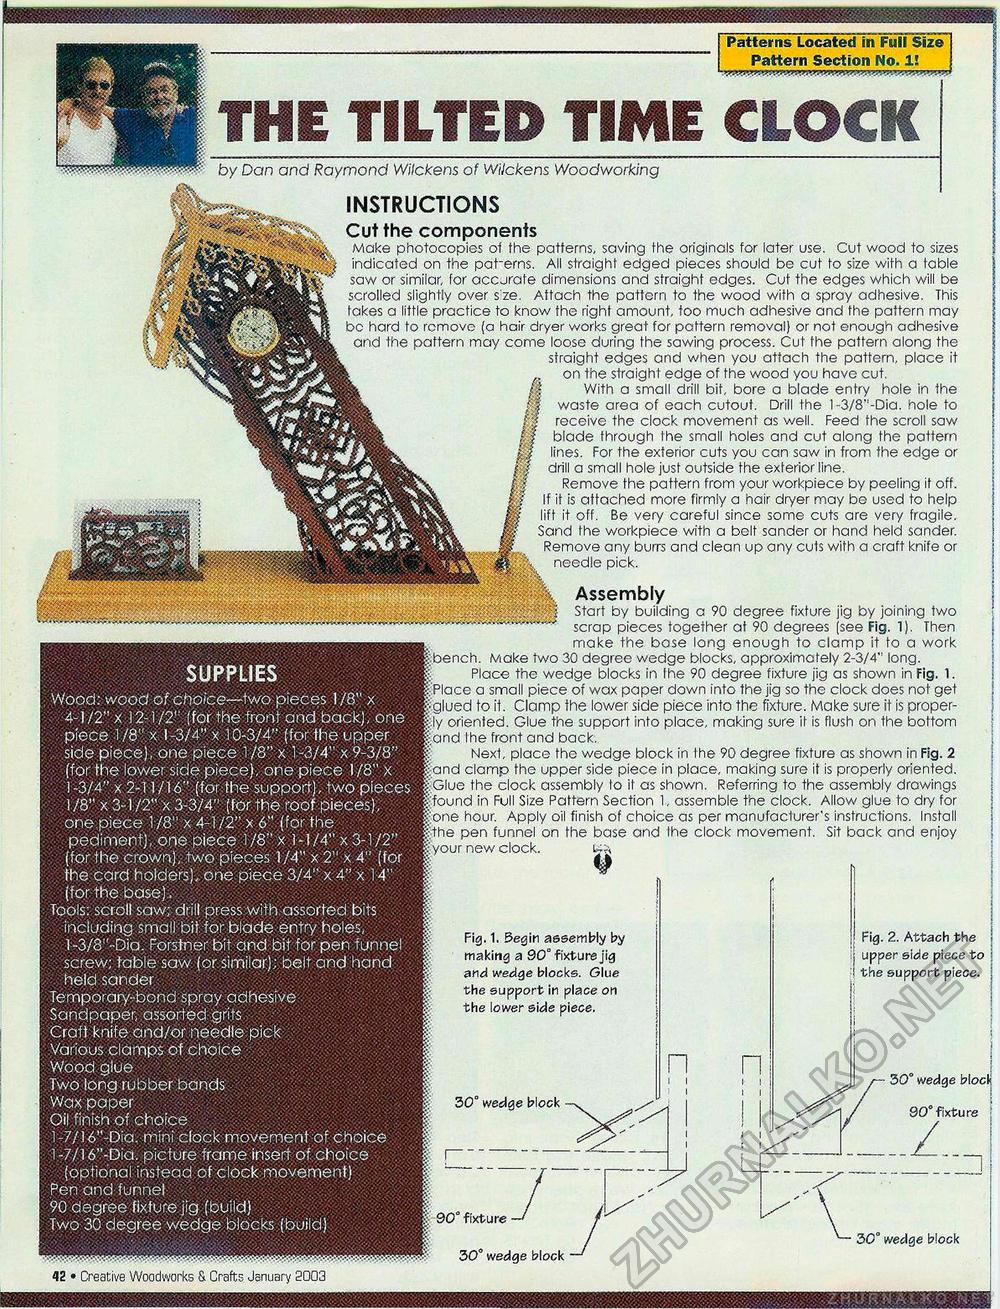
Patterns Located in Full Size Pattern Section No. 1! THE TILTED TIME CLOCK by Dan and Raymond Wilckens of Wilckens Woodworking itvw^ SUPPLIES Wood: wood of choice—two pieces 1 /8" x 4-1 /2" x 12-1/2" (for the front ond back), one piece 1/8" x 1-3/4" x 10-3/4" (for the upper side piece), one piece 1/8" x 1-3/4" x 9-3/8" (for the lower side piece), one piece 1/8" x 1-3/4" x 2-11/16" (for the support), two pieces 1 /8" x 3-1/2" x 3-3/4" (for the roof pieces), one piece 1/8" x 4-1/2" x 6" (for the pediment), one piece i/8"x 1-1/4" x3-1/2" (for the crown), two pieces 1/4" x 2" x 4" (for the card holders), one piece 3/4" x 4" x 14" (for the base), Tools: scroll saw; drill press with assorted bits including small bit for blade entry holes, )-3/8!'-Dia. Forstner bit and bit for pen funnel screw; table saw (or similar); belt and hand held sander Temporary-bond spray adhesive Sandpaper, assorted grits Craft knife and/or needle pick Various clamps of choice Wood glue Two long rubber bands Wax paper Oil finish of choice 1-7/16"-Dia. mini clock movement of choice 1 -7/16"-Dia. picture frame insert of choice (optional insteaa of clock movement) Pen and funnel 90 degree fixture jig (build) Two 30 degree wedge blocks (build) INSTRUCTIONS Cut the components Make photocopies of the patterns, saving the originols for later use. Cut wood to sizes indicated on the pat-ems. All straight edged pieces should be cut fo size with a table saw or similar, for accjrate dimensions and straight edges. Cut the edges which will be scrolled slightly over sze. Attach the pattern to the wood with a sproy adhesive. This takes a little practice to know the right amount, too much adhesive and the pattern may be hard to remove (a hair dryer works great for pattern removal) or not enough adhesive and the pattern may come loose during the sawing process. Cut the pattern along the straight edges and when you attach the pattern, place it on the straight edge of the wood you have cut. | With a small drill bit, bore a blade entry hole in the I waste area of each cutout. Drill the l-3/8"-Dia. hole to ' receive the clock movement as well. Feed the scroll saw blade through the small holes and cut along the pattern lines. For the exterior cuts you can saw in from the edge or drill a small hole just outside the exterior line. Remove the pattern from your workpiece by peeling if off. If it is attached more firmly a hair dryer may be used to help lift it off. Be very careful since some cuts are very fragile. Sand the workpiece with a bolt sander or hand held sander. Remove any burrs and clean up any culs with a craft knife or needle pick. Assembly Start by building a 90 degree fixture jig by joining two scrap pieces together at 90 degrees (see Fig. 1). Then make the bose long enough to clamp it to a work bench. Make two 30 degree wedge blocks, approximately 2-3/4" long. Place the wedge blocks in the 90 degree fixture jig as shown in Fig. 1. Place a small piece of wax paper down into the jig so the clock does not get glued to it. Clamp the lower side piece into the fixture. Make sure it is properly oriented. Glue the support into place, making sure if is flush on the bottom and Ihe front and back. Next, place the wedge block in Ihe 90 degree fixture as shown in Fig. 2 and clamp the upper side piece in place, making sure it is properly oriented. Glue the clock assembly lo if as shown. Referring to the assembly drawings found in Full Size Pattern Section 1, assemble the clock. Allow glue to dry for one hour. Apply oil finish of choice as per manufacturer's instructions. Install the pen funnel on the base and Ihe clock movement. Sit back and enjoy your new clock. . -.-;» ............. .......- ..- Fig. 1. Begin assembly by making a 90° fixture jig and wedge blocks. Glue the support in place on the lower side piece. 30° wedge block n n 90° fixture • 30" wedge block ■ • Fig. 2. Attach the ] j upper side piece to j the support piece. | 30° wedge block! 90° fixture "1 30° wedge block Creative Woodworks S. Crafts January 2003 • 25 |


