Creative Woodworks & crafts 2003-04, страница 28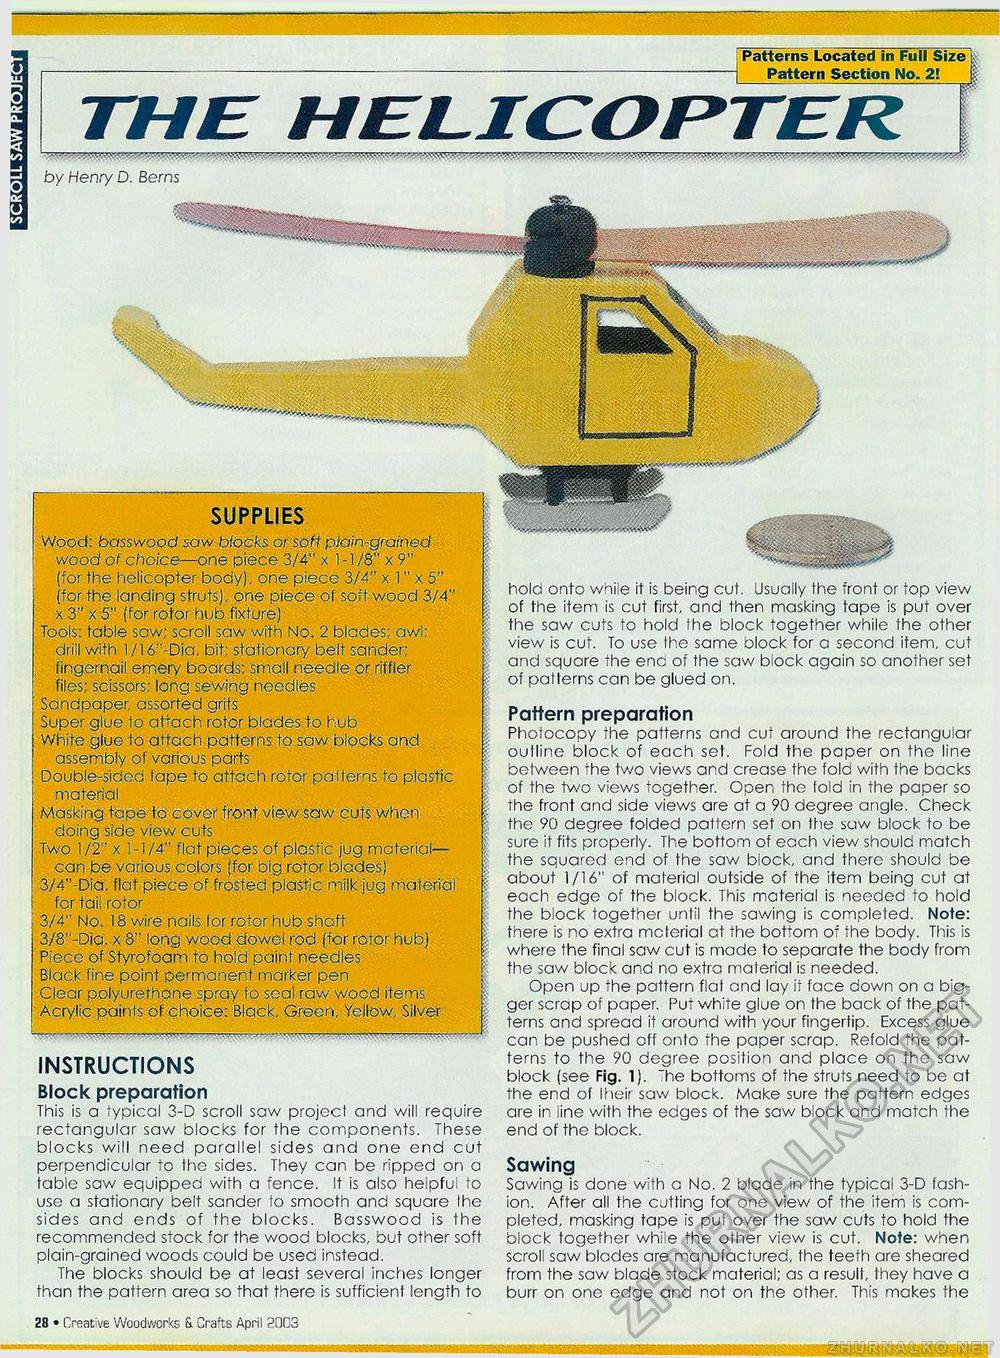
-J-, Patterns Located in Full H Pattern Section No. 2! by Hen.-y D. Berns hold onto while it is being cut. Usually the front or fop view of the item is cut first, and then masking tape is put over the saw cuts to hold the block together while the other view is cut. To use Ihe same block for a second item, cut and square the end of the saw bock again so another set of patterns can be glued on. Pattern preparation Phoiocopy the patterns and cut around the rectangular oulline block of each set. Fold the paper on the line between the two views and crease the fold with the backs of the two views together. Open the fold in the paper so the front and side views are at a 90 degree angle. Check the 90 degree folded pattern set on the saw block to be sure it fits properly. The bottom of each view should match the squared end of the saw block, and there should be about 1/16" of material outside of the item being cut at each edge of the block. This material is needed to hold the block together until the sawing is completed. Note: there is no extra mcterial at the bottom of the body. This is where the final saw cut is made to separate the body from the saw block and no extra malerial is needed. Open up the pattern fiat ond lay if face down on a bigger scrap of paper. Put white glue on Ihe back of the patterns and spread it around with your fingertip. Excess glue can be pushed off onto the paper scrap. Refold the patterns to the 90 degree position and place on the saw block (see Fig. 1). "he bottoms of the struts need to be at the end of their saw block. Make sure the pattern edges are in iine with the edges of the saw bock and match the end of the block. Sawing Sawing is done with a No. 2 blade in the typical 3-D fashion. After all the cutting for one view of the item is completed, masking tape is put over the saw cuts to hold the block together while the other view is cut. Note: when scroll saw blades are manufactured, the teeth are sheared from the saw blade stock material; as a resull, they have a burr on one edge and not on the other. This makes the INSTRUCTIONS Block preparation This is a typical 3-D scroll saw project and will require rectangular saw blocks for the components. These blocks will need parallel sides and one end cut perpendicular to the sides. They can be ripped on a table saw equipped with a fence. It is also helpfu, io use a stationary belt sander to smooth and square Ihe sides and ends of the blocks. Basswood is the recommended stock for the wood blocks, but other soft plain-grained woods could be used instead. The blocks should be at least several inches longer than the pattern area so that there is sufficient length to SUPPLIES Wood: basswood saw blocks or soft plain-grained wood of choice—one piece 3/4': x 1-1/8" x 9" (for the helicopter body), one piece 3/4" x 1" x 5" (for the landing struts), one piece of soft wood 3/4" x 3" x 5" (for rotor hub fixture) Tools: table saw; scroll saw with No. 2 blades; aw;: drill with 1/16"-Dia, bit; stationary belt sander; fingernail emery boards; small needle or riffler files; scissors; long sewing needles Sondpaper, assorted grits Super glue to attach rotor blades to hub White glue to attach patterns to saw blocks and assembly of various parts Double-sidod tape to attach rotor patterns to plastic material Masking tape to cover front view saw cuts when doing side view cuts Two 1/2" x ',-1/4" flat pieces of plastic jug material— can be various, colors (for big rotor blades) 3/4"-Dia. flat piece of frosted plastic milk jug material for tail rotor 3/4" No. 18 wire nails lor rotor hub shaft 3/8"-Dia. x 8" long wood dowel rod (for rotor hub) Piece of Styrofoam to hold pain! needles Black fine point permanent marker pen Clear polyurefhane spray to seal raw wood items Acrylic paints of choice: Black, Green, Yellow, Silver Creative Woodworks S. Crafts April 2003 • 19 |


