Creative Woodworks & crafts 2003-04, страница 30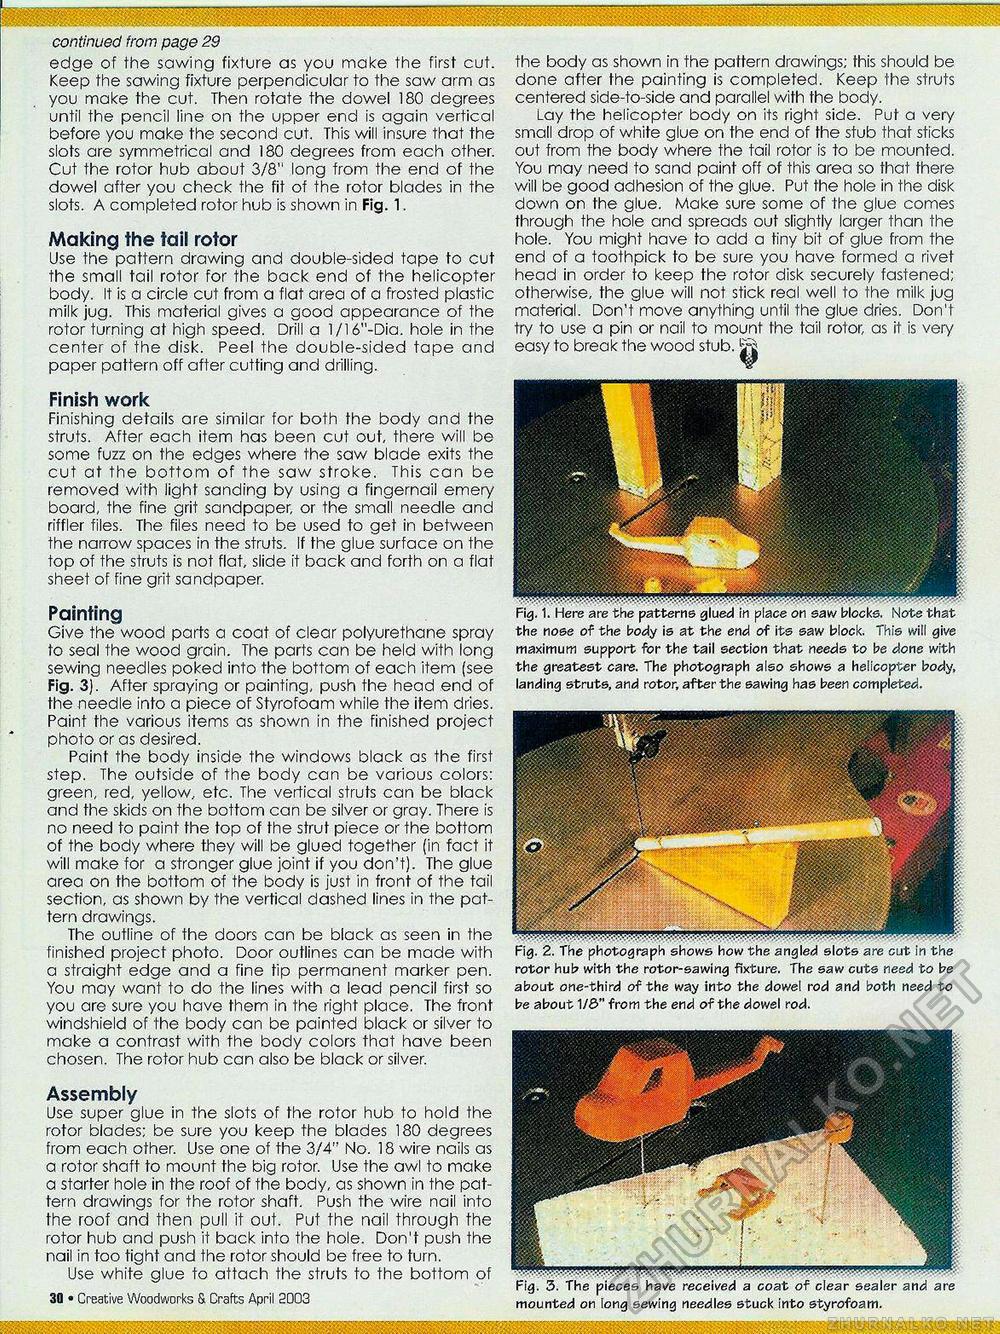
continued from page 29 edge of the sowing fixture as you make the first cut. Keep the sawing fixture perpendicular to the saw arm as you make the cut. Then rotate the dowei 180 degrees until the pencil line on the upper end is again vertical before you make the second cut. This will insure that the slots are symmetrical and 180 degrees from each other. Cut the rotor hub about 3/8" long from the end of the dowel after you check the fit of the rotor blades in the slots. A completed rotor hub is shown in Fig. 1. Making the tail rotor Use the pattern drawing and double-sided tape to cut the small tail rotor for the back end of the helicopter body. It is a circle cut from a flat area of a frosted plastic milk jug. This material gives a good appearance of the rotor turning at high speed. Drill a 1/16"-Dia. hole in the center of the disk. Peel the double-sided tape and paper pattern off after cutting and drilling. Finish work Finishing details are similar for both the body and the struts. After each item has been cut out, there will be some fuzz on the edges where the saw blade exits the cut at the bottom of the saw stroke. This can be removed with light sanding by using a fingernail emery board, the fine grit sandpaper, or the small needle and riffler files. The files need to be used to get in between the narrow spaces in the struts. If the glue surface on the top of the struts is not flat, slide it back and forth on a flat sheet of fine grit sandpaper. Painting Give the wood parts a coat of clear polyurethane spray to seal the wood grain. The parts can be held with long sewing needles poked into the bottom of each item (see Fig. 3). After spraying or painting, push the head end of the needle into a piece of Styrofoam while the item dries. Paint the various items as shown in the finished project photo or as desired. Paint the body inside the windows black as the first step. The outside of the body can be various colors: green, red, yellow, etc. The vertical struts can be black and the skids on the bottom can be silver or gray. There is no need to paint the top of the strut piece or the bottom of the body where they will be glued together (in fact it will make for a stronger glue joint if you don't). The glue area on the bottom of the body is just in front of the tail section, as shown by the vertical dashed lines in the pattern drawings. The outline of the doors can be black as seen in the finished project photo. Door outlines can be made with a straight edge and a fine tip permanent marker pen. You may want to do the lines with a lead pencil first so you are sure you have them in the right place. The front windshield of the body can be painted black or silver to make a contrast with the body colors that have been chosen. The rotor hub can also be black or silver. Assembly Use super glue in the slots of the rotor hub to hold the rotor blades; be sure you keep the blades 180 degrees from each other. Use one of the 3/4" No. 18 wire nails as a rotor shaft to mount the big rotor. Use the awl to make a starter hole in the roof of the body, as shown in the pattern drawings for the rotor shaft. Push the wire nail into the roof and then pull it out. Put the nail through the rotor hub and push it back into the hole. Don't push the nail in too tight and the rotor should be free to turn. Use white glue to attach the struts to the bottom of 30 • Creative Woodworks & Crafts April 2003 rotor hub with the rotor-sawing fixture. The saw cuts need to be about one-third of the way into the dowel rod and both need to be about 1/3" from the end of the dowel rod- mounted on long sewing needles stuck into styrofoam. the body as shown in the pattern drawings; this should be done after the painting is completed. Keep the struts centered side-to-side and parallel with the body. Lay the helicopter body on its right side. Put a very small drop of white glue on the end of the stub that sticks out from the body where the tail rotor is to be mounted. You may need to sand paint off of this area so that there will be good adhesion of the glue. Put the hole in the disk down on the glue. Make sure some of the glue comes through the hole and spreads out slightly larger than the hole. You might have to add a tiny bit of glue from the end of a toothpick to be sure you have formed a rivet head in order to keep the rotor disk securely fastened; otherwise, the glue will not stick real well to the milk jug material. Don't move anything until the glue dries. Don't try to use a pin or nail to mount the tail rotor, as it is very easy to break the wood stub. ....... are the patterns glued in place on saw blocks. Note that the nose of the body is at the end of its saw block. This will give maximum support for the tail section that needs to be done with the greatest care. The photograph also shows a helicopter body, landing struts, and rotor, after the sawing has been completed. |


